My First Soda Pop Cake
I first made this cake for my grandson’s birthday. He loved root beer floats. I thought, why not make it a cake? His eyes got so wide when he saw it. I still laugh at that.
This recipe is special. It mixes two happy things into one. A cold float and a soft cake. It matters because it turns a favorite drink into a celebration. That’s a little bit of kitchen magic.
Let’s Talk About That Batter
You will cook the cocoa and sugar with root beer. This is the fun part. It makes your kitchen smell like a sweet, chocolaty soda shop. Doesn’t that smell amazing?
The batter will look a little lumpy. That is perfectly okay. Do not worry. It bakes up into the softest, moistest cake. Fun fact: The soda makes it rise without needing yeast. It’s science you can eat!
The Icy Secret Layer
Now for the ice cream. You must let it soften first. Trying to spread hard ice cream is no fun. I learned that the hard way. Once, I tried to rush. Let’s just say it was a messy lesson.
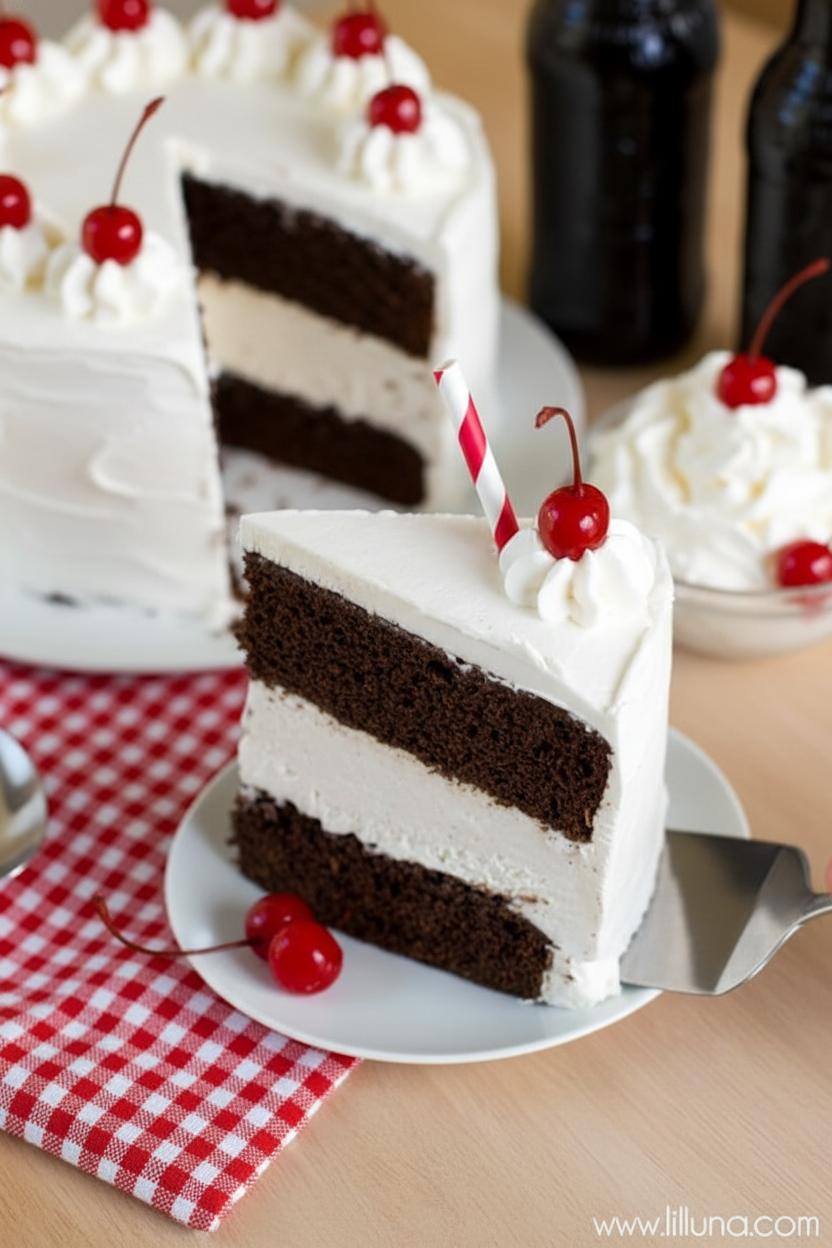
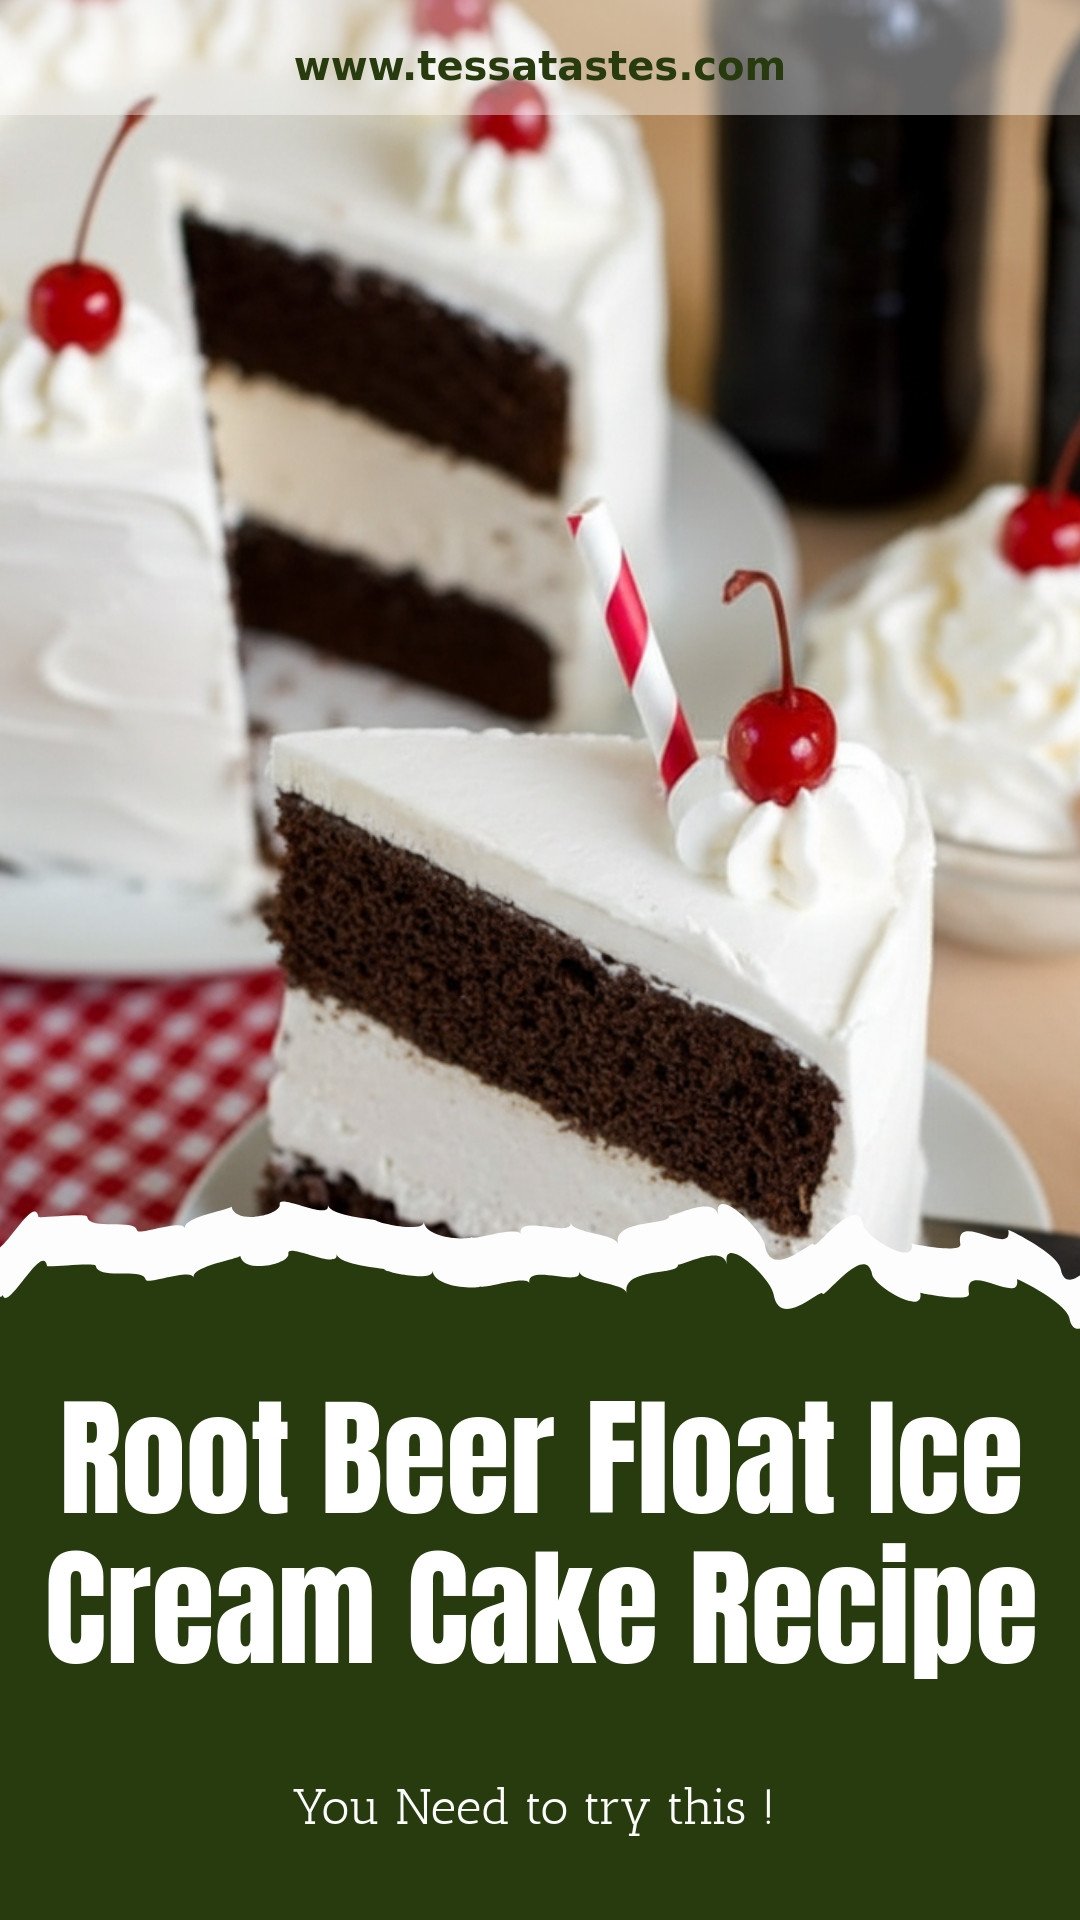
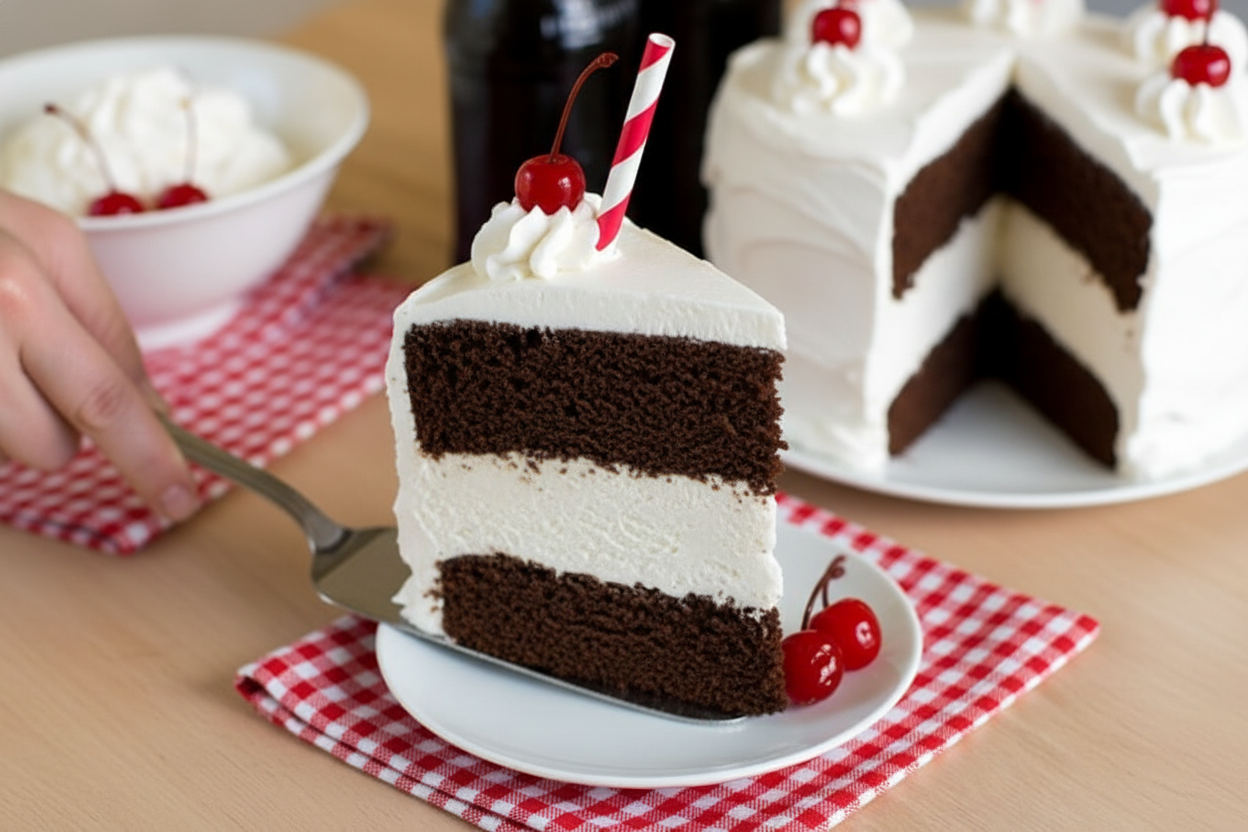
That frozen layer matters. It gives you a surprise in every slice. Cold ice cream meets soft cake. It makes the whole dessert feel playful and special. What’s your favorite ice cream for a treat? Mine will always be vanilla here.
Putting It All Together
Assembly is like building a happy tower. Cake, then ice cream, then more cake. The whipped cream frosting is like a fluffy cloud. It holds everything together.
Use a big spatula to frost it. Do not aim for perfect. Rustic and homemade is the best look. Pop it back in the freezer. The wait is the hardest part. Do you think you’ll add extra cherries on top?
Why This Cake Is a Keeper
This cake is more than ingredients. It is about making memories. It is a conversation starter. “You put a float in a cake?” Yes, we did. It brings smiles.
It also teaches a good lesson. Sometimes, the silliest ideas are the best ones. Mixing things up can be wonderful. What two favorite treats would you combine? Tell me your idea. I’d love to hear it.
Ingredients:
| Ingredient | Amount | Notes |
|---|---|---|
| all purpose flour | 2 cups | |
| natural unsweetened cocoa powder | 1 cup | |
| sugar | 1 1/4 cup | |
| brown sugar | 1/2 cup | |
| root beer or cherry coke | 2 cups | not diet |
| unsalted butter | 1/2 cup | |
| eggs | 2 | |
| root beer extract or cherry extract | 1 tbsp | |
| baking soda | 1 1/2 tsp | |
| salt | 1 tsp | |
| vanilla ice cream | 1 quart | |
| heavy whipping cream | 3 cups | |
| powdered sugar | 2/3 cup | |
| vanilla extract | 1 tsp | |
| salt | pinch | |
| cherries | for topping | on top |
My Root Beer Float Ice Cream Cake
Hello, dear! Pull up a chair. Let’s make a memory. This cake tastes like a summer afternoon at the old soda shop. My grandson Sam invented it one very hot day. He loved root beer floats more than anything. I still laugh at that. He wanted to eat one, but have it as cake, too. So we got to work in my kitchen. The result is this chilly, chocolaty, creamy dream. Doesn’t that sound amazing? It’s a bit of a project, but so worth it. Let’s begin.
Step 1: The Ice Cream Layer
First, let’s soften the ice cream. Leave the carton on the counter for about 15 minutes. Line a cake pan with plastic wrap. Let the wrap hang over the sides. Now, spread the soft ice cream in the pan. Make it nice and even. Pop it back in the freezer. It needs to get firm again. This takes about two hours. (My hard-learned tip: Use the plastic wrap! It’s the only way to lift the ice cream out later.)
Step 2: The Chocolate Cake Batter
Time for the chocolate cake! Heat your oven to 325°F. Get two more cake pans ready. I just use baking spray and parchment paper. Now, the fun part. In a saucepan, mix cocoa, both sugars, root beer, and butter. Warm it until the butter melts. The smell is so rich and sweet. Take it off the heat. Stir in that root beer extract. Let it cool for a bit. What’s your favorite soda flavor? Share below!
Step 3: Bake the Cakes
Let’s finish the batter. Crack two eggs into your big mixing bowl. Pour in the warm chocolate mixture. Stir until the eggs disappear into it. Now, gently add the flour, baking soda, and salt. The batter will look a little lumpy. That’s perfectly fine, I promise. It bakes up beautifully. Divide the batter between your two pans. Slide them into the oven. They need about 30 minutes to bake.
Step 4: The Whipped Cream
While the cakes cool, make the whipped cream. Pour the heavy cream into a cold bowl. Add powdered sugar, vanilla, and a tiny pinch of salt. Now, whip it! Use a mixer or a strong arm. Whip until soft peaks form. It should look like a fluffy cloud. Set this aside. Now, check your ice cream layer. It should be solid. This is the magic part.
Step 5: Assembly
Let’s put it all together. Place one chocolate cake on a plate. Lift your ice cream block out using the plastic wrap. Peel off the wrap. Set the ice cream right on the cake. Top it with the second cake layer. Now, frost the whole thing with your whipped cream. Be generous! Top it with bright red cherries. Doesn’t that look wonderful? Freeze it until you’re ready to serve. Slice with a hot knife for clean pieces.
Cook Time: 30 minutes (plus 4+ hours freezing)
Total Time: About 5 hours
Yield: 12 servings
Category: Dessert, Cake
Three Fun Twists to Try
This cake is wonderful as-is. But sometimes, it’s fun to play. Here are three simple twists. Cherry Cola: Use cherry cola and cherry extract instead of root beer. Add chopped maraschino cherries to the ice cream layer. Grown-Up Float: Add a tablespoon of bourbon to the whipped cream. It gives a lovely, warm flavor. Chocolate Chip: Stir mini chocolate chips into the softened ice cream. It adds little bites of chocolate joy. Which one would you try first? Comment below!
Serving It Up Right
This cake is a celebration all by itself. For a real treat, drizzle chocolate sauce over each slice. A little extra whipped cream on the side never hurts. Crushed peanuts on top add a nice salty crunch. For drinks, I love pairing it with a cold glass of milk. That’s the classic. For the adults, a small glass of tawny port is just lovely. It sips like a cozy blanket. Which would you choose tonight?
Keeping Your Ice Cream Cake Happy
This cake lives in the freezer. Wrap it tightly in plastic wrap first. Then cover it with foil or a lid. This keeps ice crystals away. It will stay tasty for about two weeks.
You cannot reheat this cake. It is a frozen treat! Just slice it frozen and let it sit for five minutes. This softens it perfectly for eating. I learned this the hard way.
I once left a slice out too long. It became a sweet puddle! Batch cooking is easy here. Make the cake layers ahead and freeze them. This saves you time on a busy day.
Planning ahead matters. It makes special desserts stress-free. You can enjoy the party too. Have you ever tried storing it this way? Share below!
Simple Fixes for Common Cake Troubles
First, lumpy batter is normal here. Do not overmix it. Just stir until the flour disappears. Your cake will still be wonderfully soft and rich.
Second, soft ice cream is messy. Let it soften just until spreadable. If it melts, put the pan back in the freezer. I remember when my ice cream layer looked like soup!
Third, whipped cream can turn to butter. Stop whipping as soon as peaks form. This ensures a light, fluffy frosting. Getting these steps right builds your confidence.
It also makes the flavors and textures perfect. Which of these problems have you run into before?
Your Ice Cream Cake Questions, Answered
Q: Can I make this gluten-free? A: Yes! Use your favorite gluten-free flour blend. The one-for-one kind works best.
Q: How far ahead can I make it? A: Assemble the whole cake two days before. The flavors get even better.
Q: What if I don’t have root beer extract? A: Use vanilla extract instead. Your cake will taste like a classic float.
Q: Can I make a smaller cake? A: Halve the recipe. Use two six-inch pans. Baking time will be less.
Q: Any fun extras? A: Try a sprinkle of crushed root beer barrels on top. Fun fact: Root beer was originally made from roots and herbs! Which tip will you try first?
From My Kitchen to Yours
I hope you love making this cake. It brings back such happy summer memories for me. I would love to see your creation. Share a picture of your family enjoying it.
Your photos always make my day. Have you tried this recipe? Tag us on Pinterest! You can find me at @TessasKitchen. I cannot wait to see what you make.
Happy cooking!
—Tessa Hammond.
Root Beer Float Ice Cream Cake Recipe
Description
Experience the nostalgic flavors of a root beer float in a decadent ice cream cake, featuring rich chocolate cake, a vanilla ice cream layer, and whipped cream frosting.
Ingredients
Instructions
- ICE CREAM. Remove the vanilla ice cream from the freezer and allow it to soften at room temperature. Line a 9″x2″ cake pan with plastic wrap, making sure that you have a fair amount of overhang. Using a spatula, carefully spread the ice cream so that you have a nice even layer. Cover and place in the freezer to firm up, about 2 hours.
- PREP. Preheat your oven to 325°F. Line the bottoms of 2 9″x2″ cake pans with parchment paper and then lightly coat with baking spray, set aside.
- WET INGREDIENTS. Meanwhile, in a saucepan set over medium heat, combine the cocoa powder, sugars, root beer and butter. Heat until the butter has melted. Remove from the heat and add the root beer extract. Allow to cool while preparing the remaining ingredients.
- DRY INGREDIENTS. In a large mixing bowl, combine slightly warm butter mixture with the eggs. Mix until the eggs are incorporated. Gradually add the flour, salt and baking soda. The batter will look slightly lumpy but that’s ok.
- BAKE. Pour into the prepared pans and bake for 30 minutes. Remove from the oven and allow the cakes to cool in the pans for 30 minutes, then remove them and allow them to cool completely on a wire rack.
- WHIPPED CREAM. Whip the cream along with the powdered sugar, vanilla and salt until it is stiff.
- ASSEMBLE. To assemble the cake, place one layer of chocolate cake onto a plate, cake stand, or cake round. Place the ice cream (with plastic wrap removed) onto the top of the cake. Place the other layer on top of the ice cream. Using a spatula, frost the top and sides of the cake with the whipped cream. Garnish with cherries and freeze until you’re ready to eat it.
Notes
- For best results, use a full-fat root beer or cherry cola (not diet) for the richest flavor. The cake can be assembled and stored in the freezer, covered, for up to 1 week.


Leave a Reply