My First Donut Disaster
My first try at donuts was a funny mess. I was about fourteen. The dough was so sticky it got in my hair. My donuts came out looking like little rocks. I still laugh at that.
But you know what? We ate them anyway. They tasted good, even if they looked silly. This matters because cooking is about trying. It is not about being perfect right away.
Why We Let Dough Rest
That step where the dough sits and gets puffy is magic. The little yeast bubbles make the dough light. It is like a tiny nap for your dough. Doesn’t that smell amazing when it rises?
Letting it rest matters. It makes your donuts soft and airy, not tough. Rushing this part is the biggest mistake. So be patient with your dough. It is worth the wait.
The Joy of Frying
Watching the donuts swim in hot oil is my favorite part. They puff up and turn a perfect gold. Fun fact: The hole in the middle helps them cook evenly all the way through.
Keep your oil at 375 degrees. Use a thermometer if you have one. This makes sure they are crispy outside, cooked inside. Do you like your donuts more cakey or fluffy?
The Perfect Glaze Dip
The glaze is simple. Just powdered sugar, water, and vanilla. Dip the warm donuts right away. The heat helps that sweet coat stick so nicely.
This step is where you can be creative. Maybe add a little lemon zest or cinnamon to your glaze? What is your dream donut topping? Tell me about it.
Sharing is the Best Part
Donuts are best shared fresh. The glaze will set in minutes. Then gather everyone around. A warm donut makes any day feel special.
Making them yourself is a gift of love. It says, I took time for you. That is what cooking is really about. Who will you make these for first?
Ingredients:
| Ingredient | Amount | Notes |
|---|---|---|
| all-purpose flour | 2 1/2 cups, divided | plus more for dusting |
| granulated sugar | 1/4 cup | |
| salt | 1/4 tsp | |
| instant yeast | 1 packet (about 2 1/4 tsp) | quick acting or rapid rise |
| milk | 2/3 cup | scalded and cooled to 115˚F |
| light olive oil (or vegetable/canola oil) | 1/4 cup | |
| egg yolks | 2 | room temperature |
| vanilla extract | 1/2 tsp | for dough |
| powdered sugar | 1 lb (4 cups) | for glaze |
| water | 5-6 Tbsp | for glaze |
| vanilla extract | 1 Tbsp | for glaze |
| oil for frying (e.g., peanut or vegetable) | as needed |
My Favorite Sunday Donuts
Hello, dear! Come sit at the table. Let’s make something special. I always made these glazed donuts on Sunday mornings. The smell would wake everyone up. They’d come padding into the kitchen, still in pajamas. Doesn’t that sound lovely? It’s a happy memory for me. We’ll make new ones today. The process is like a little science project. But a delicious one! I still laugh at my first try. My donuts were funny shapes. They were still gobbled up, of course. Taste matters most, not perfection.
Here is how we make the magic happen. Follow these steps with me. I’ll tell you my secrets along the way.
- Step 1: First, we wake up the yeast. Warm your milk carefully. It should feel like a warm bath. Too hot and you’ll hurt the yeast! Mix it with flour, sugar, and yeast. Watch for little bubbles after ten minutes. That’s the yeast saying hello. (Hard-learned tip: If no bubbles form, your milk was too hot or cold. Start over with new yeast.)
- Step 2: Now, stir in the oil, egg yolks, and vanilla. It will look a bit messy. That’s just fine. Add most of the remaining flour. Mix until it becomes a shaggy ball. Then use your hands. Knead it right in the bowl for five minutes. The dough should feel soft and a little sticky. Like a baby’s cheek.
- Step 3: Let the dough take a nap. Cover the bowl tightly. I put mine in a warm oven. Let it rest until it doubles in size. This takes about 45 minutes. Be patient. This is when the dough grows up. What do you think the yeast eats to grow? Share below!
- Step 4: Time to shape our donuts! Roll the dough on a floured surface. Get it about a quarter-inch thick. Use your cutter firmly. Save the little holes. They are the cook’s treat. Gently re-roll the scraps. Place them on a baking sheet. Let them rise again until puffy. They look like little pillows.
- Step 5: While they rise, make the glaze. Just mix powdered sugar, water, and vanilla. Stir until it’s smooth. Now, heat your oil to 375 degrees. Carefully fry two donuts at a time. They turn a beautiful golden brown. Flip them once. This part goes fast.
- Step 6: This is the best step. Dip each hot donut right into the glaze. Let the extra drip off. Place it on a rack. The glaze will set into a sweet shell. Fry the holes last. Enjoy them warm. Nothing beats a warm, glazed donut. The kitchen smells amazing.
Cook Time: 20 minutes
Total Time: About 2 hours
Yield: 11-12 donuts & holes
Category: Breakfast, Treat
Three Fun Twists to Try
The basic recipe is perfect. But sometimes, we feel playful. Here are three easy twists. They make the donuts feel new again.
- Cinnamon Sugar Sparkle: Skip the glaze. Roll warm donuts in cinnamon and sugar. It’s classic and crunchy.
- Lemon Sunshine Glaze: Use lemon juice instead of water in the glaze. Add a little lemon zest. It’s so bright and cheerful.
- Chocolate Dip: Melt some chocolate chips with a spoon of oil. Dip one side of the glazed donut. Let it set. Pure happiness.
Which one would you try first? Comment below!
Serving Them Up Right
These donuts are stars all by themselves. But a little presentation is fun. Pile them high on a pretty plate. Mix donuts and holes together. For a party, set up a topping bar. Have sprinkles, crushed cookies, and colored sugars ready. Let everyone decorate their own. It’s such a laugh.
What to drink? A cold glass of milk is the best partner. It always has been. For the grown-ups, a hot cup of black coffee is just right. It cuts the sweetness perfectly. Which would you choose tonight?
Keeping Your Donuts Fresh and Happy
Fresh donuts are best eaten the same day. But I know you might have leftovers. Let’s keep them tasty. Store cooled donuts in a single layer. Use an airtight container at room temperature for one day.
For longer storage, freeze them. Place unglazed donuts on a baking sheet until solid. Then pop them into a freezer bag. They will keep for a month. To reheat, just warm them in a 300-degree oven for five minutes.
I once froze a whole batch for my grandson’s visit. He said they tasted like I just made them. Batch cooking lets you enjoy treats anytime. It saves you from starting from scratch. Have you ever tried storing them this way? Share below!
Donut Troubles? Here Are Easy Fixes
Sometimes donuts don’t puff up right. The oil temperature is usually the cause. If the oil is too cool, they soak up grease. If it’s too hot, they brown too fast. Use a thermometer for perfect 375-degree oil.
Another issue is tough dough. You might add too much flour. The dough should stay soft and slightly sticky. I remember when my first batch was like hockey pucks. I learned to add flour slowly. This matters because gentle handling makes a tender, fluffy donut.
Finally, a thin, runny glaze can happen. Just add more powdered sugar a spoonful at a time. A good glaze should coat the back of a spoon. Getting the glaze right makes them look and taste special. Which of these problems have you run into before?
Your Donut Questions, Answered
Q: Can I make these gluten-free? A: Yes. Use a good gluten-free flour blend made for baking.
Q: Can I make the dough ahead? A: Absolutely. After the first rise, you can refrigerate it overnight.
Q: What can I use instead of egg yolks? A: One whole egg can replace the two yolks. The texture will be just a bit different.
Q: Can I make a smaller batch? A: You can cut all the ingredients in half. It works perfectly.
Q: Any fun extra tips? A: Try adding a pinch of nutmeg to the dough. It’s my little secret for a cozy flavor. Which tip will you try first?
From My Kitchen to Yours
I hope you have fun making these donuts. The smell of them frying is pure joy. It reminds me of Saturday mornings with my own children. I would love to see your creations.
Share your kitchen victories with me. Have you tried this recipe? Tag us on Pinterest! Your pictures make my day. Thank you for cooking with me today.
Happy cooking!
—Tessa Hammond.

Glazed Donuts Recipe Video Tutorial
Description
Learn how to make soft, fluffy, and perfectly sweet homemade glazed donuts with this easy-to-follow recipe and video tutorial.
Ingredients
Donut Dough:
Donut Glaze:
Instructions
- Scald milk: Pour milk into a small saucepan over medium/low heat, stirring constantly to prevent film from forming. Once milk reaches 180˚F, or you see milk steaming, remove from heat and transfer to a measuring cup to cool to 115˚F on a thermometer.
- Proof dough: In a large mixing bowl, add 1 cup flour, 1/4 cup sugar, 1 packet yeast and 1/4 tsp salt, and whisk to combine. Add 2/3 cup warm milk, whisk in 1/4 cup oil, 2 egg yolks, and 1/2 tsp vanilla extract and whisk to combine. Cover with plastic wrap and let rest at room temperature 10-15 minutes or until some bubbles form on the surface (this indicates your yeast is active).
- Knead: Use a firm spatula to mix in most of the remaining 1 1/2 cups flour, adding just enough flour until dough holds together and no longer sticks to the sides of the bowl (add the last 2 Tbsp flour only if needed). Knead the dough in the bowl by hand for 5 minutes. If dough is really sticking to your hands, dust lightly with flour then continue kneading. Dough should be soft and slightly sticky.
- Let dough rise: Cover bowl with plastic wrap and set in a warm 100˚F oven for 45 min or at room temp for 1.5 to 2 hours until doubled in size.
- Roll and cut donuts: Turn dough out onto a floured surface. Roll dough with a rolling pin to 1/4” to 1/3” thick and use a donut cutter to make 11-12 donuts and donut holes. Gently press together scraps and re-roll to get another donut if desired.
- Let donuts rise: Place donuts and donut holes on a parchment lined baking sheet, with just enough space so they are not touching. Cover with a tea towel and let donuts rise again in a warm place for 20 minutes or at room temperature for 45 minutes until puffed.
- Make glaze: combine all glaze ingredients in a bowl and stir together until sugar is dissolved then set aside.
- Fry Donuts: In a dutch oven with clip on thermometer or in a deep fryer, Heat oil to 375˚F. Once donuts have puffed, fry 2 donuts at a time for 45 to 60 seconds per side until golden on each side, flipping once.
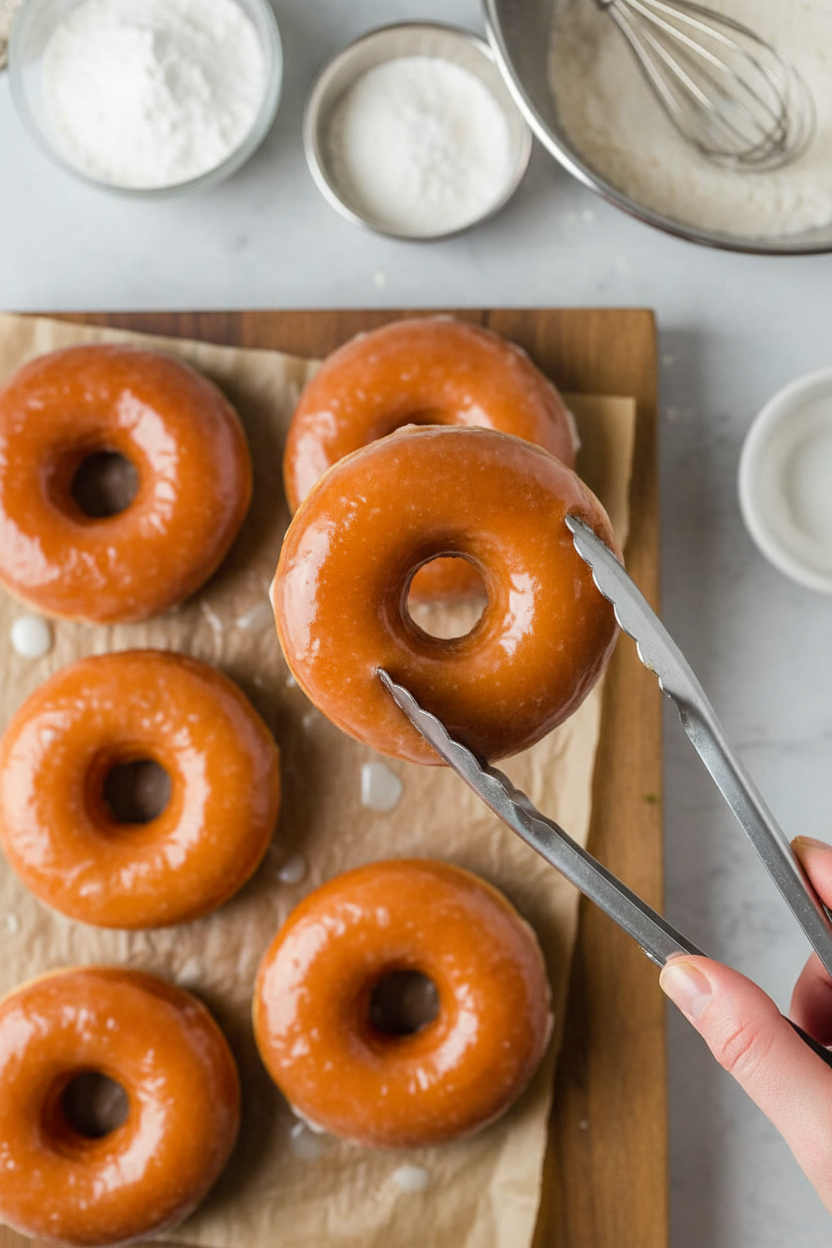
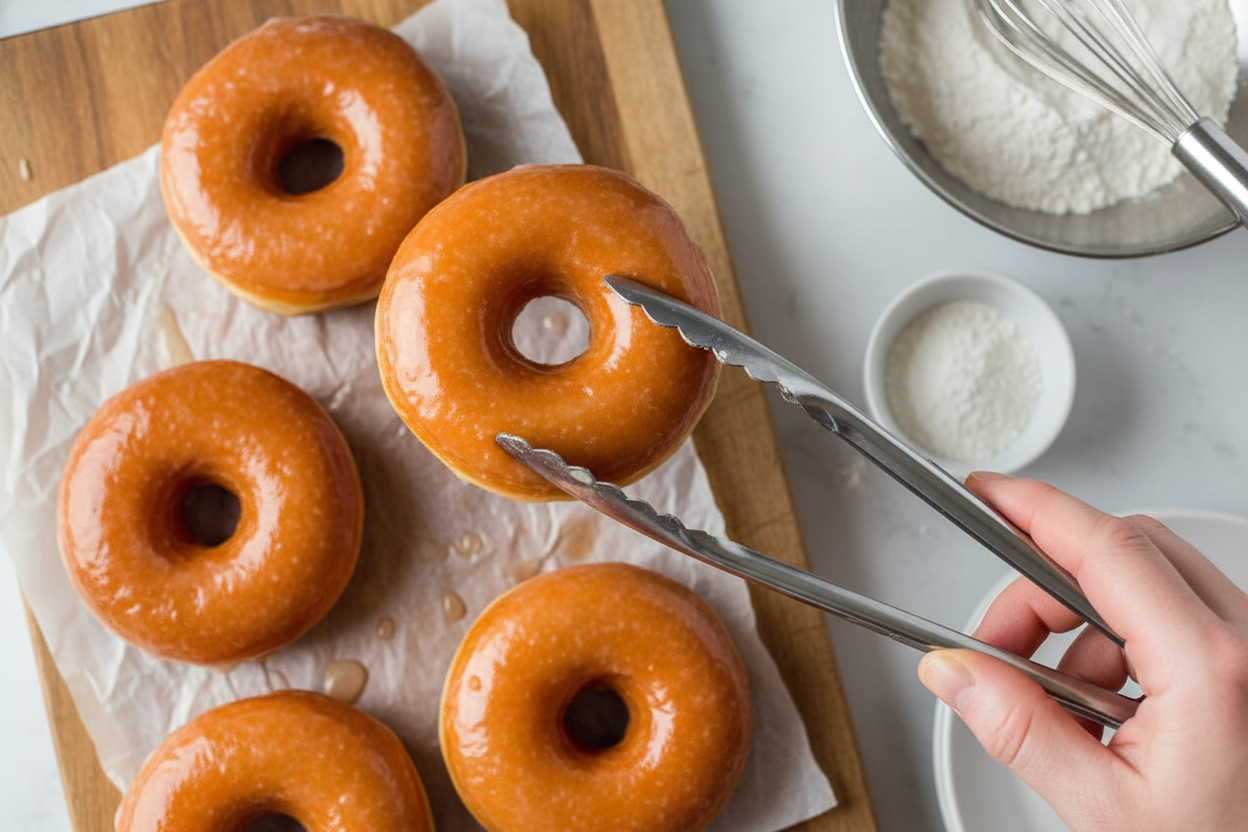
- Glaze donuts: Remove donuts from the oil one at a time and Immediately dip both sides in glaze then transfer to a wire rack.
- Fry donut holes: Fry and glaze the donut holes in 2 batches. Serve donuts as soon as the glaze is set.
Notes
- For best results, ensure your milk is cooled to the correct temperature (115°F) before adding yeast. Don’t overcrowd the pan when frying to maintain oil temperature. Serve fresh for the best texture.


Leave a Reply