My Grandson’s Favorite Dinner
My grandson Leo calls these “chicken lollipops.” I still laugh at that. He asks for them every Friday. It makes my heart so happy.
This recipe is simple. It turns plain chicken into something fun. You get to use your hands. That’s the best part of cooking. What’s a meal your family always asks you to make?
The Magic of Mayo
You might think mayo is just for sandwiches. Here’s a fun fact: Mayo makes the breadcrumbs stick like glue. It also keeps the chicken juicy inside.
I learned this trick from my friend Marge years ago. I was skeptical. But it works perfectly every time. This matters because nobody likes dry chicken. The mayo is your secret helper.
Let’s Get Our Hands Dirty
First, cut your chicken into strips. Season it well. Then, mix in that mayo with your hands. Doesn’t that feel funny? Let it sit in the fridge.
Threading the chicken on skewers is like a puzzle. Try to make them flat and even. This matters for cooking. All pieces will be done at the same time. No one gets a raw bite!
The Golden Sizzle
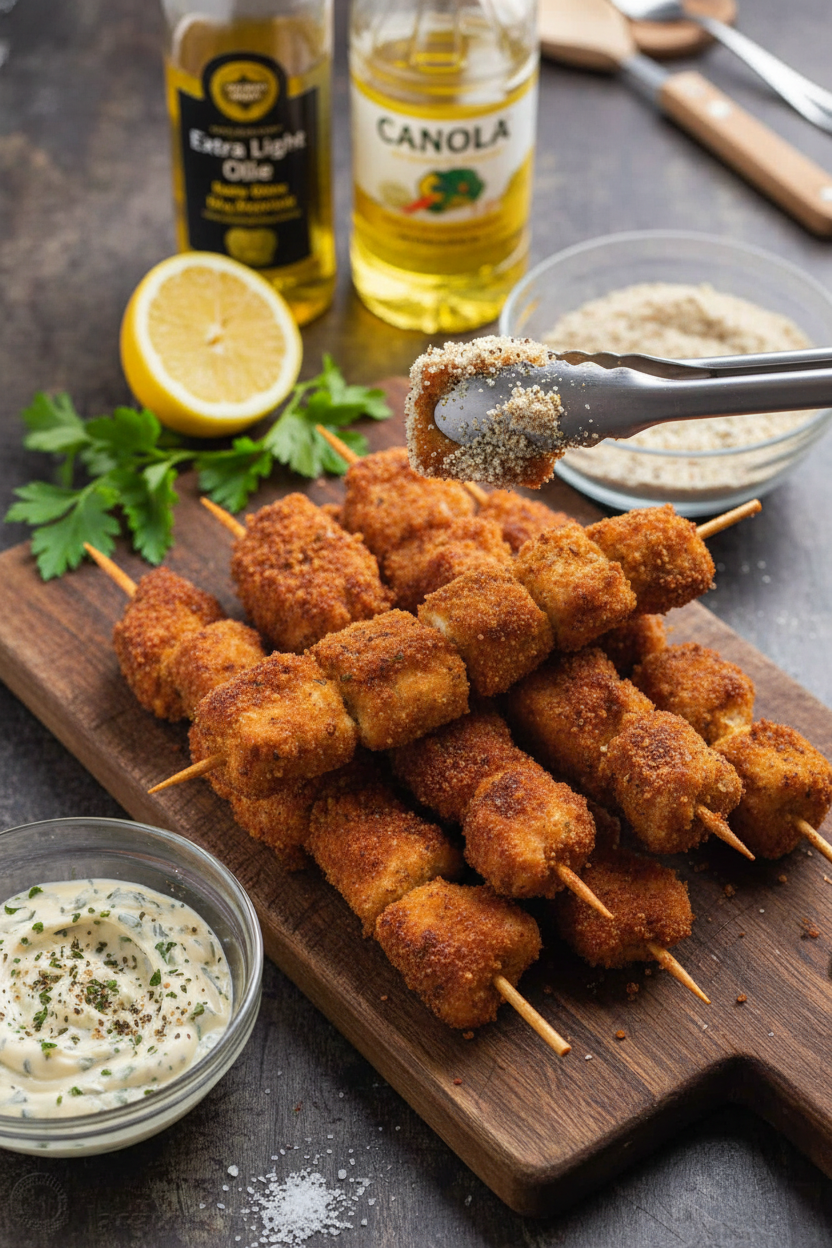
Now, roll your skewers in the breadcrumbs. Press gently. Heat your oil in a pan. Listen for that gentle sizzle when you add the chicken.
Cook until they are golden brown. Doesn’t that smell amazing? That smell means home to me. Do you prefer frying or baking your crispy foods?
Serving With a Smile
Let them drain on a paper towel. This takes off extra grease. Then, serve them right away. They are great with a simple salad or rice.
Seeing people enjoy food you made is the best feeling. Food is more than eating. It’s about sharing time together. Tell me, what will you serve with your skewers?
Ingredients:
| Ingredient | Amount | Notes |
|---|---|---|
| Chicken breast | 2 lbs | |
| Italian-style breadcrumbs | 1 cup | |
| Mayonnaise | 3/4 cup | |
| Mrs Dash | 1 tsp | |
| Fine sea salt | 1 tsp | |
| Black pepper | 1/2 tsp | Freshly ground |
| Extra light olive oil or canola oil | As needed | For frying |
| Small wooden skewers | 12 |
My Grandson’s Favorite Breaded Chicken Skewers
Hello, dear. Come sit at the table. Let’s talk about chicken skewers. My grandson Leo requests these every Friday. He calls them “chicken lollipops.” I still laugh at that. They are wonderfully crispy and tender. The secret is a simple mayo marinade. Doesn’t that smell amazing? It makes the chicken so juicy. Let me show you how we make them.
Step 1: Prep & Marinate
First, cut your chicken into bite-sized pieces. Place them in a big bowl. Sprinkle with salt, pepper, and Mrs. Dash. Now, add the mayonnaise. Mix it all with your hands. This part is fun and messy. Let it rest in the fridge for an hour. This lets the flavors get cozy. (A hard-learned tip: soaking your wooden skewers in water first stops them from burning later.)
Step 2: Thread the Skewers
Time to thread the chicken! Push the pieces onto the skewers. Try to keep the flat sides facing the same way. This helps them cook evenly. I always make a little assembly line. It feels like a craft project.
Step 3: Breadcrumb Coating
Pour your breadcrumbs onto a plate. Now, roll each skewer in the crumbs. Press gently so they stick. You want a nice, even coat. This gives us that perfect golden crunch. I think of it as putting a little jacket on each piece.
Step 4: Cook to Perfection
Heat a good layer of oil in your pan. Carefully add the skewers. Cook them for a few minutes on each side. You want them golden brown. The sizzle is the best sound. Use a thermometer to check they’re done. We want 165 degrees inside. Then let them drain on a paper towel. And just like that, you’re done!
Three Fun Twists to Try
This recipe is like a friendly base camp. You can explore from here. Try one of these fun twists next time. They make dinner feel like a new adventure.
Pizza Party: Use pizza-seasoned breadcrumbs. Add a little grated parmesan to the mayo.
Sweet & Smoky: Mix a teaspoon of smoked paprika and a pinch of brown sugar into the breadcrumbs.
Garden Herb: Use plain breadcrumbs. Stir a tablespoon of fresh, chopped dill right into the mayonnaise.
Serving Them Up Right
I love to serve these skewers stuck upright in a big mug of mashed potatoes. It makes everyone smile. A simple green salad on the side is perfect. Or some steamed green beans with a squeeze of lemon. For dipping, try cool ranch dressing or a little honey mustard.
For a drink, lemonade is always a winner. It cuts through the richness. For the grown-ups, a crisp lager beer pairs wonderfully.
Keeping Your Skewers Tasty Later
Let’s talk about keeping these skewers for another day. First, let them cool completely. Then, pop them in a sealed container in the fridge. They will stay good for about three days.
You can freeze them, too. I wrap each cooled skewer in a little foil. Then, I place them all in a freezer bag. They keep for a month. This is perfect for busy nights.
To reheat, use your oven. It keeps them crispy. I learned this the hard way. My microwave made them soggy once. No one liked that.
Making a double batch is a smart trick. It saves you time next week. This matters because good food should make life easier, not harder. Have you ever tried storing it this way? Share below!
Simple Fixes for Common Hiccups
Sometimes, the breadcrumbs won’t stick. Your chicken might be too wet. Just pat the pieces dry with a paper towel first. This makes the mayo coating cling better.
The breading can burn before the chicken cooks. Your heat is too high. Keep it at a steady medium. I remember when I rushed this. We had very dark, crunchy skewers.
The chicken might taste bland. Do not skip the marinating time. Letting it sit lets the flavors get cozy inside. This matters for a juicy, tasty bite every time.
Getting it right builds your cooking confidence. You learn what to watch for. Which of these problems have you run into before?
Your Quick Questions, Answered
Q: Can I make this gluten-free? A: Yes! Use your favorite gluten-free breadcrumbs. They work just the same.
Q: Can I make them ahead? A: You can bread the skewers a few hours early. Keep them covered in the fridge until frying.
Q: I don’t have Mrs. Dash. A: Use any herb blend you like. Italian seasoning is a great swap.
Q: Can I double the recipe? A: Absolutely. Just use two pans to fry. Do not crowd the chicken.
Q: Any optional tip? A: A squeeze of lemon at the end is lovely. Fun fact: The acid brightens all the other flavors. Which tip will you try first?
From My Kitchen to Yours
I hope you love making these skewers. They always remind me of summer picnics. Cooking is about sharing joy and full bellies.
I would love to see your creation. It makes my day to see your kitchen wins. Have you tried this recipe? Tag us on Pinterest! You can find me at @TessasKitchenTable.
Thank you for cooking with me today. Happy cooking!
—Tessa Hammond.


Breaded Chicken Skewers Recipe Video Tutorial
Description
Crispy, golden-brown breaded chicken skewers, perfect for a quick and delicious meal or appetizer.
Ingredients
Instructions
- Cut the chicken into 3/4″ wide pieces and place in a large mixing bowl. Season with salt, pepper, and Mrs. Dash. Mix in 3/4 cup mayo then let the chicken marinate in the refrigerator for 1 hour or overnight.
- Thread the chicken pieces onto the skewers. Try to have the flat sides facing in one direction for even cooking.
- Pour bread crumbs on a large plate or platter. Roll the chicken skewers in bread crumbs until evenly coated.
- In a large nonstick pan, add enough oil to generously cover the bottom, set pan over medium heat. Sautee the chicken skewers for about 3 minutes per side, flipping until golden brown on both sides and the internal temperature reaches 165˚F on an instant read thermometer.
- Transfer to a paper towel lined platter to absorb any excess oil then serve.
Notes
- For best results, ensure the oil is hot before adding the skewers to prevent the breading from absorbing too much oil.


Leave a Reply