A Party in Your Hands
Hello, my dear. Come sit. Let’s talk about little bites of joy. These crispy cheese ball bites are just that. They are a whole party you can hold. I love how the pretzel stick gives you a handle. It’s fun, isn’t it?
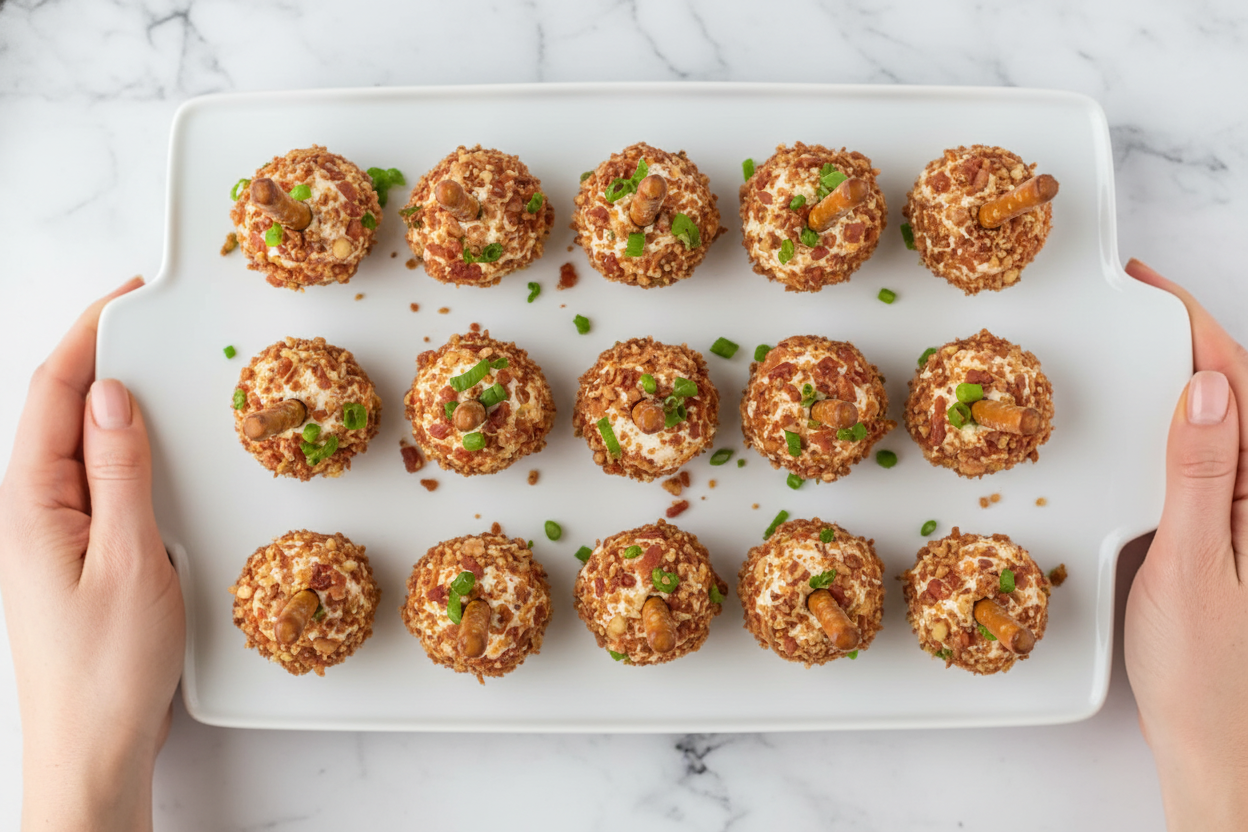
You mix soft cream cheese with sharp cheddar. Then you roll it in bacon and nuts. The salty crunch with the cool cheese is perfect. I still laugh at the first time I made them. My grandson ate three before they even got to the table! What’s your favorite party snack to grab?
The Secret is in the Chill
Now, here is a little lesson. You must chill the cheese balls. Do not skip this! I know you want to eat them right away. But patience makes them better.
The cold helps them keep their shape. It makes them firm for rolling. This matters because a messy ball is a sad ball. A firm ball is a happy, crispy ball. Trust your grandma on this one.
Shred Your Own Cheese
Let me tell you a tiny secret. The recipe says not to use pre-shredded cheese. There is a good reason. Those bags have a powder on them. It stops clumping, but it also stops melting nicely.
Shredding your own block takes one extra minute. But it makes the cheese mixture so smooth. This matters for the flavor. It blends perfectly with the cream cheese. Doesn’t that smell amazing when you mix it?
A Funny Little History
Big cheese balls have been at parties forever. My mother made a giant one. It was the size of a grapefruit! We would spread it on crackers.
But one year, my hands were full. I had a plate in one hand. I needed a free snack! So I made mini balls. The pretzel stick came later. It was a happy accident. Do you prefer big snacks or little bite-sized ones?
Fun Fact & Final Touch
Here is a fun fact for you. The paprika isn’t just for color. It gives a tiny, warm sweetness. It balances the salty bacon so well.
Rolling the balls is the best part. Get your hands a little messy. Press the bacon and nuts on gently. Make sure each one gets a good coat. Then pop in the pretzel stick. They look like little lollipops! Will you use regular or the tiny twisted pretzels?
Ingredients:
| Ingredient | Amount | Notes |
|---|---|---|
| Cream cheese | 1 1/2 (8 ounce) blocks | softened |
| Cheddar cheese | 1 cup | shredded (do not use pre-shredded) |
| Garlic salt with parsley flakes | 1 teaspoon | |
| Paprika | 1 teaspoon | |
| Black pepper | to taste | freshly ground |
| Bacon | 8 slices | cooked and chopped |
| Pecans | 1/3 cup | finely chopped |
| Chives | 1/4 cup | chopped |
| Pretzel sticks | 18 |
My Crispy Cheese Ball Bites: A Party in Your Hand!
Hello, my dear! It’s Tessa. Come sit a moment. I want to tell you about my favorite little bites. They are perfect for sharing. I first made these for my grandson’s birthday. He said they looked like tasty hedgehogs! I still laugh at that. They are creamy, crunchy, and so fun. Let’s make some kitchen magic together. You will love how easy they are.
Step 1: Prepare the Tray
First, let’s get our tray ready. Tear off a piece of parchment paper. Line a small baking sheet with it. This keeps our bites from sticking later. Now, set that sheet aside. It’s waiting for its cheesy friends. Doesn’t that smell amazing? The kitchen already feels cozy.
Step 2: Mix the Cheeses
Grab a medium mixing bowl. Plop in your softened cream cheese. Add the shredded cheddar cheese. Now, sprinkle in the garlic salt and paprika. Give it a few grinds of black pepper. Use a big spoon to mix it all. Mix until it’s smooth and happy. (A hard-learned tip: shred your own cheddar. The bagged kind won’t stick as well!)
Step 3: Form and Chill the Balls
Time to make our balls! Use a cookie scoop or a spoon. Scoop up some of that cheesy mixture. Roll it gently between your palms. Make about 14 little balls. Place each one on your prepared sheet. Pop the whole tray into the fridge. They need to chill for one hour. This helps them stay round and firm.
Step 4: Make the Coating
While they chill, let’s make the coating. In a shallow dish, mix your chopped bacon. Add the finely chopped pecans. Then, stir in the fresh chives. This mix is salty, crunchy, and herby all at once. It’s the best part! What’s your favorite crunchy snack? Share below!
Step 5: Coat and Serve
The fun part is here! Take your chilled cheese balls. Roll each one in the bacon-pecan mix. Press gently so the goodies stick. Finally, poke a pretzel stick into the top of each ball. There’s your hedgehog! Refrigerate them until you’re ready to serve. Then, watch them disappear from the plate.
Cook Time: 1 hour (chilling)
Total Time: 1 hour 20 minutes
Yield: 14 bites
Category: Appetizer, Snack
Three Tasty Twists to Try
You can dress these bites up for any season. Feel free to play with the recipe. It’s your kitchen adventure! Here are three ideas I love.
- The Pizza Lover: Swap cheddar for mozzarella. Add a pinch of Italian herbs. Use mini pepperoni in the coating.
- The Garden Friend: Skip the bacon for a vegetarian treat. Use toasted sunflower seeds and fresh dill instead. So fresh and green!
- The Sweet & Salty: Use chopped candied pecans. Add a tiny bit of brown sugar to the cream cheese. A delightful surprise.
Which one would you try first? Comment below!
Serving Them Up With Style
Presentation is part of the fun. I like to stick them in a small pumpkin in the fall. For summer, a bright bowl of lemon halves works. Serve them with crisp apple slices or sweet grape clusters. The flavors sing together.
For drinks, a chilled apple cider is lovely. Grown-ups might enjoy a crisp, cold lager. The bubbles cut right through the richness. Which would you choose tonight?

Keeping Your Cheese Ball Bites Perfect
These bites are best served cold and fresh. Pop them in the fridge for up to two days. Cover them well with plastic wrap.
You can freeze them for a month, too. Just skip the pretzel stick until serving. I once forgot to cover a batch. They dried out and tasted sad.
Storing them right keeps the flavors happy. It also means you can make them ahead. This is great for surprise guests or busy days.
Have you ever tried storing it this way? Share below!
Simple Fixes for Common Snack Bites
Is your cheese mixture too soft to roll? Chill it longer. The fridge is your best friend here.
Are the toppings not sticking? Gently press the ball into the mix. I remember when my first batch was bare. A little pressure fixes it.
Is the pretzel stick breaking? Just poke a starter hole with a toothpick first. This saves the snack and your patience.
Getting it right builds your kitchen confidence. It also makes every bite taste just as you dreamed.
Which of these problems have you run into before?
Your Quick Questions, Answered
Q: Can I make these gluten-free?
A: Yes! Use gluten-free pretzel sticks or a celery stick instead.
Q: How far ahead can I make them?
A: You can make the balls two days before. Add toppings and sticks the day you serve.
Q: What if I don’t have pecans?
A: Try chopped almonds or leave them out. It will still be tasty.
Q: Can I double the recipe?
A: Absolutely. Just use a bigger bowl and baking sheet.
Q: Any fun extra tip?
A: A cookie scoop makes perfect balls. *Fun fact: This tool is called a disher!*
Which tip will you try first?
From My Kitchen to Yours
I hope you love making these little bites. They always bring smiles to my table.
I would love to see your creations. Sharing food pictures is like sharing a happy secret.
Have you tried this recipe? Tag us on Pinterest! You can find me at @TessasKitchenNook.
Thank you for cooking with me today. Happy cooking!
—Tessa Hammond.

Crispy Cheese Ball Bites Recipe
Description
These irresistible bite-sized appetizers combine creamy, seasoned cheese with a crispy bacon-pecan coating, all served on a pretzel stick for easy eating.
Ingredients
Instructions
- Line a small baking sheet with parchment paper. Set aside.
- In a medium mixing bowl combine cream cheese, shredded cheese, garlic salt, paprika and pepper.
- Use a cookie scoop to form 14 mini balls from the cream cheese mixture and place on prepared baking sheet. Refrigerate for at least 1 hour.
- In a shallow dish mix together chopped bacon, pecans and chives.
- Roll cream cheese balls into this mixture, then insert a pretzel stick into the top of each ball.
- Refrigerate until ready to serve.
Notes
- For best results, ensure cream cheese is fully softened. Use block cheese and shred it yourself for a creamier texture. Balls can be made a day ahead and stored covered in the fridge.


Leave a Reply