My First Kitchen Disaster
I still laugh at that story. I was a new bride. I tried to make these kotleti for my husband. I forgot to wet my hands. The meat stuck to my fingers like glue. What a mess we had.
That’s why I tell you to keep a bowl of water nearby. Wet hands make everything easier. This matters because cooking should be fun, not frustrating. Little tricks save the day.
What Are These Tasty Patties?
These are Pozharsky kotleti. They are soft, juicy patties from Russia. They are usually just chicken. But I use both chicken and beef. It makes the flavor richer and deeper.
The secret is the soaked bread and whipped egg whites. They make the inside so light and tender. You will be surprised. Fun fact: long ago, a traveling prince loved these so much, he named them after the cook!
The Magic of Whipped Egg Whites
This step seems fussy. But trust your grandma Tessa. Whipping the egg whites is the real magic. It puts tiny bubbles into the meat. Those bubbles make the patties fluffy.
Fold them in gently with a spatula. Does your family have a special trick for making meatballs tender? I would love to hear it. This matters because texture is just as important as taste. A light bite makes everyone smile.
Cooking Them Just Right
Use both oil and butter in your pan. The oil stops the butter from burning. The butter gives a lovely golden color. Doesn’t that smell amazing when they start to cook?
Do not crowd the pan. Cook them in batches. This keeps the heat steady. They will get a perfect crust. Flip them a few times. They are done when the juices run clear.
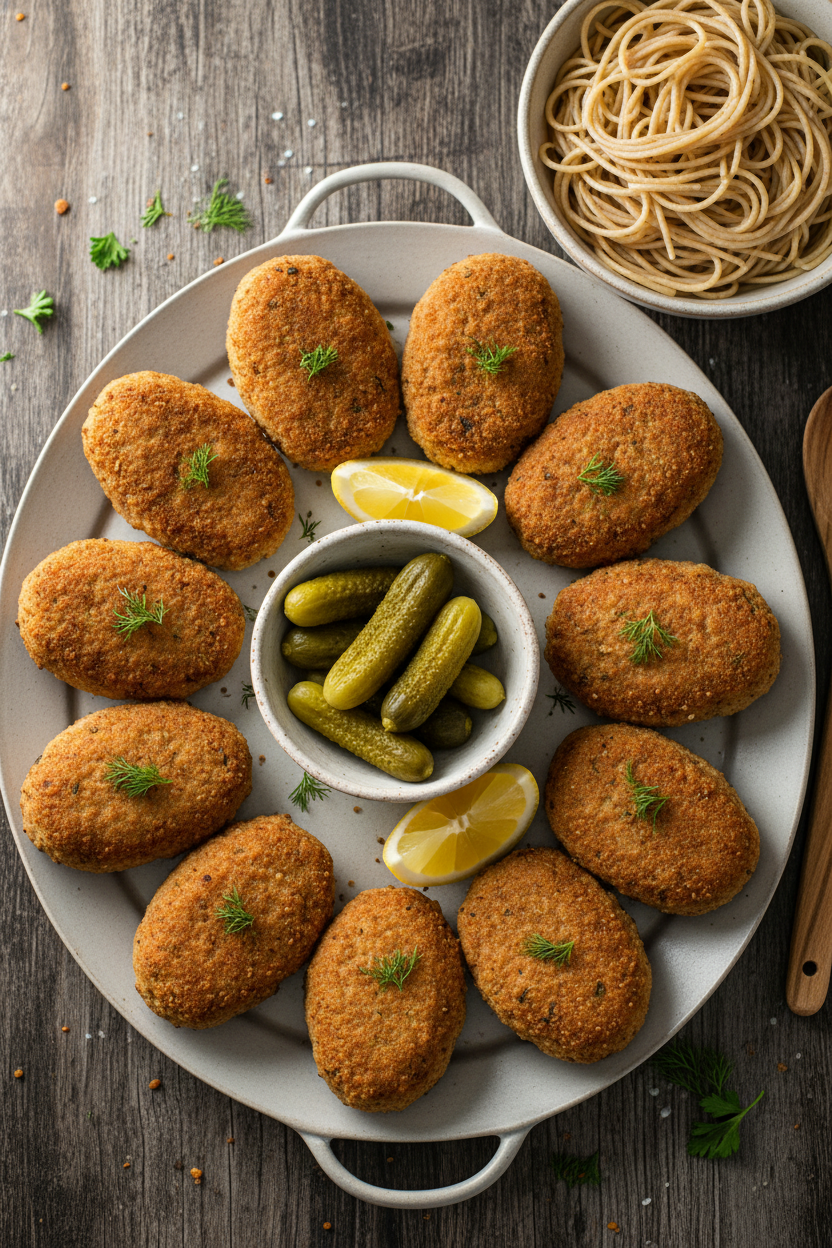
Serving Your Creation
We love these with mashed potatoes. The creamy potatoes are perfect with the crispy kotleti. A simple cucumber salad is nice too. It feels like a hug on a plate.
What is your favorite thing to eat with a crispy patty? Tell me in the comments. Making food for people you love matters. It is a quiet way to say “I care for you.” Now, go make a little mess and a lot of joy.
Ingredients:
| Ingredient | Amount | Notes |
|---|---|---|
| whole wheat bread, crusts removed | 3 slices | |
| whole milk | 1/3 cup | |
| ground chicken | 1 lb | |
| lean ground beef | 1 lb | |
| finely diced onion | 1/3 cup | 1 small onion |
| unsalted butter, melted | 3 Tbsp | |
| egg yolks | 2 | whites separated for another use |
| fresh or frozen dill, chopped | 2 Tbsp | |
| salt | 1/2 Tbsp | |
| ground black pepper | 1/2 tsp | |
| eggs, beaten | 2 | for breading |
| dry Italian bread crumbs | 1 cup | for breading |
| Light Olive Oil and unsalted butter | to saute | equal parts |
My Grandmother’s Cozy Kotleti
Hello, my dear. Come sit. Let’s make my grandmother’s kotleti. They are little, juicy meat patties. We call them croquettes sometimes. My grandma made them every Sunday. The whole house would smell like butter and dill. Doesn’t that smell amazing? It still makes me feel so cozy. We will use both chicken and beef. It makes them extra tender. I still laugh at that. My brother would try to sneak them before dinner. Let’s get our hands messy together.
Step 1: Soak the Bread
First, let’s soften the bread. Put the crustless slices in a bowl. Pour the milk over them. Let it sit for a few minutes. The bread will drink up all the milk. It feels a bit funny, doesn’t it? This little trick keeps our kotleti wonderfully moist. It’s my grandma’s secret. A hard-learned tip: use your fingers to squeeze the bread gently. It mixes in much better!
Step 2: Mix the Ingredients
Now, put all the main things in a big bowl. Add the chicken, beef, onion, and melted butter. Don’t forget the egg yolks, dill, salt, and pepper. Then add the soggy bread. Mix it all with your clean hands. Feel the cool, squishy mixture. It’s okay to get messy. This is the fun part. Do you think mixing by hand or with a spoon is better? Share below!
Step 3: Add the Egg Whites
Here’s the magic step. Beat the egg whites in a clean bowl. Beat them until they look like fluffy clouds. Then, fold them gently into the meat. Use a big spoon and a soft touch. This makes the kotleti light and airy. It’s like giving them little pillows inside. I always think it’s a neat trick.
Step 4: Shape and Coat
Set up your stations. One bowl with cold water for your hands. One with beaten eggs. One with breadcrumbs. Wet hands stop the meat from sticking. Shape the meat into little ovals. Dip each one in egg, then crumbs. Line them up on your board like little soldiers. A hard-learned tip: make them all first. Then you can cook without rushing!
Step 5: Cook the Kotleti
Time to cook! Heat butter and oil in your pan. Listen for that gentle sizzle. Add a few patties. Don’t crowd them. Cook them slowly, about 5 minutes per side. Flip them a few times. They should turn a beautiful golden brown. To check if they’re done, cut one open. The inside should not be pink. Then you know they’re perfect.
Cook Time: 20 minutes
Total Time: 45 minutes
Yield: About 20 kotleti
Category: Dinner, Main Course
Three Fun Twists to Try
My grandma had one way. But we can play, too. Here are some fun ideas. The Cheesy Surprise: Hide a tiny cube of mozzarella inside each patty. It melts into a gooey center. The Herby Garden: Swap dill for fresh parsley and chives. It tastes like a summer garden. The Little Spice: Add a pinch of paprika to the breadcrumbs. It gives a warm, cozy flavor. Which one would you try first? Comment below!
How to Serve Your Masterpiece
These kotleti are so friendly. They go with almost anything. I love them with mashed potatoes and a simple cucumber salad. Or, put them on soft dinner rolls for a special sandwich. A dollop of sour cream on top is always good. For a drink, a cold glass of apple cider is lovely. Grown-ups might like a light lager beer. It cuts through the richness nicely. Which would you choose tonight?
Keeping Your Kotleti Cozy for Later
Let’s talk about saving some for later. These kotleti freeze beautifully. First, let them cool completely. Then, place them on a baking sheet and freeze for one hour. This is called a flash freeze. It keeps them from sticking together later.
After that, pop them into a freezer bag. They will keep for two months. To reheat, just warm them in a skillet over medium heat. Add a tiny bit of oil or butter. I once reheated one in the microwave. It got a bit soggy. The skillet is best for that crispy outside.
Batch cooking like this saves busy nights. It turns a big cooking day into many easy meals. That matters for family time. You can sit down together faster. Have you ever tried storing it this way? Share below!
Fixing Common Kotleti Quirks
Sometimes our cooking needs a little help. Here are three common fixes. First, if your mixture feels too wet, add a spoonful of breadcrumbs. If it feels too dry, add a splash of milk. This helps you form perfect patties.
Second, do not crowd the pan. I remember when I tried to cook them all at once. They steamed instead of frying. Cooking in batches gives each one a golden crust. That crispy outside matters for great texture and flavor.
Third, keep your hands wet when shaping. This stops the meat from sticking to your fingers. It makes the job much cleaner and easier. Solving these small problems builds your cooking confidence. You learn that you can fix things. Which of these problems have you run into before?
Your Kotleti Questions, Answered
Q: Can I make these gluten-free? A: Yes! Use gluten-free bread and breadcrumbs. The recipe works just the same.
Q: Can I make them ahead? A: Absolutely. Shape and bread them a day before. Keep them covered in the fridge until cooking.
Q: What if I don’t have dill? A: Try parsley or chives. You can also use a teaspoon of dried herbs.
Q: Can I double the recipe? A: You sure can. It’s a great idea for a big family or freezing. *Fun fact: The original Pozharsky kotleti were made with just veal or chicken!*
Q: Any optional tips? A: A little grated apple in the mix adds a sweet, juicy surprise. Which tip will you try first?
From My Kitchen to Yours
I hope you love making these kotleti. They are little bites of comfort. Cooking is about sharing stories and good food. I would love to see your kitchen creations.
Show me your golden-brown patties on a plate. Or your family gathered around the table. Have you tried this recipe? Tag us on Pinterest! You can find me at @TessasKitchenNook. Thank you for cooking with me today.
Happy cooking!
—Tessa Hammond.


Chicken and Beef Pozharsky Kotleti Croquettes
Description
Classic Russian-style croquettes made with a mix of ground chicken and beef, flavored with dill and onion, then breaded and pan-fried to perfection.
Ingredients
For Breading/Cooking:
Instructions
- In a shallow bowl, combine 3 slices crustless bread with 1/3 cup milk. Set aside to soak a few minutes.
- In the bowl of a mixer (or you can mix by hand), combine 1 lb ground chicken, 1 lb ground beef, 1/3 cup finely diced onion, 3 Tbsp melted butter, 2 egg yolks, 2 Tbsp dill, 1/2 Tbsp salt and 1/2 tsp black pepper. Add milk-soaked bread to the mixing bowl (adding any remaining milk from the plate) and mix until well combined (I used a paddle attachment on low speed).
- In a separate medium mixing bowl, beat 2 egg whites on high speed until stiff peeks form. Use a spatula to blend the egg whites into the meat mixture until well combined.
- Set up 1 bowl with some cold water to keep hands moist while forming patties. Pour 2 beaten eggs into a second shallow bowl and in a third shallow bowl, add 1 cup Italian bread crumbs.
- With wet hands, form patties into ovals (I used a flat ice cream scoop to get even patties). Dip patties on both sides into beaten egg, letting excess egg drip off. Finally dip into bread crumbs and place on a cutting board until ready to saute. It helps to pre-make all of the patties before starting to saute.
- Heat a large heavy skillet over medium/low heat with 2 Tbsp butter and 2 Tbsp oil. When butter sizzles, add patties about 6 at a time (don’t crowd the pan). Saute about 5 min each side (10 min total), flipping a few times while cooking. To check for doneness: juices will run clear when pierced with a knife, or simply cut one in half and take a peek inside.
Notes
- Nutrition information is not provided in the text.


Leave a Reply