A Kitchen Full of Tails
My kitchen gets very busy on Sunday afternoons. That’s when I bake for the week. Last Sunday, my dog Buddy would not leave my side. He sat right by the oven. His nose twitched with every smell. I knew he wanted a special treat, too.
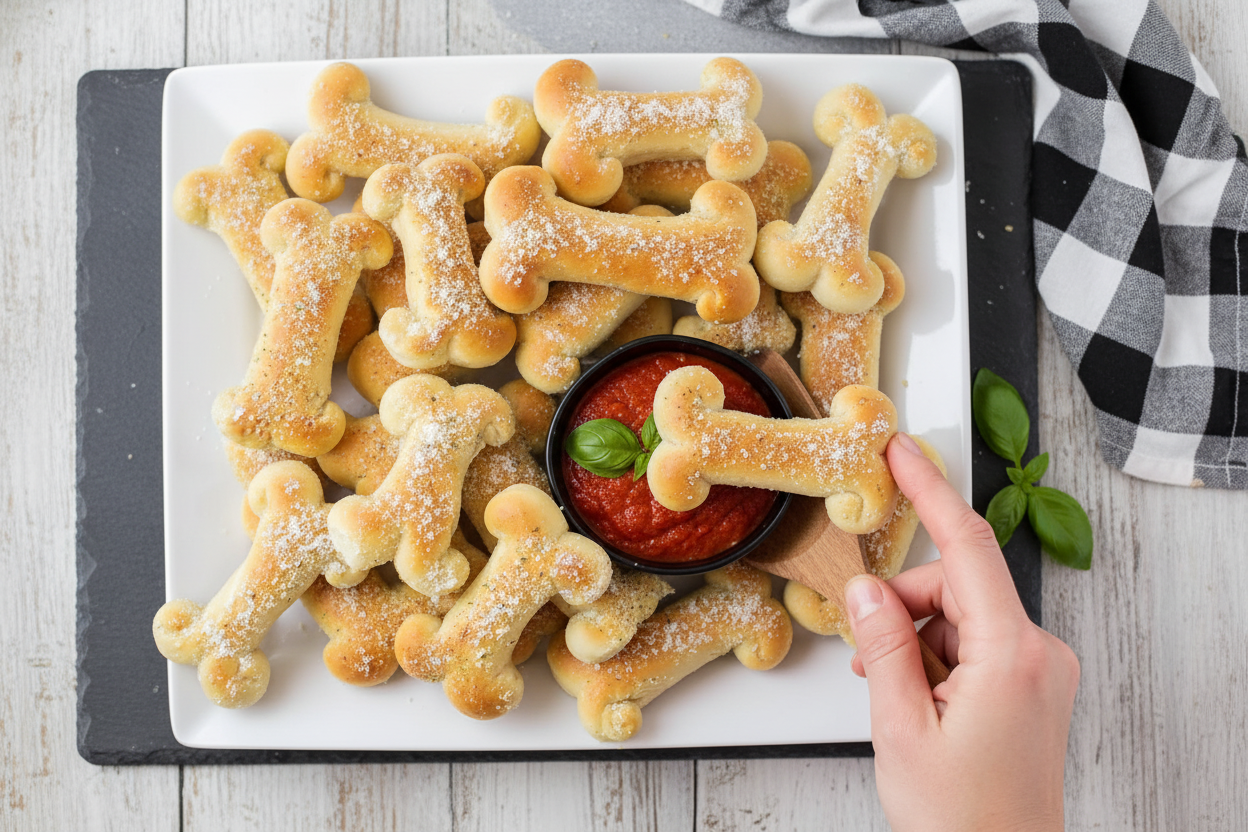
So I decided to make breadsticks. But not for people. I shaped them just for him. I twisted the dough into little bones. His tail thumped the floor the whole time. Doesn’t that just make your heart smile? What does your dog do when you’re in the kitchen?
Why We Make Special Treats
Store-bought dog snacks can have strange names in the ingredients. I like knowing what my Buddy eats. This matters because our furry friends trust us to care for them. Making their food is a big part of that love.
These breadstick bones use simple things. Flour, water, a little yeast. The topping is just butter, garlic salt, and cheese. *Fun fact: The yeast makes the dough fluffy for dogs, but it’s completely safe after baking!* Seeing Buddy’s happy dance for a homemade bite is the best reward.
Let’s Make the Dough
First, we wake up the yeast. Mix it with warm water and sugar. Let it sit until it gets foamy. It looks like a tiny science experiment in your bowl. I still laugh at that. It means our breadsticks will be nice and soft.
Then add the salt, oil, and flour. Mix it all up. You’ll get a soft, squishy dough. Knead it until it feels smooth like a puppy’s ear. This part is fun with your hands. Put the dough in a bowl, cover it, and walk away. Let it take a nap for an hour. It will grow big and puffy!
Shaping Our Bone Breadsticks
After the dough’s nap, gently poke it down. Divide it into 16 little pieces. Roll one piece into a long rope. Now, here’s the magic. Cut a small slit near each end of the rope. Roll the dough on each side of the slit. Roll them in opposite directions.
Suddenly, you have a bone shape! It’s easier than it sounds. Place all your bones on a baking sheet. Let them rise again for about 45 minutes. They will get nice and plump. While you wait, tell me, what’s your dog’s favorite trick? Mine is “sit pretty.”
Baking and Sharing
Heat your oven to 425°F. Bake the bones until they are golden brown. Doesn’t that smell amazing? Take them out and brush with melted butter. Sprinkle on a tiny bit of garlic salt and parmesan. Let them cool before sharing.
This matters because sharing food is a language of love. For dogs and people. You can serve one with a little marinara sauce for dipping. Just for you, not your pup! Would you try one, or save them all for your best furry friend?
Ingredients:
| Ingredient | Amount | Notes |
|---|---|---|
| Warm water | 1 cup + 2 tablespoons | For the breadstick dough |
| Active dry yeast | 1 ¼ teaspoons | For the breadstick dough |
| Sugar | 2 tablespoons | For the breadstick dough |
| Salt | 1 ½ teaspoons | For the breadstick dough |
| Canola oil | 3 tablespoons | For the breadstick dough |
| Flour | 3-3¼ cups | For the breadstick dough |
| Butter, melted | 2 tablespoons | For the topping |
| Garlic salt | ½ teaspoon | For the topping |
| Grated parmesan cheese | 1 tablespoon | For the topping |
| Marinara sauce | For serving | Optional, for dipping |
Breadstick Bones: A Treat For Your Best Friend
Hello, my dears. It’s Tessa. Today, let’s bake for our furry friends. My old dog, Buster, loved these. His tail would thump the floor the whole time. Doesn’t that smell amazing? We’re making breadstick bones. They look just like little dog bones. Your pup will think they’re magic.
This dough is simple to work with. It’s soft and friendly, just like a good playmate. You can mix it in a bowl with a spoon. I still laugh at that. I remember Buster trying to sneak one off the counter. He was so hopeful. Let’s get our hands a little floury, shall we?
Step 1: First, wake up the yeast. Put the warm water in a big bowl. Sprinkle in the yeast and sugar. Give it a little stir. Let it sit for about five minutes. It will get foamy and bubbly. This means it’s alive and happy. (A hard-learned tip: If it doesn’t foam, your water was too hot or cold. Start over!)
Step 2: Now, add the salt and oil. Stir it all together. Next, add two cups of flour. Mix it until it’s a shaggy mess. Then, add more flour, a little at a time. Stop when the dough pulls away from the bowl. It should be soft, not sticky.
Step 3: Time to knead! Push and fold the dough for five minutes. Do this on a floured counter. It feels wonderful in your hands. The dough will become smooth and elastic. Place it in a greased bowl. Cover it with a towel. Let it take a nap for one hour. It will get nice and puffy.
Step 4: The dough is awake! Gently punch it down. This part is fun. Divide the dough into sixteen little balls. Roll each ball into a long rope. Now, here’s the fun part. You’ll cut a small slit at each end. Then, roll the dough on each side into a little spiral. It makes a perfect bone shape! What’s your dog’s favorite trick? Share below!
Step 5: Place your bones on a baking sheet. Cover them again. Let them rise for another hour. They will plump up nicely. Near the end, heat your oven to 425°F. Bake them for 12 to 14 minutes. They will turn a lovely golden brown. Your kitchen will smell like a bakery.
Step 6: Take the bones out of the oven. Be careful, they’re hot! Brush them with melted butter right away. Then, sprinkle on the garlic salt and parmesan. Let them cool completely before sharing. We must always let treats cool for our pups. Now, watch those happy tails wag!
Cook Time: 14 minutes
Total Time: About 2 hours 30 minutes
Yield: 16 breadstick bones
Category: Dog Treats, Baking
Three Tasty Twists For Your Bones
Once you know the basic recipe, you can play! Here are some fun ideas. I like to change things up for different dogs. It keeps things exciting for them. Try one of these simple twists next time.
Cheesy Pup Bones: Add a half cup of shredded cheddar to the dough. Mix it in with the flour. It makes the bones extra special and yummy.
Peanut Butter Bliss: Swap the canola oil for the same amount of peanut butter. Use the kind with no xylitol. Dogs go crazy for this smell.
Apple Cinnamon Tails: Add a half cup of finely grated apple and a teaspoon of cinnamon. It’s a sweet, autumn-flavored surprise. Which one would you try first? Comment below!
Serving Your Breadstick Bones
These bones are a party all by themselves. But you can make them even more fun. For a special puppy playdate, put some marinara sauce in a small bowl. Let it be a dipping sauce. Just a little, as a treat. You could also crumble one over your dog’s regular dinner. It’s a tasty topper.
Now, for the humans in the house! While your dog enjoys their bone, you deserve a treat too. These breadsticks are delicious for people. Pair them with a cold glass of lemonade on a summer day. Or, for a cozy evening, a light, crisp white wine goes beautifully. Which would you choose tonight?

Keeping Your Breadstick Bones Fresh
Let’s talk about keeping these treats tasty. First, cool them completely. Then store them in an airtight container. They will stay soft for about two days on the counter.
For longer storage, the freezer is your friend. I wrap each bone in plastic wrap. Then I tuck them all into a big freezer bag. I once forgot to wrap one. It got freezer burn and tasted sad.
To reheat, just warm them in a 350°F oven for five minutes. This brings back that fresh-baked magic. Batch cooking matters because it saves you time later. You can have a happy pup treat ready in minutes. Have you ever tried storing it this way? Share below!
Simple Fixes for Common Breadstick Troubles
Sometimes dough can be tricky. But do not worry. Here are easy fixes. First, if your dough won’t rise, check your yeast. The water must be warm, not hot. Hot water will kill the yeast. I remember when I used boiling water by mistake. My dough never puffed up!
Second, if the dough is too sticky, add a little more flour. Go one tablespoon at a time. Third, if your breadsticks are hard, you may have baked them too long. Oven temperatures can vary. This matters because small fixes build your cooking confidence. Getting it right also means better flavor for everyone. Which of these problems have you run into before?
Your Breadstick Bone Questions, Answered
Q: Can I make these gluten-free? A: Yes! Use a good gluten-free flour blend made for baking.
Q: Can I make the dough ahead? A: You can. Let it rise once in the fridge overnight.
Q: What can I swap for parmesan? A: Try a sprinkle of dried parsley or nutritional yeast.
Q: Can I make a bigger batch? A: Absolutely. Just double all the ingredients. Fun fact: yeast is a living thing! It eats the sugar to make the dough rise.
Q: Is the garlic salt safe for dogs? A: For people only! Skip the garlic salt for dog treats. Which tip will you try first?
From My Kitchen to Yours
I hope you and your furry friend love this recipe. Baking for others is an act of love. It creates sweet memories in your kitchen. I would love to see your creations.
Share a picture of your pup enjoying their special bone. Or show off your beautifully twisted breadsticks. Have you tried this recipe? Tag us on Pinterest! Thank you for baking with me today.
Happy cooking!
—Tessa Hammond.

Breadstick Bones Recipe For Dogs
Description
A fun and tasty homemade treat for your furry friend, shaped like bones and perfect for sharing (with your dog!).
Ingredients
2 tablespoons butter, melted
½ teaspoon garlic salt
1 tablespoon grated parmesan cheese
marinara sauce
Instructions
- In a large bowl or the bowl of a stand mixer, dissolve the yeast and sugar in the warm water. Let sit until foamy and bubbly.
- Add the salt, oil, and two cups of flour, and mix to combine. Add the remaining flour, ¼ cup at a time, to form a soft dough that pulls away from the sides of the bowl. Knead until smooth, then place in a greased bowl, cover, and let rise for one hour.
- After the dough has risen, gently punch it down and divide it into 16 equal pieces.
- Roll each piece into a 12-inch rope, then cut a 2-3 inch slit on each side of the rope. Roll the dough on either side of the slit into a spiral, in opposite directions, to make a bone shape.
- Place the breadsticks on a greased or parchment-lined baking sheet. Cover and let rise for 45 minutes to an hour, until doubled in size.
- During the last 10 minutes of rise time, preheat the oven to 425°F. Bake 12-14 minutes, until golden brown.
- Remove from the oven and brush with the melted butter, then sprinkle with garlic salt, and parmesan. Serve warm.
Notes
- These are treats for dogs. The garlic salt and parmesan are for human taste; adjust or omit for your dog’s preference. Always consult your vet about ingredients for your pet.


Leave a Reply