My First Kitchen Mess
I tried baking vanilla wafers when I was young. I used a whole bottle of vanilla! The kitchen smelled wonderful. But the cookies were too dark and chewy. I still laugh at that.
It taught me a good lesson. Measuring matters. Too much of a good thing can change everything. That’s why we use just one tablespoon here. It makes the flavor just right.
The Heart of the Cookie
Let’s start with the dough. Cream the butter and sugar well. This makes the cookie light. Doesn’t that smell amazing already? It’s the sweet start of everything.
Then add the egg, milk, and vanilla. This is the wet mix. It will look a bit curdled. That’s perfectly fine. Trust the process. Now, what’s your favorite smell in the kitchen? Is it vanilla, or something else?
Little Drops of Dough
Mix your dry ingredients into the wet bowl. Do it gently. Stop when you see no more flour. The dough will be soft. Drop little mounds onto your sheet. They don’t have to be perfect.
They spread as they bake. That’s why we space them out. They turn a lovely light gold. Let them cool completely. This patience is important. A warm cookie will melt your chocolate dip!
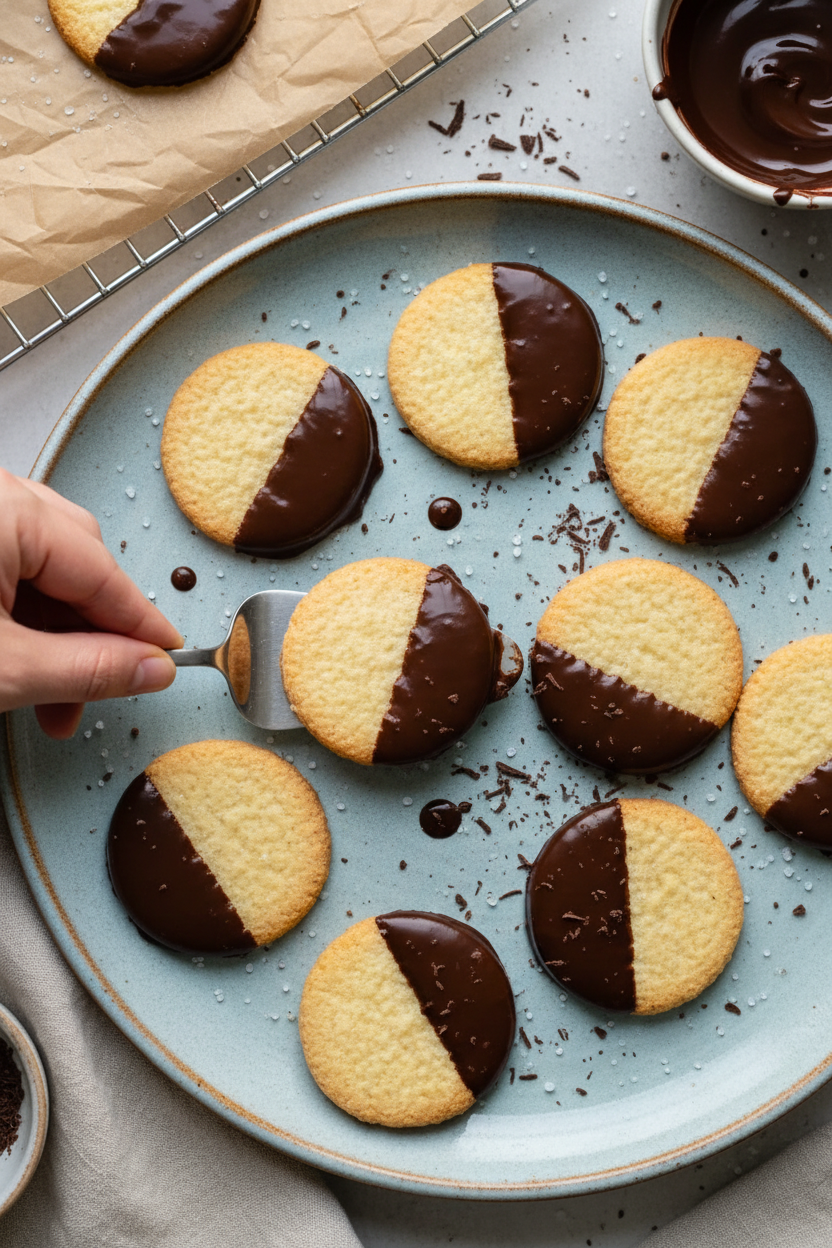
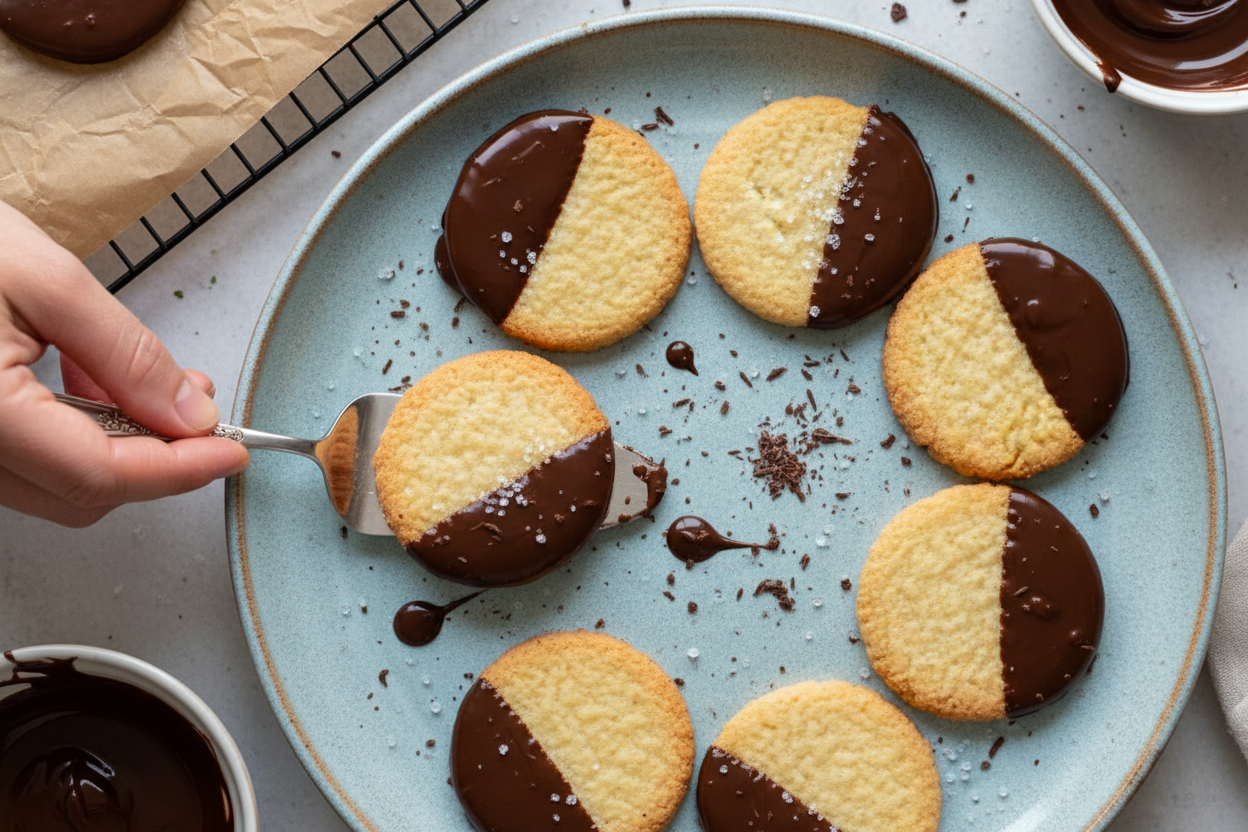
The Magic Dip
Now for the fun part! Melting chocolate is like a little science. Use a microwave bowl. Heat it for 20 seconds, then stir. Repeat until it’s smooth. The coconut oil makes it shiny and helps it set.
*Fun fact: The cocoa bean grows on a tree inside a big, colorful pod!* Dip each cookie halfway. Let the extra chocolate drip off. Then lay it down to set. Do you like one big dip, or drizzling chocolate all over?
Why We Do This
Sharing food is sharing love. These cookies are simple. But dipping them makes them special. It shows you took extra time. That thought matters more than a perfect shape.
Baking connects us. It’s a skill you can always use. It brings people together. I’d love to hear, what’s the first thing you ever baked? Was it a success or a happy mess like mine?
Ingredients:
| Ingredient | Amount | Notes |
|---|---|---|
| all-purpose flour | 1 cup | |
| baking powder | 1/4 teaspoon | |
| salt | 1/4 teaspoon | |
| unsalted butter, softened | 1/2 cup | |
| granulated sugar | 1/2 cup | |
| large egg | 1 | |
| milk | 1 tablespoon | |
| pure vanilla extract | 1 tablespoon | |
| semi-sweet chocolate, chopped or chips | 6 ounces | For Dipping Chocolate |
| coconut oil or vegetable shortening | 1 teaspoon | For Dipping Chocolate; optional |
My Vanilla Wafers Dipping Chocolate Adventure
Hello, my dear! Come sit at the table. Let’s make something special today. We’re baking vanilla wafers from scratch. Then we’ll dip them in chocolate. Doesn’t that sound lovely? I learned this recipe from my own grandma. She called them “tea cookies.” We’d make them on rainy afternoons. The whole kitchen would smell like vanilla and sugar. I still smile thinking about it. Today, we’ll make our own sweet memories. Are you ready? Let’s begin our little adventure together.
Step 1: First, turn your oven to 350°F. Line a baking sheet with parchment paper. This little paper is a lifesaver. It keeps the cookies from sticking. I learned that the hard way once! Now, whisk the flour, baking powder, and salt in a bowl. Just set it aside for now. It’s like gathering your little team of dry helpers.
Step 2: Next, let’s cream the butter and sugar. Use a big bowl for this. Beat them until they look light and fluffy. It should look like pale yellow clouds. This step gives the cookie its lovely texture. (A hard-learned tip: Your butter must be soft! If it’s cold, you’ll have lumps. I leave mine on the counter for an hour first.)
Step 3: Crack in the egg. Add the milk and that wonderful vanilla. Oh, that smell is just heaven! Mix it all together until it’s one happy, smooth mixture. See how it comes together? That vanilla is the heart of the cookie. It makes all the difference, I promise you.
Step 4: Now, add your team of dry helpers. Pour the flour mixture into the wet one. Mix it gently, just until you see no more white flour. Don’t mix too much! Over-mixing makes tough cookies. We want them tender and light. What’s your favorite smell in the kitchen? Share below!
Step 5: Use a teaspoon to drop little mounds of dough. Space them about two inches apart. They will spread as they bake. I still laugh at my first batch. I put them too close and got one giant cookie! Bake them for 12 to 15 minutes. The edges should be just lightly golden.
Step 6: Let the cookies cool completely. This is the hardest part, waiting! But it’s important. Now, melt the chocolate with a bit of coconut oil. Do this in short bursts in the microwave, stirring each time. Dip half of each cookie in. Let the extra chocolate drip off. Place them on parchment to set. The shiny chocolate is so pretty.
Cook Time: 12–15 minutes
Total Time: About 1 hour
Yield: About 2 dozen cookies
Category: Dessert, Cookies
Three Fun Twists to Try
Once you master the basic recipe, you can play! Here are three of my favorite twists. They are simple but make the cookies feel brand new. I love seeing what my grandkids choose.
Sparkling Sugar Dip: After dipping in chocolate, sprinkle the wet part with colored sugar. It adds a fun crunch and sparkle.
Orange Zest Joy: Add a teaspoon of orange zest to the cookie dough. The orange and chocolate taste like a special holiday.
Peppermint Patty Style: Use peppermint extract instead of vanilla. Add a tiny crushed candy cane on the chocolate dip. So festive!
Which one would you try first? Comment below!
Serving Them Up With Style
These cookies are perfect just on a plate. But sometimes, I like to make it an event. For a party, stack them in a little tower on a cake stand. It looks so fancy! You could also serve them with a bowl of fresh berries. The sweet cookie and tart berry are a lovely pair.
What to drink? For the grown-ups, a small glass of sweet dessert wine is nice. It sips like liquid honey. For everyone, a cold glass of milk is the classic choice. Or try a cup of peppermint tea. It’s so cozy. Which would you choose tonight?
Keeping Your Wafers Crisp & Chocolate Shiny
Let’s talk about storing these sweet treats. They keep well in a sealed container. Use wax paper between layers to protect the chocolate. They will stay fresh for about five days.
You can also freeze them for a month. Just place them in a single layer first. Once frozen solid, you can stack them. Thaw them right in the container.
I once left a batch on the counter overnight. The chocolate got soft and smudged everywhere. Now I always use the fridge to set it hard. This little step makes a big difference.
Batch cooking saves so much time. Make the dough and freeze it in logs. Slice and bake when you want fresh cookies. This matters because it makes a special treat easy anytime.
Have you ever tried storing it this way? Share below!
Simple Fixes for Common Cookie Troubles
First, if your dough is too sticky, just chill it. Cold dough is much easier to handle. I remember when my first batch spread into one big cookie. Chilling for 30 minutes fixes this perfectly.
Second, your chocolate might be too thick for dipping. Add that tiny bit of coconut oil. It makes the chocolate smooth and glossy. This matters because a good dip looks beautiful and tastes smooth.
Third, the wafers might be too soft after baking. Simply leave them in the oven a minute longer. Let them cool completely on the rack. This gives you the perfect crisp base for dipping.
Fixing small problems builds your cooking confidence. You learn that mistakes have easy solutions. This matters because confident cooks have more fun in the kitchen.
Which of these problems have you run into before?
Your Quick Cookie Questions, Answered
Q: Can I make these gluten-free?
A: Yes! Use a good gluten-free flour blend. The results are just as tasty.
Q: Can I make them ahead?
A: Absolutely. Bake the wafers a day early. Dip them in chocolate the day you serve them.
Q: What if I don’t have vanilla extract?
A: You can use almond extract instead. *Fun fact: vanilla comes from orchids!*
Q: Can I double the recipe?
A: You sure can. Just mix in a bigger bowl. It’s great for a party.
Q: Is the coconut oil necessary?
A: It’s optional but helpful. It makes the chocolate dip easier and set shinier.
Which tip will you try first?
From My Kitchen to Yours
I hope you love making these little bites of joy. They always remind me of my own grandma. She taught me that simple treats bring the biggest smiles.
I would love to see your creations. Sharing food stories connects us all. Your kitchen adventures make me so happy.
Have you tried this recipe? Tag us on Pinterest! Use our handle @TessasKitchenNook. I can’t wait to see your photos.
Happy cooking!
—Tessa Hammond.
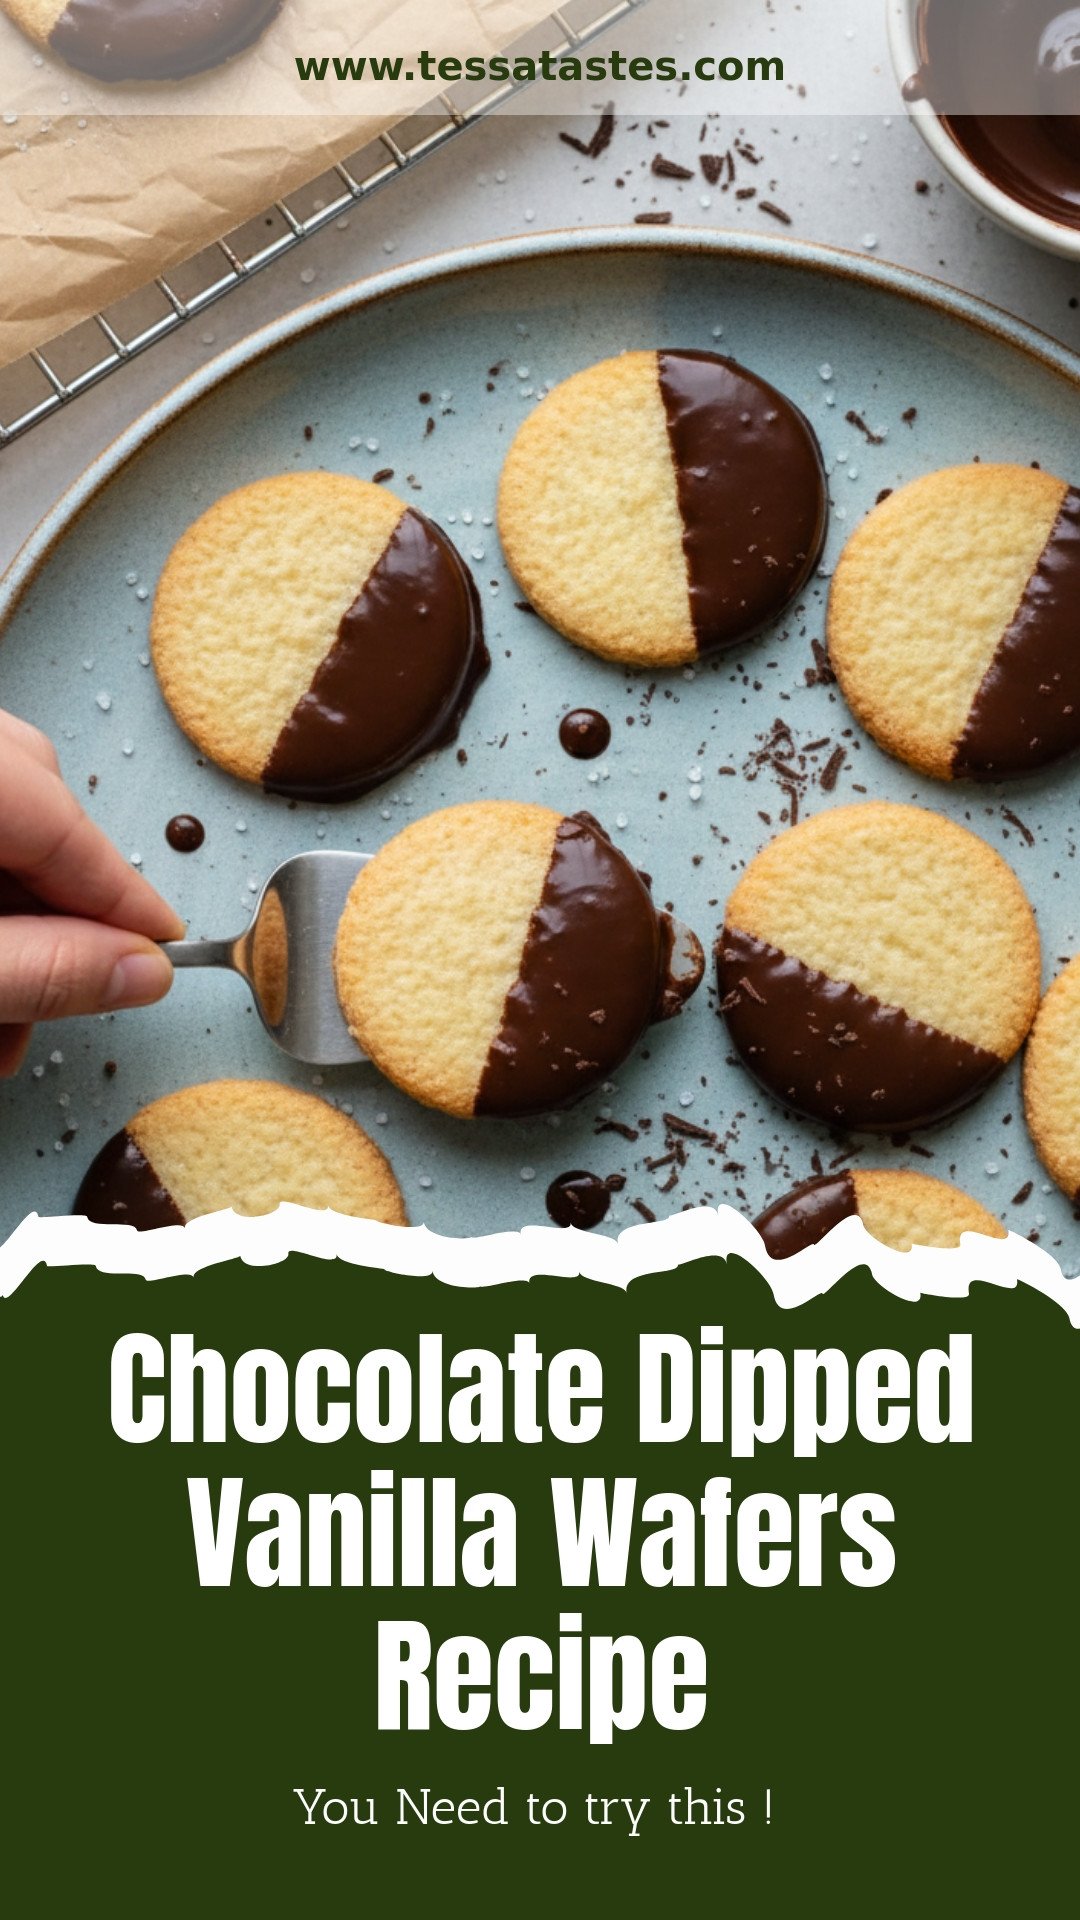
Chocolate Dipped Vanilla Wafers Recipe
Description
Experience the perfect blend of crisp, buttery vanilla cookies and rich, smooth chocolate in this simple and elegant treat.
Ingredients
Vanilla Wafers
Dipping Chocolate
Instructions
- Preheat oven to 350°F. Line a baking sheet with parchment paper.
- Whisk together flour, baking powder, and salt in a small bowl; set aside.
- Beat softened butter and granulated sugar in a large bowl until light and fluffy.
- Incorporate egg, milk, and vanilla extract into the butter mixture until fully combined.
- Gradually add dry ingredients to wet ingredients, mixing just until combined.
- Drop teaspoon-sized mounds of dough onto the baking sheet, spacing about 2 inches apart.
- Bake for 12 to 15 minutes until edges are lightly golden. Cool on sheet for 5 minutes, then transfer to wire rack to cool completely.
- Combine chopped chocolate and optional coconut oil in a microwave-safe bowl. Heat in 20-second intervals, stirring until smooth.
- Dip half of each cooled cookie into melted chocolate. Allow excess to drip off, then place on parchment to set. Refrigerate for 10 minutes to harden chocolate if desired.
Notes
- For a decorative touch, sprinkle the dipped chocolate with sea salt, sprinkles, or chopped nuts before it sets.


Leave a Reply