Chocolate Macarons Recipe and Baking Guide: Chocolate Macarons Recipe and Baking Guide
Tessa Hamound
My First Macaron Mess
My first try at macarons was funny. I was in such a rush. I didn’t let the egg whites get to room temperature. The batter was a runny puddle. I still laugh at that.
Patience matters here. Good things take a little waiting. Letting those whites warm up is key. It helps them get nice and fluffy. Your batter will be perfect.
Why We Let Them Rest
After you pipe your little circles, they must rest. Wait until they are not shiny. They should not stick to your finger. This step is very important.
This rest forms a “skin.” That skin helps them rise up, not out. It gives them those pretty little “feet.” Without it, they might crack. So take a break together.
A Little Chocolate History
Chocolate makes everything better, doesn’t it? These little cookies feel fancy. But they are just almonds, sugar, and joy. The cocoa powder is our magic dust.
Fun fact: Macarons are from Italy, not France! A chef brought them there long ago. The French made them famous, of course. I love that story.
What’s your favorite treat that feels fancy? Is it these, or maybe something else? Tell me about it.
The Gentle Fold
Mixing the dry ingredients is a gentle dance. Use a spatula and fold. Do not stir hard. You want to keep all that air in the egg whites.
The batter is ready when it flows like a ribbon. It should fall slowly from your spatula. This matters because it keeps them light. Over-mixing makes them flat. Be kind to your batter.
Making the Sandwich
The buttercream is the sweet hug in the middle. Beat the butter until it’s pale. Doesn’t that smell amazing? Add the sugar and cocoa slowly.
If it’s too thick, add a splash of milk. Pipe it onto half the cookies. Then top them to make sandwiches. Do you like a little or a lot of filling? I always go for a lot.
Share a picture if you make them! I would love to see your kitchen creations.
Ingredients:
Ingredient
Amount
Notes
Fresh egg whites
146 grams
at room temperature
Vanilla extract
1 teaspoon
Sugar
74 grams
Ground almond flour
114 grams
sifted
Powdered sugar
230 grams
sifted
Cocoa powder
15 grams
Butter, softened
4 tablespoons
for buttercream
Powdered sugar
1 cup
for buttercream
Cocoa powder
2 tablespoons
for buttercream
Milk or half and half
1-2 tablespoons
for buttercream
My Favorite Chocolate Macarons
Hello, dear! Let’s make something special today. These chocolate macarons are like little clouds. They are crisp, chewy, and filled with creamy chocolate. I learned this recipe from my friend Marie years ago. We laughed so much that first time. Our kitchen was covered in powdered sugar! But the result was pure magic. I know the steps seem fancy. But don’t you worry. We will take it nice and slow, just like she taught me. You can do this. Ready to make some magic together?
Step 1: Mise en Place
Get your pans ready first. Line two baking sheets with parchment paper. Now, fit a piping bag with a round tip. Set these aside. This is called “mise en place.” It just means getting everything ready. It makes the dancing in the kitchen much easier. Trust me on this one.
Step 2: Whip the Egg Whites
Let’s whip those egg whites! Put the whites, vanilla, and sugar in a very clean bowl. Start beating on low. Then go medium, then high. We want stiff, shiny peaks. It should look like fluffy white clouds. (A hard-learned tip: Make sure your bowl has no grease. Even a tiny bit of yolk can stop the whites from whipping up!).
Step 3: Fold in Dry Ingredients
Now, gently fold in the dry ingredients. Add the almond flour, powdered sugar, and cocoa. Use a spatula and fold gently. We want the batter to be smooth. It should flow off the spatula like a thick ribbon. This part is key. How do you know it’s ready? It should flow slowly, like lava. Share below!
Step 4: Pipe and Rest
Time to pipe! Scoop your batter into the bag. Pipe little circles onto your sheets. Now, tap the pans firmly on the counter. This gets rid of air bubbles. I still tap them like I’m telling them a secret. Let them sit for 20 to 60 minutes. They need to form a skin. They shouldn’t feel sticky when you touch them lightly.
Step 5: Bake and Cool
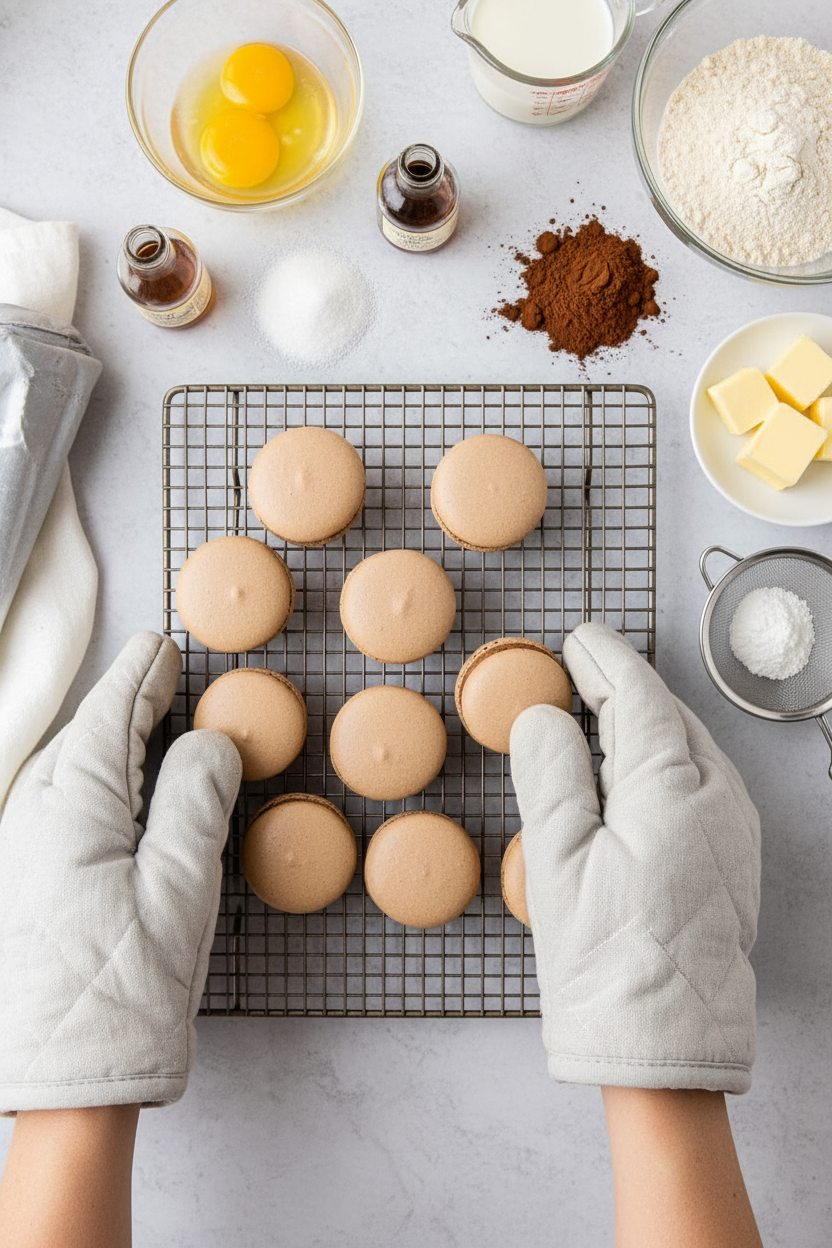
While they rest, heat your oven to 285°F. Bake them for about 21 minutes. Let them cool completely on the pan. They must be totally cool before you move them. Patience makes perfect feet! Those are the ruffly bottoms. Isn’t that a funny name?
Step 6: Fill and Assemble
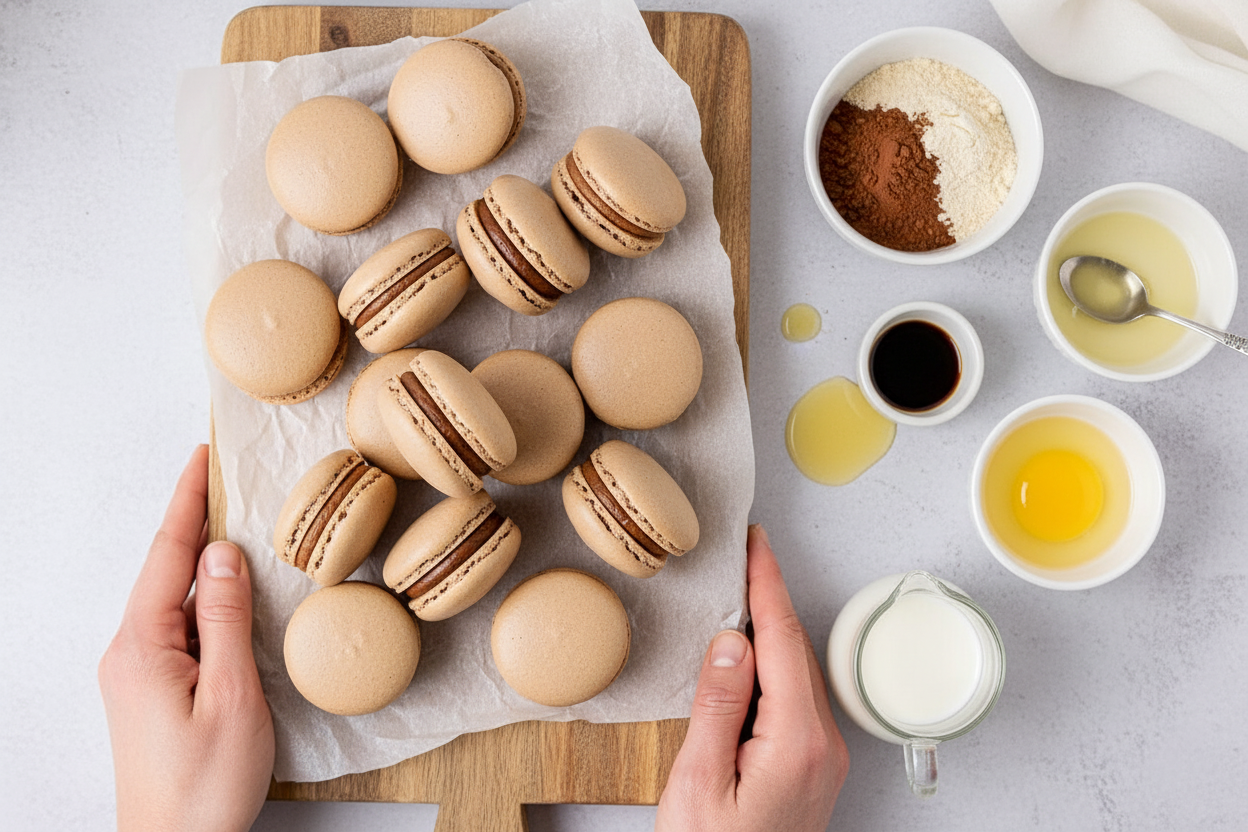
Finally, the buttercream! Beat the butter until it’s fluffy. Mix in the powdered sugar and cocoa. Add a splash of milk to make it smooth. Pipe it onto half the shells. Top with another shell to make a sandwich. Doesn’t that look wonderful? You made macarons!
Cook Time: 21–22 minutes Total Time: About 1 hour 30 minutes Yield: About 24 filled macarons Category: Dessert, Baking
Fun Twists to Try Next Time
Once you master the basic recipe, the fun begins! You can play with the flavors. Here are a few of my favorite ideas. They always make people smile at our tea parties.
Peppermint Patty: Add a drop of peppermint extract to the buttercream. It’s so fresh and wintry.
Orange Chocolate: Add a little orange zest to the shell batter. Doesn’t that sound sunny?
Cookie Dough Center: Mix mini chocolate chips into the buttercream. It tastes just like cookie dough!
Which one would you try first? Comment below!
Serving Them Up with Style
These little treats deserve a pretty plate. I love to stack them on my grandmother’s cake stand. You could also arrange them in a circle, like a flower. For a party, put each one in a tiny paper cup. They look so dainty that way.
What to drink? A cold glass of milk is always perfect. It’s a classic for a reason. For the grown-ups, a small glass of ruby port is lovely. The rich fruit flavor dances with the chocolate. Which would you choose tonight?
Chocolate Macarons Recipe and Baking Guide
Keeping Your Macarons Happy
Macarons are best eaten fresh. But sometimes you need to save them. Store them in an airtight container. They will last three days in the fridge.
You can freeze them for a month, too. Freeze the shells and filling separately. This keeps the texture perfect. Thaw them in the fridge overnight.
I once put a whole box in the freezer. I forgot about them for weeks. Finding them later felt like a sweet treasure. Batch cooking matters for little treats like this.
It means you always have something special to share. You can double the recipe easily. Just pipe and bake in batches. Have you ever tried storing it this way? Share below!
Macaron Troubles? Let’s Fix That
Macarons can be tricky. But do not worry. Here are three common fixes. First, cracked tops often mean wet batter.
Let the piped shells rest longer. They need a dry skin. I remember when mine cracked. I was too impatient to wait.
Second, no “feet” means the batter was over-mixed. Fold gently just until it flows. Getting the feet right builds your baking confidence. It shows you did the steps just so.
Third, hollow shells come from under-mixing or hot ovens. Fold a bit more next time. An oven thermometer helps a lot. This matters for the best chewy texture. Which of these problems have you run into before?
Your Quick Macaron Questions
Q: Are these gluten-free? A: Yes! Almond flour has no gluten. Just check your other labels.
Q: Can I make them ahead? A: The shells can be baked a day early. Fill them the day you serve.
Q: What if I don’t have almond flour? A: You must use almond flour. Other flours will not work the same.
Q: Can I double the recipe? A: Yes, but mix in two separate batches. It is easier to control.
Q: Any fun add-ins? A: A tiny pinch of sea salt on top is lovely. *Fun fact: Macarons were popularized by French royalty!* Which tip will you try first?
From My Kitchen to Yours
I hope you try these little chocolate clouds. Baking is about joy, not perfection. Share your creations with someone you love.
I would love to see your beautiful macarons. Your kitchen stories make my day. Have you tried this recipe? Tag us on Pinterest! You can find me at @TessasKitchenNook.
Master the art of French patisserie with these delicate Chocolate Macarons, featuring crisp shells and a rich chocolate buttercream filling.
Ingredients
For the macarons:
For the chocolate buttercream:
Instructions
Line two baking sheets with parchment or silicone liners and set aside. Prepare a large piping bag with a round tip and set aside.
Add the egg whites, vanilla, and sugar to a large clean bowl or the bowl of a stand mixer. Beat on low speed for two minutes. Increase the speed to medium and beat for an additional two minutes, until light and foamy. Increase the speed to high and beat for an additional two minutes, or until stiff peaks form.
Add the almond flour, powdered sugar, and cocoa powder to the egg white mixture. Fold in gently with a spatula, scraping the sides as you go, until the batter is smooth and falls from the spatula in a ribbon. Be careful not to over mix.
Scoop the batter into the prepared piping bag, then pipe it onto the prepared baking sheets, making 1 1/2 inch circles. Tap the baking sheets on the counter gently several times to release air bubbles, and use a toothpick to smooth any bubbles out.
Let the macarons rest for 20-60 minutes, until they are no longer shiny on top and don’t stick to your finger when touched lightly. While the macarons are resting, preheat the oven to 285°F (140°C).
After the macarons have rested, bake for 21-22 minutes in the preheated oven. Let them cool completely before removing from the baking sheet.
To make the buttercream, beat the butter until light and fluffy. Add the powdered sugar, cocoa powder, and 1 tablespoon milk, and mix until smooth. Add additional milk if needed to reach a smooth consistency. Beat on high until light and fluffy. Scoop the buttercream into a piping bag, and snip off the end. Pipe onto half of the macarons, then top with another macaron to make a sandwich.
Notes
Ensure all your equipment is completely grease-free for the meringue to whip properly. Letting the piped macarons rest to form a skin is crucial for the classic ‘feet’ to develop. Store filled macarons in an airtight container in the refrigerator for up to 3 days.
Tessa Hamond is an inventive home cook who believes in the beauty of food stories. From easy weeknight dinners to indulgent desserts, she blends fresh ingredients, heartfelt flavor, and creative presentation so each dish delights both eye and palate. Follow for recipes that are approachable yet artful, kitchen tips to simplify your routine, and food styling inspiration that turns every meal into a celebration.


Leave a Reply