Kitchen Magic with Onion Skins
Hello, dear. Come sit at my table. Let’s talk about Easter eggs. We will make them beautiful. But we won’t use a store kit. We will use onion skins from your grocery bag. Doesn’t that sound clever? The color comes from nature itself. I love that.
My own grandma taught me this. She never wasted a thing. She saved every papery onion peel. Her eggs looked like warm, polished wood. I still smile thinking of her hands at work. This matters because it connects us to the past. It is a gentle, slow kind of fun.
A Little Story & A Fun Fact
One year, my grandson helped me. He chose dill from the garden for the eggs. He was so careful placing each sprig. When we unwrapped them, he gasped. The ferny patterns were perfect! He said it was like a secret message from the plant.
*Fun fact: The yellow and red colors in onion skins are called flavonoids. They are good for you! But today, they are just good for making pretty eggs. Did you ever think an onion could be so pretty?
Why This Old Way Matters
This is more than just coloring eggs. It is a small adventure. You watch plain water turn into a rich, tea-like dye. You see the surprise pattern under the stocking. This matters because it teaches patience. Good things take a little time.
It also makes you look at scraps differently. Onion skins, old nylons, garden herbs. They are not trash. They are art supplies! What kitchen scrap do you think is beautiful? Tell me, I’d love to know.
Let’s Make Some Eggs
First, boil those onion skins. Your kitchen will smell sweet and earthy. Doesn’t that smell amazing? Add the salt. It helps the color stick to the eggshell. Now, get your eggs ready. Room-temperature eggs are best. They won’t crack in the hot water.
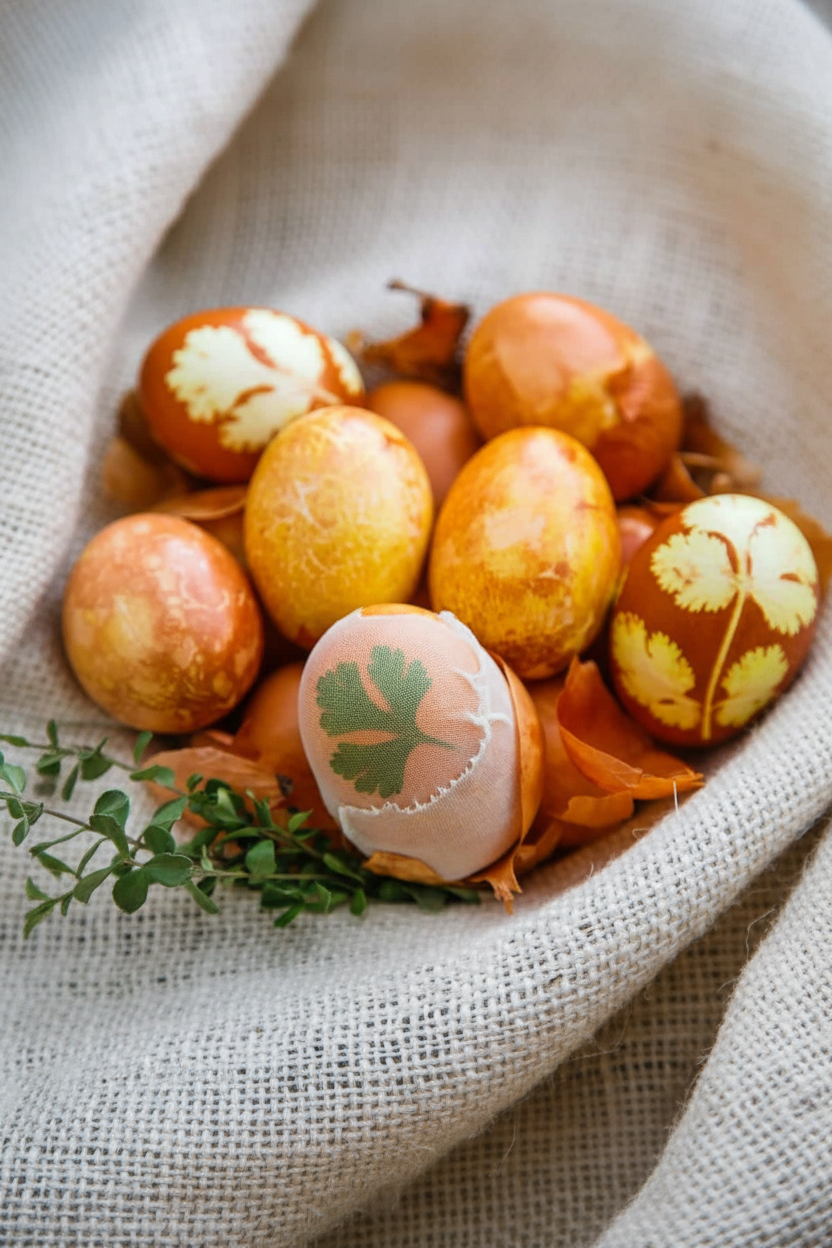
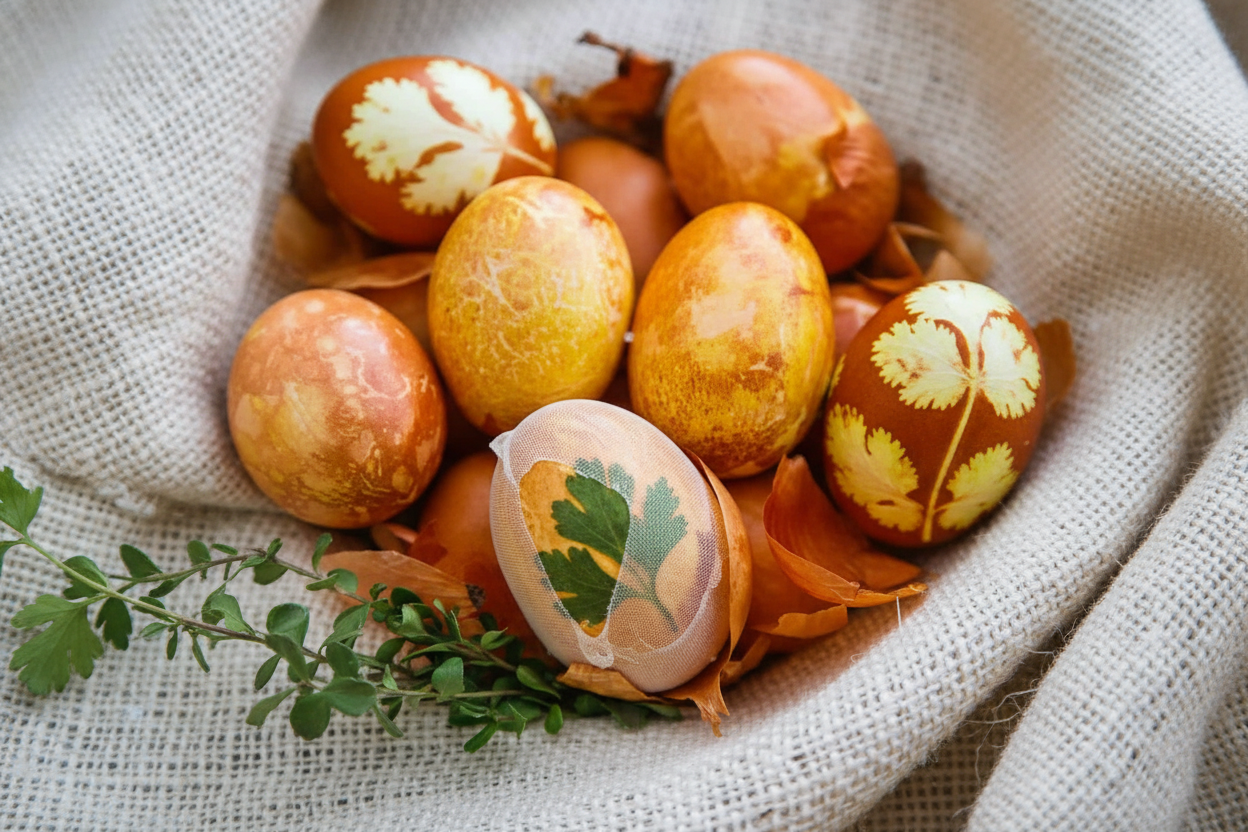
You can make three kinds. Herb patterns need nylons to hold the leaves flat. Marbled eggs are wrapped in onion skins. For solid colors, just let the eggs swim free in the pot! Which method will you try first?
The Big Reveal & A Shiny Finish
After ten minutes, take the eggs out. Let them cool. This is the hard part—waiting! Then, snip the stocking away. Wipe off the herbs. Oh, the reveal is the best part. Every egg is a unique little wonder.
Finally, make them shine. Just a dab of oil on a paper towel. Rub it gently all over each egg. They will glow like little gems. Will you display them in a bowl or hide them for a hunt? Share a picture if you can!
Ingredients:
| Ingredient | Amount | Notes |
|---|---|---|
| Nylon stockings, or foil | 1 pair | For wrapping the eggs |
| Fresh herbs (parsley, cilantro, etc.) | A few sprigs | For creating patterns on the eggs |
| White eggs | 12 | Room temperature* |
| Yellow onion peels | About 1/2 of a plastic grocery bag | For creating the natural dye |
| Salt | 1/2 Tbsp |
My Onion-Skin Easter Eggs: A Story in Every Shell
Hello, my dear! Let’s make something magical. We’ll use onion skins from the pantry. My own grandma taught me this. She called them “wood eggs.” Doesn’t that sound lovely? You gather the papery skins from yellow onions. Save them in a bag. I still laugh at that. My husband thought I was saving trash!
This is slower than a store-bought kit. But it tells a story. You’ll see. The color comes from simple, earthy things. It feels like a little kitchen secret. Your eggs will look like old treasure. Ready? Let’s begin our gentle boil.
- Step 1: First, fill a medium pot one-third full with water. Add most of your onion skins. Turn the heat to high. Let it boil for ten minutes. Watch the water turn a deep, rusty orange. It smells like a warm soup. Now, stir in that half tablespoon of salt. (Hard-learned tip: The salt helps the color stick better to the shell!)
- Step 2: While your dye simmers, prep your eggs. For herb patterns, press a small sprig flat on a dry egg. A parsley leaf is perfect. Then, take one leg of the nylon stocking. Gently stretch it over your hand. Place the egg in your palm. Carefully pull the nylon up and over the egg. Twist the end tight like a candy wrapper. Tie it with string. It’s a funny little bundle.
- Step 3: Time for the bath! Lower your bundled eggs into the pot. Make sure they are covered by the colored water. Let them boil for ten minutes. I use a spoon to roll them sometimes. This gives a more even color. Then, turn off the heat. Let everything cool right in the pot. Patience is key here.
- Step 4: Once they are cool, snip the stockings off. Wipe away the herbs with a damp paper towel. You’ll see the pale leaf print left behind. It always feels like a surprise. For shiny eggs, add the last touch. Put a tiny bit of oil on a paper towel. Gently rub each egg. They will glow! What herb would you use for your print? Share below!
Cook Time: About 30 minutes
Total Time: About 1 hour (with cooling)
Yield: 12 eggs
Category: Holiday, Crafts
Three Fun Twists on Our Wood Eggs
Once you know the basic way, you can play! Here are my favorite ideas. They make each batch a new adventure. Try one this year.
- The Confetti Egg: Use tiny flower petals instead of big herbs. Dandelions or violets work beautifully.
- The Two-Tone Egg: Boil an egg for a light color first. Then, add a herb and stocking for a second, shorter boil.
- The Speckled Egg: After drying, flick a wet toothbrush with brown watercolor paint. It makes sweet little specks.
Which one would you try first? Comment below!
Sharing Your Beautiful Creations
These eggs are too pretty to hide! Arrange them in a rustic bowl with some wheat grass. Or nestle them in a basket of brown paper shred. They become a centerpiece all on their own. For your Easter meal, they are wonderful.
Serve them with a simple spring salad. Add some salty ham and fresh bread. For a drink, I love iced mint tea with lemon. It’s so refreshing. My brother always prefers a light cider. It tastes like apples and sunshine. Which would you choose tonight?
Keeping Your Beautiful Eggs Safe and Sound
Let’s talk about storing these pretty eggs. First, let them cool completely. Then, pop them in the fridge. They will stay fresh for about one week. Do not freeze your hard-boiled eggs. The freezer makes the whites tough and rubbery.
I like to make a big batch for Easter morning. It saves so much time. I remember my first time. I left them on the counter all night. What a sad, spoiled breakfast that was!
Storing them right matters. It keeps your family safe from germs. It also makes your holiday morning calm and happy. You can focus on family, not fussing in the kitchen.
Have you ever tried storing them this way? Share below!
Little Troubles and Easy Fixes
Sometimes, pretty eggs can have little problems. First, the color looks too light. Just boil them a few minutes longer. The onion dye gets darker with time.
Second, the herb patterns might be blurry. This happens if the stocking is too loose. I once used a big, old stocking. The parsley slid right off the egg! Pull the nylon very snug.
Third, the eggs might crack while boiling. Always start with room-temperature eggs. Adding salt to the water helps, too. Fixing these small issues builds your confidence. You learn that mistakes are just part of cooking. It also makes sure your eggs look as lovely as they taste.
Which of these problems have you run into before?
Your Quick Questions, Answered
Q: Is this recipe gluten-free?
A: Yes, it is naturally gluten-free. All the ingredients are safe.
Q: Can I make the dye ahead?
A: You can boil the onion skins a day early. Just keep the colored water in the fridge.
Q: What if I don’t have fresh herbs?
A: Try leaves from your yard! Clean, flat leaves like spinach work well. *Fun fact: People have used plants to dye cloth for thousands of years!
Q: Can I double the recipe?
A: Absolutely. Just use a bigger pot. Make sure the water still covers all the eggs.
Q: Is the oil shine necessary?
A: No, but it makes the colors glow. It gives them a lovely, gentle shine.
Which tip will you try first?
Wrapping Up From My Kitchen
I hope you have fun with this old-fashioned project. It connects us to simpler times. Every egg tells a little story of your effort.
I would love to see your creations. Your marbled eggs or herb prints will be beautiful. Sharing our results makes the kitchen feel friendlier.
Have you tried this recipe? Tag us on Pinterest! I can’t wait to see your family’s colorful eggs. Happy cooking!
—Tessa Hammond.
Dye Easter Eggs Naturally With Onion Skins
Description
Create beautifully dyed Easter eggs using natural onion skins for a woodsy, marbled, or herb-patterned look.
Ingredients
Instructions
- Make Natural Easter Egg Dye with Onion Peels: Fill a medium pot with 2/3 of the onion peels and add water until it’s about 1/3 full. Boil for 10 minutes to allow the onion to release its color, then add 1/2 Tbsp salt. While this is cooking, start prepping your eggs.
- Method #1: Herb Patterns: Wrap cilantro, parsley, or whatever herbs you wish to use around the egg. Pull the stocking over one hand and place the egg over it. Grab hold of the egg with your stocking hand and wrap your fingers around it, being careful to keep the herbs from folding or wrinkling. Invert the stocking over the egg, then tighten and twist at the base. The stocking should wrap snugly around the egg to keep the herbs in place. *Note: foil does not hold herbs well enough; if you want the herb prints, you NEED nylons. Tie a string around the base to secure the stocking. Boil for 10 minutes making sure the eggs are fully submerged. Then, remove them from the water, and let them cool until they are at a safe temperature to handle. Then use scissors to cut away the stocking. Wipe away herb remains with a paper towel.
- Method #2: Marbelized Eggs: Wrap each egg with enough onion peels to cover the surface; there should be no white showing. Cover with a stocking and secure as instructed above, or wrap in foil to keep the onion peel in place. Boil the eggs for 10 minutes, keeping them completely submerged, then remove. Once cool enough to handle, cut away stocking, or remove foil if using.
- Method #3: Solid Woodsy Colors: Put the eggs into the pot directly with the onion peel; no pantyhose/foil are required! Cook for 10 minutes (or longer if you want a darker tone).
- Making the Eggs Shiny: Pour some oil on a paper towel and rub the eggs with it.
Notes
- Nutrition Per Serving: Calories: 63, Total Fat: 4g, Saturated Fat: 1g, Trans Fat: 0.02g, Polyunsaturated Fat: 1g, Monounsaturated Fat: 2g, Cholesterol: 164mg, Sodium: 353mg, Potassium: 61mg, Total Carbohydrates: 0.3g, Sugar: 0.2g, Protein: 6g, Vitamin A: 238IU, Calcium: 25mg, Iron: 1mg


Leave a Reply