My First Doughnut Disaster
Let me tell you about my first time making doughnuts. I was so excited. I forgot to let the dough rise. I fried them right away.
They were like little hockey pucks. We could not eat them. My dog wouldn’t even try one. I still laugh at that. It taught me a big lesson. Good things need a little patience. That’s why letting the dough rise matters so much. It makes them soft and fluffy.
Making Your Dough
Start with your warm milk. It should feel cozy on your wrist. Not hot. Add your eggs, sugar, and that lovely vanilla. Doesn’t that smell amazing already?
Now, the yeast and flour go in. Let your mixer do the hard work. It will look messy at first. Then it becomes a smooth, soft ball. This kneading matters. It makes the dough strong enough to hold all those air bubbles. That’s what gives you a light doughnut.
The Magic of Waiting
Cover the bowl with a clean towel. Find a warm spot for it. Let it sit. This is the hardest part. Go read a book or play outside.
Come back in an hour or two. You will be so surprised. The dough will be twice as big. Poke it gently. It will sigh. This waiting time is not empty. It is full of tiny, invisible life. The yeast is having a party in there. Fun fact: That’s why we call it “proofing” the dough. We are proving the yeast is alive and working!
Frying Fun
Now, the exciting part. Heat your oil carefully. You want it just right. A little piece of dough should sizzle gently when you drop it in.
Fry just two or three at a time. Do not crowd the pot. Watch them turn a beautiful golden brown. Flip them with tongs. Let them drain on paper towels. What was your favorite smell as a kid? For me, it’s always been frying doughnuts.
The Chocolate Dip
While they cool a bit, make the glaze. Melt the chocolate and butter together. Go slow. Stir, stir, stir. I like to use a double boiler. It feels old-fashioned.
Then whisk in the cream until it’s shiny. Dip the top of each warm doughnut right in. Let the extra drip off. Place them on a rack. The glaze will set into a perfect, crackly shell. Do you prefer milk chocolate or dark chocolate for dipping? I love hearing people’s favorites.
Ingredients:
| Ingredient | Amount | Notes |
|---|---|---|
| all-purpose flour or 1:1 gluten-free flour | 4 ¾ cups | plus ~½ cup extra for rolling |
| instant yeast | 2 ¼ tsp (1 packet) | |
| large eggs | 2 | |
| butter | 8 tbsp | melted & cooled |
| warm milk | 1 ⅓ cups | ≤110°F |
| sugar | ⅓ cup | |
| salt | 1 tsp | |
| vanilla bean paste or extract | 2 tsp | |
| Canola or vegetable oil | as needed | for frying |
| Parchment paper | as needed | cut into ~5” squares |
| semi-sweet or milk chocolate chips | 1 cup | |
| butter | 4 tbsp | |
| vanilla extract | ½ tsp | |
| heavy cream | ¾ –1 ¼ cups | adjust as needed |
My Favorite Saturday Morning Doughnuts
Good morning, my dear. Isn’t it a lovely day for a project? I love making these doughnuts on a slow Saturday. The whole house fills with a warm, sweet smell. It reminds me of my own grandma’s kitchen. She always had a plate of something warm waiting. Let’s make some memories together, shall we?
This recipe is easier than it looks. I promise. The yeast does most of the work for you. You just need to be a little patient. I still laugh at my first batch. I was so impatient, I fried them too soon. They were like little hockey pucks! So let’s take our time. Ready?
Step 1: First, let’s wake up the yeast. In your mixer bowl, combine the warm milk, eggs, sugar, vanilla, and melted butter. Give it a quick mix. It should look a bit creamy. Now add the yeast, flour, and salt. (Hard-learned tip: Make sure your milk is just warm, not hot. Hot milk will put the yeast right back to sleep!). Mix on low, then let the mixer run for about 8 minutes. The dough will become smooth and pull away from the sides.
Step 2: Now, cover the bowl with a clean towel. Find a cozy spot for it to rest. Let it sit until it doubles in size. This can take a few hours. I use this time to tidy up or read a book. What’s your favorite thing to do while you wait? Share below! When the dough is big and puffy, it’s time to play.
Step 3: Cut your parchment paper into little squares. Roll the dough out on a floured surface. Aim for about half an inch thick. Use a glass or a round cutter to cut out your doughnuts. A bottle cap is perfect for the holes! Place each one on a parchment square. Cover them again and let them get puffy. This takes about 30 to 60 minutes.
Step 4: Time to fry! Heat about 3 inches of oil in a heavy pot. You want it to reach 350°F. Carefully lower 2 or 3 doughnuts into the oil. Fry for 2-3 minutes per side until golden brown. They will float. Doesn’t that smell amazing? Drain them on paper towels. Let them cool just a bit before glazing.
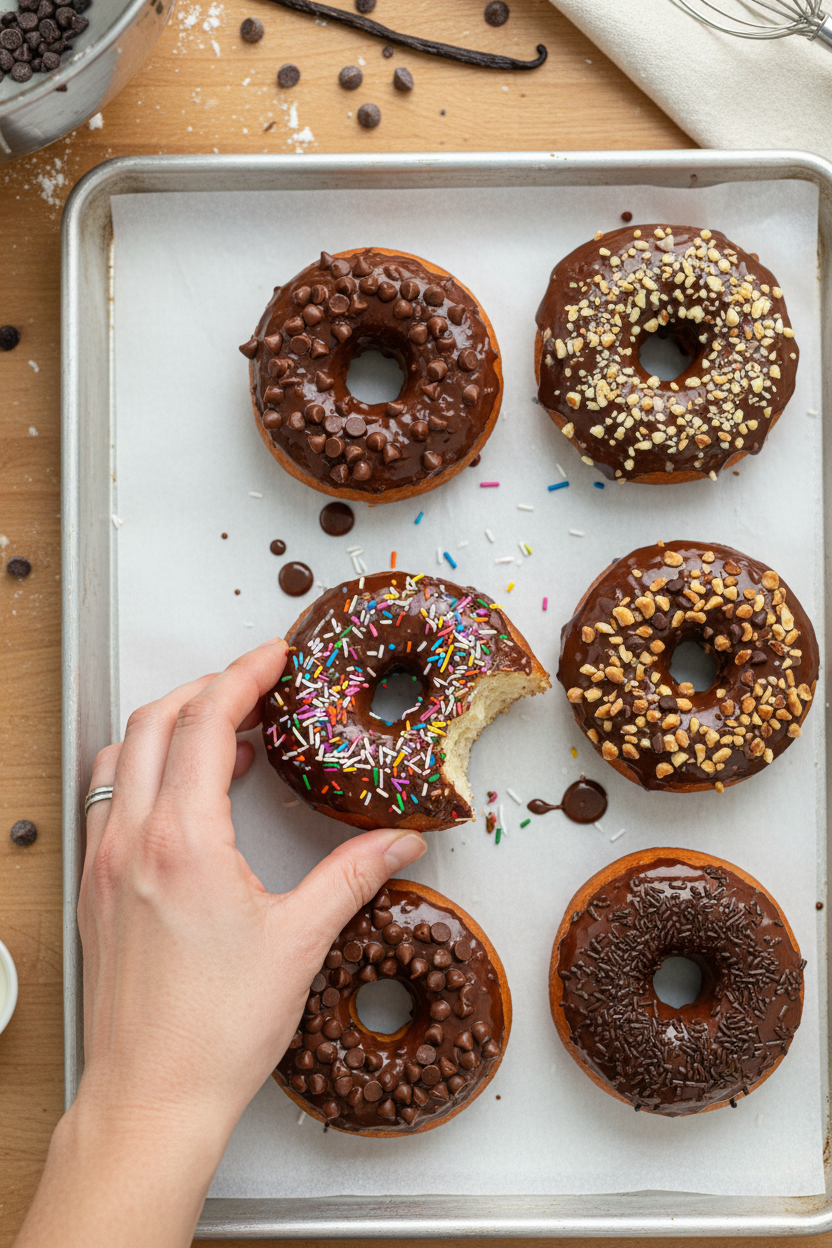
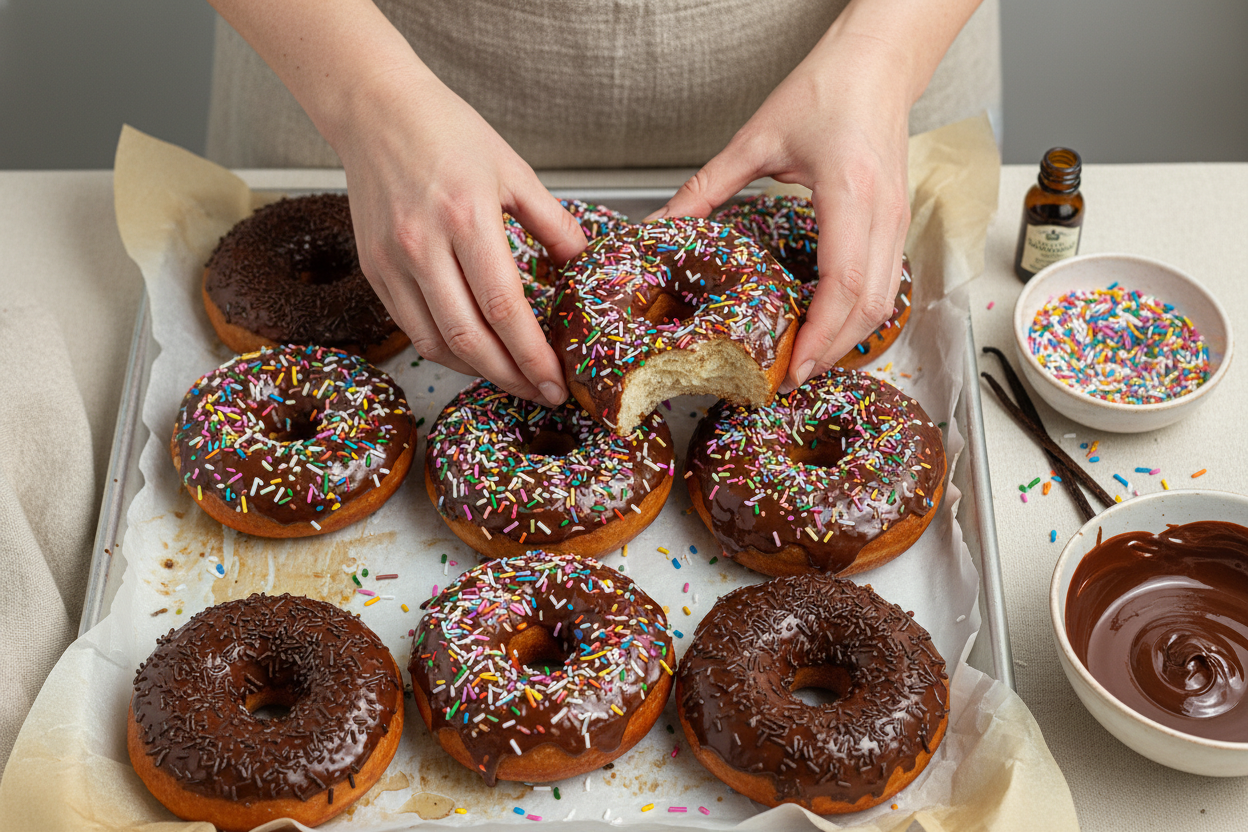
Step 5: For the glaze, melt the chocolate and butter together. You can use a double boiler or the microwave. Be very gentle. Chocolate burns so easily. Whisk in the vanilla. Then, slowly stir in the heavy cream until it’s shiny and perfect. Dip the top of each warm doughnut right into the glaze. Let the extra drip off. Place them on a rack to set. Then, enjoy your beautiful, homemade treat!
Cook Time: 20–30 minutes active, 3–4 hours rising
Total Time: About 4 hours
Yield: About 12–15 doughnuts
Category: Breakfast, Dessert
Let’s Get Creative!
The fun doesn’t stop with chocolate glaze. Oh no. Once you have the basic dough, you can do anything. Here are a few of my favorite twists. They always make people smile.
Cinnamon Sugar Sparkle: Skip the glaze. While the doughnuts are still hot, roll them in a mix of cinnamon and sugar. Simple and classic.
Berry Happy Glaze: Mash a few raspberries or strawberries. Mix the juice into a simple powdered sugar glaze. It turns a lovely pink.
Peanut Butter Cup Dream: Add a spoonful of peanut butter to the chocolate glaze. Drizzle it over the top. It’s my grandson’s absolute favorite.
Which one would you try first? Comment below!
Serving Them Up Right
These doughnuts are best shared fresh and warm. I like to pile them high on a big platter. Everyone can just help themselves. For a special touch, sprinkle a few rainbow sprinkles on the wet glaze. Or, add a tiny pinch of sea salt on top of the chocolate. It makes the flavor pop.
What to drink? A tall, cold glass of milk is always perfect. It just goes together. For the grown-ups, a hot cup of strong black coffee is wonderful. The bitter coffee and sweet doughnut are a perfect match.
Which would you choose tonight? A cold milk or a hot coffee? I think I’d have one of each.
Keeping Your Doughnuts Fresh and Happy
These doughnuts are best eaten the day you make them. But I know life gets busy. Let them cool completely first. Then store them in a single layer in a container. They will keep for two days at room temperature.
You can freeze them for later, too. Freeze the unglazed doughnuts on a tray. Once solid, pop them into a freezer bag. They will keep for a month. I once froze a whole batch for my grandson’s surprise visit. He was so thrilled!
To reheat, warm frozen doughnuts in a 300°F oven for 10 minutes. Then dip them in the warm glaze. Batch cooking matters. It means a sweet treat is always ready for friends or a cozy morning. Have you ever tried storing it this way? Share below!
Doughnut Troubles? Here Are My Fixes
Is your dough too sticky? Do not panic. Just add a little extra flour. Sprinkle it on while kneading. The dough should pull away from the bowl’s sides. I remember when my dough was like glue. A bit more flour fixed it perfectly.
Are your doughnuts oily? Your oil is likely too cool. Use a thermometer. Keep it at 350°F. This matters for taste. A proper fry gives a crisp outside and a soft, fluffy inside. No one likes a greasy doughnut.
Is your glaze too thick or thin? Start with ¾ cup of cream. Add more slowly until it drips nicely. *Fun fact: Chocolate can “seize” or get lumpy if water gets in the bowl.* Fixing small problems builds your cooking confidence. Which of these problems have you run into before?
Your Doughnut Questions, Answered
Q: Can I make these gluten-free? A: Yes! Use the gluten-free flour blend listed. You may need a bit extra for rolling.
Q: Can I make the dough ahead? A: You can let it rise slowly in the fridge overnight. Shape them in the morning.
Q: What if I don’t have vanilla bean paste? A: Regular vanilla extract works just as well. Use the same amount.
Q: Can I make a half batch? A: Absolutely. Just halve all the ingredients. It’s perfect for a smaller family.
Q: Any optional tips? A: Try adding a pinch of cinnamon to the dough. It adds a lovely warmth. Which tip will you try first?
From My Kitchen to Yours
I hope you love making these doughnuts. The smell of them frying is pure joy. It reminds me of my own grandmother’s kitchen. I would love to see your creations.
Share a photo of your glazed, beautiful doughnuts. It makes my day to see you baking. Have you tried this recipe? Tag us on Pinterest! Thank you for spending time in the kitchen with me.
Happy cooking!
—Tessa Hammond.
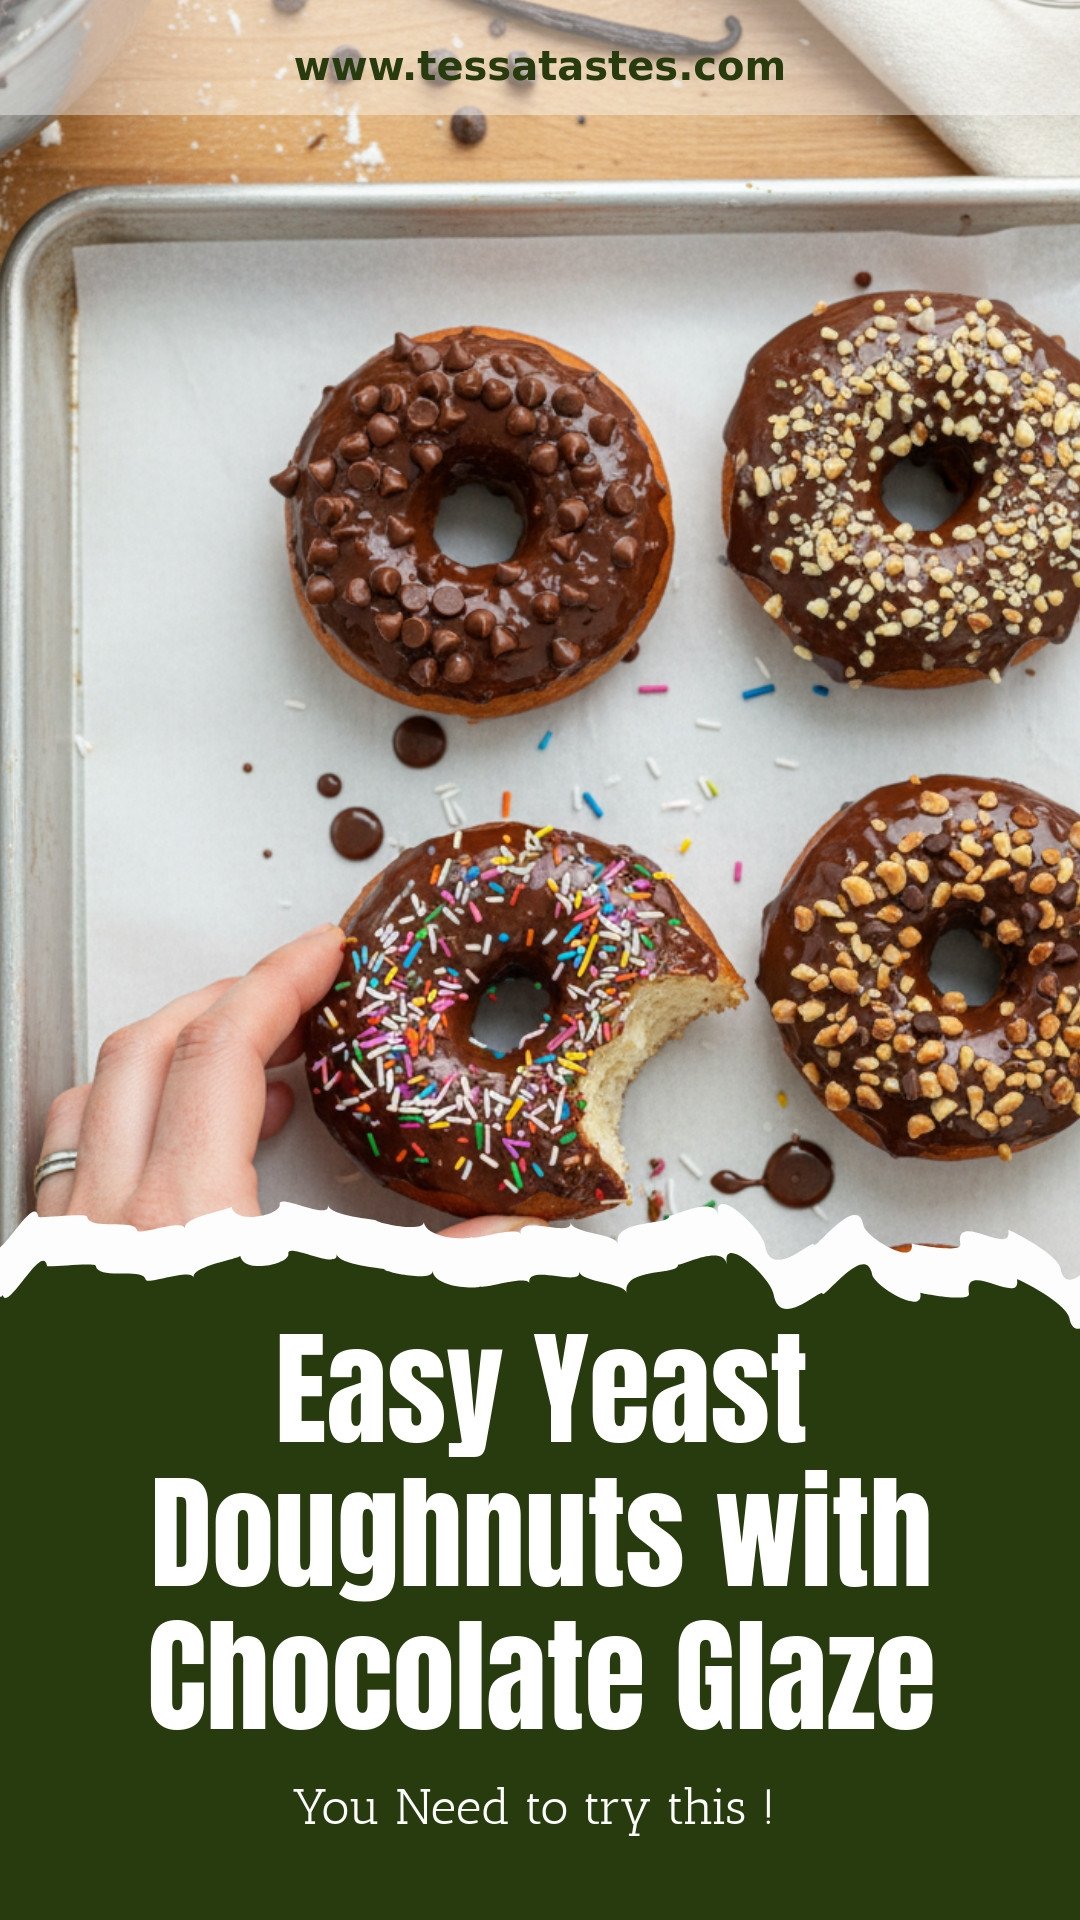
Easy Yeast Doughnuts with Chocolate Glaze
Description
Light and fluffy homemade yeast doughnuts, fried to golden perfection and dipped in a rich, silky chocolate glaze.
Ingredients
Chocolate Glaze:
Instructions
- Make the Dough: In stand mixer bowl, combine warm milk, eggs, sugar, vanilla, and melted butter. Mix briefly. Add yeast, flour, and salt. Mix on low, then on speed 3 for 7–9 minutes until dough pulls away but stays slightly sticky. Cover and let rise until doubled, 1–3 hours.
- Shape the Doughnuts: Cut parchment into 5” squares and set on baking sheets. Roll out dough ½” thick, cut rounds with 3” cutter and centers with 1” cutter. Place on parchment. Cover and let rise 30–60 minutes until puffed.
- Fry the Doughnuts: Heat 3” oil in Dutch oven/skillet to 350°F. Fry 2–3 doughnuts at a time, 2–3 minutes per side. Drain on paper towels.
- Make the Chocolate Glaze: Double Boiler Method: Fill saucepan with 1–2” water, bring to simmer. Place heat-safe bowl on top (do not let it touch water). Add chocolate + butter, stirring until smooth. Microwave Method: Place chocolate + butter in microwave-safe bowl. Heat in 20-second intervals, stirring each time. Do not overheat. Whisk in vanilla. Slowly add cream until glaze is glossy.
- Dip & Finish: Let doughnuts cool ~5 minutes. Dip tops into glaze. Place on rack over parchment to set.
Notes
- For best results, ensure your milk is warm but not hot (≤110°F) to avoid killing the yeast. The dough should be slightly sticky; avoid adding too much extra flour. Maintain oil temperature for even frying.


Leave a Reply