My Apple Picking Adventure
I got the apples for this crisp at a farm. It was a sunny, cool day. The trees were heavy with red fruit.
I reached for a high one and got a little shower of leaves. I still laugh at that. The apples smelled sweet and fresh right off the branch. Using fruit you pick yourself just feels special.
Why We Make a Topping First
You mix the topping before the apples. This seems backwards, right? But it’s a smart trick. It lets the flavors in the topping get to know each other.
It also means your hands are clean for coating the apples. You won’t get sticky oat bits in your apple bowl! *Fun fact*: The crumbly topping is called a “streusel.” It’s a fun word to say.
The Heart of the Crisp
Now, the apples. Toss them gently with the syrup and spices. Doesn’t that smell amazing? Cinnamon and apples are best friends.
The lemon juice is my secret. It keeps the apples from turning brown. It also adds a tiny bright taste. This matters because food should be a joy for your eyes and your tongue.
Baking Time is Story Time
While it bakes, the kitchen fills with warmth. That’s when I usually call my grandkids. I tell them about the farm.
Watch for bubbles around the edges. That means it’s ready. Let it cool just a bit before serving. This matters because patience makes the first bite even sweeter. What’s your favorite thing to do while you wait for dessert to bake?
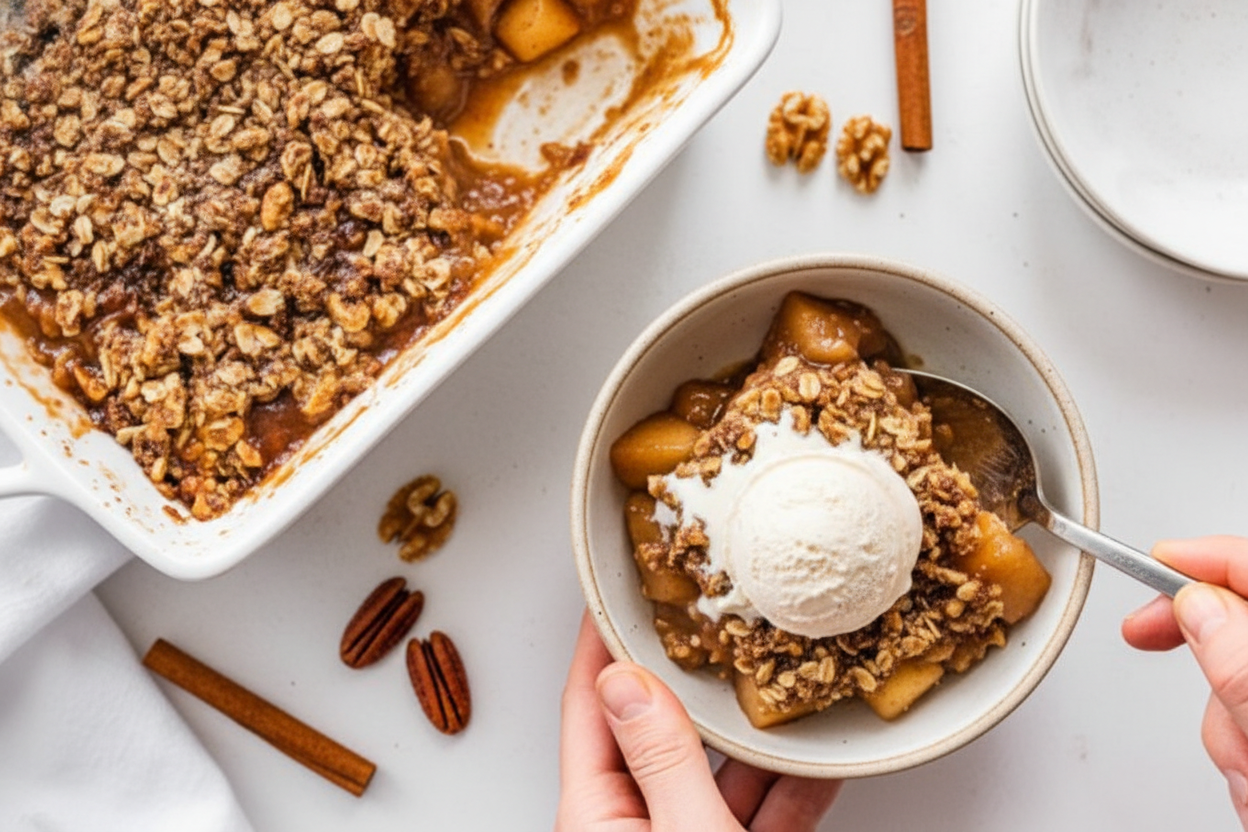
Serving Up Smiles
Serve it warm. A little scoop of vanilla ice cream on top is perfect. The cold cream melts into the hot crisp.
This isn’t just a dessert. It’s a hug in a bowl. It’s made with simple, good things. Do you like yours with ice cream or whipped cream? Tell me your favorite way.
Your Turn in the Kitchen
You can make this your own. Try using pears instead of apples. Or use walnuts if you don’t have pecans.
Cooking is about sharing. It’s about making memories. What’s a food memory that always makes you smile? I’d love to hear it.
Ingredients:
| Ingredient | Amount | Notes |
|---|---|---|
| apples, peeled (or unpeeled) and thinly sliced | 6 cups (about 6 medium) | |
| pure maple syrup | ¼ cup | |
| lemon juice | 1 Tablespoon | |
| arrowroot powder | 1 Tablespoon | or cornstarch |
| ground cinnamon | 1 teaspoon | |
| ground nutmeg | ⅛ teaspoon | |
| sea salt | ⅛ teaspoon | |
| Topping | ||
| coconut sugar | 1 cup | |
| old-fashioned rolled oats | 1 cup | gluten-free, if needed |
| almond flour | ½ cup | |
| chopped pecans or walnuts | ½ cup | |
| coconut oil | ½ cup | not melted |
My Cozy Apple Crisp: A Bowl of Autumn Sunshine
Hello, my dear! Come sit a spell. The air is getting crisp, just like our apples should be. I love this time of year. My kitchen smells of cinnamon and warm fruit.
This apple crisp is my go-to happy dessert. It feels like a hug in a bowl. We use maple syrup for sweetness, just like my grandpa tapped from his trees. Doesn’t that smell amazing already? Let’s make some memories together.
Step 1: First, turn your oven to 350°F. Let it get nice and warm. Now, make the crunchy topping. Mix the coconut sugar, oats, almond flour, and nuts in a bowl. Add the coconut oil. Use your fingers to mix it! It should look like crumbly sand. (A hard-learned tip: Keep that coconut oil solid. Melted oil makes a soggy topping, trust me!).
Step 2: Time for the apples! Peel them if you like. I sometimes leave the skins on for extra goodness. Slice them thin. Toss them in a big bowl with everything else. The lemon juice keeps them bright. The cinnamon makes it all sing. I still laugh at how I once used a whole tablespoon of nutmeg. What a spicy surprise that was!
Step 3: Pour your saucy apples into a greased dish. A pie pan or square dish works perfectly. Now, take that crumbly topping. Sprinkle it all over the apples. Don’t press it down. We want it light and fluffy. Do you like your topping extra thick or nice and even? Share below!
Step 4: Bake it for about 45 minutes. Oh, the waiting is the hardest part! Check it at 30 minutes. If the top gets too dark, just lay a piece of foil over it. It’s done when the filling bubbles and the top is golden. Let it cool for just a few minutes. Then, dig in!
Cook Time: 45–50 minutes
Total Time: 1 hour
Yield: 6 servings
Category: Dessert
Three Tasty Twists on Our Classic
This recipe is like a favorite sweater. You can dress it up for any occasion! Here are three fun ways to change it.
The Berry Burst: Swap two cups of apples for frozen blueberries or raspberries. You’ll get a beautiful, juicy purple filling.
The Ginger Snap: Add a teaspoon of grated fresh ginger to the apples. It gives a lovely little zing that makes you smile.
The Chocolate Dream: Stir a handful of dark chocolate chips into the topping. They get all melty and wonderful. Which one would you try first? Comment below!
Serving It Up With Style
A warm scoop of this crisp is perfect on its own. But let’s make it special. Top it with a dollop of vanilla ice cream. Watch it melt into the cracks. You could also use a fluffy cloud of whipped coconut cream.
What to drink? A cold glass of apple cider is just right. For the grown-ups, a small glass of sweet sherry pairs beautifully. It tastes like a fall evening. Which would you choose tonight?

Keeping Your Apple Crisp Cozy
Let’s talk about keeping your crisp delicious for days. First, let it cool completely. Then cover it tightly. It will be happy on the counter for two days. For longer stays, the fridge is best for up to five days.
You can freeze it before or after baking. Just wrap the dish well. I once froze a baked crisp for a surprise visit. My grandson loved it warmed up! Reheat slices in the oven at 300°F. This keeps the topping crisp.
Batch cooking is a wonderful trick. Make a double batch of topping. Store the extra in your freezer. This makes a future dessert so fast. Having easy, healthy treats ready matters. It brings sweet comfort on busy days. Have you ever tried storing it this way? Share below!
Simple Fixes for Common Crisp Troubles
Is your topping too dry? The coconut oil should be solid, not melted. I remember when mine was oily. I used melted oil by mistake. A solid fat makes perfect crumbs. This matters for that lovely, crumbly texture we all love.
Are the apples too watery? Toss them well with the arrowroot. This powder thickens the juices as it bakes. No one likes a soupy bottom! Is the top browning too fast? Just lay a piece of foil over it. This stops the burning but lets it cook.
Fixing small problems builds your cooking confidence. You learn how ingredients work together. Then you can make any recipe your own. Which of these problems have you run into before?
Your Apple Crisp Questions, Answered
Q: Can I make this gluten-free? A: Yes! Just use certified gluten-free oats. The almond flour is naturally gluten-free.
Q: Can I make it ahead? A: Absolutely. Assemble it the night before. Keep it covered in the fridge. Bake it the next day.
Q: What are easy ingredient swaps? A: Use cornstarch for arrowroot. Try brown sugar for coconut sugar. Any baking apple works well.
Q: Can I double the recipe? A: You can! Use a 9×13 inch baking dish. You may need a few extra minutes to bake.
Q: Any optional tips? A: A pinch of ginger is lovely. *Fun fact: Adding oats to crisps became popular during World War II when flour was rationed.* Which tip will you try first?
From My Kitchen to Yours
I hope you enjoy making this cozy dessert. It always makes my kitchen smell like happiness. I would love to see your creation. Share a photo of your family enjoying it.
Your stories and twists on recipes inspire me. Let’s keep sharing the simple, good things. Have you tried this recipe? Tag us on Pinterest!
Happy cooking! —Tessa Hammond.

Healthy Apple Crisp: Healthy Apple Crisp Recipe Easy Homemade Dessert
Description
Enjoy a classic, comforting dessert made healthier with this easy apple crisp. Sweet, tender apples are topped with a crunchy oat and nut topping for the perfect homemade treat.
Ingredients
Topping
Instructions
- Preheat oven to 350°F.
- Make the topping by mixing together sugar, rolled oats, almond flour and nuts. Add butter or coconut oil and combine until topping is crumb-like. Set aside.
- Add apple slices to a large bowl with maple syrup, lemon juice, arrowroot powder, cinnamon, nutmeg and salt. Gently toss until all apple slices are coated.
- Transfer apple mixture to greased 8×8 square baking dish or a 9-inch round pie pan.
- Sprinkle crisp topping over apple mixture.
- Bake for 45-50 minutes or until the apple filling is bubbly and the top is golden. Check the crisp around 30 minutes in. If the crisp seems to be browning too quickly, cover with foil for the remaining 15-20 minutes.
- Cool on a wire rack for 5-10 minutes.
- Serve warm with ice cream or whipped topping.
Notes
- Store in an airtight container. Leftovers will store well at room temperature for 2-3 days or in the refrigerator for up to 5 days.


Leave a Reply