My First Pierogi Disaster
My first time making pierogi was a mess. I was about fourteen. I used too much filling. When I boiled them, they all burst open. My potato filling swam away like little clouds. I still laugh at that.
But you know what? We ate them anyway. They were delicious, even if they looked funny. This matters because cooking is about trying. It is never about being perfect the first time. What was your first kitchen mess? I would love to hear your story.
The Heart of the Matter: The Dough
Good pierogi dough is soft and friendly. It should not fight you. The secret is letting it rest. That thirty-minute wait is important. It lets the dough relax.
Then it will roll out nicely for you. This matters because patience is a quiet ingredient. It is in every good recipe. *Fun fact: pierogi dough is sometimes called “pasta” dough in Poland!* Do you prefer mixing dough by hand or with a mixer?
The Cozy Potato Filling
Mash your potatoes until they are smooth. Then add the butter and cheeses. Doesn’t that smell amazing? It smells like a warm hug. The cream cheese makes it extra creamy.
The mozzarella gives it a gentle stretch. This filling is simple comfort food. It is the taste of home. I always make a little extra. I might sneak a spoonful before filling the dough.
Shaping Your Little Pillows
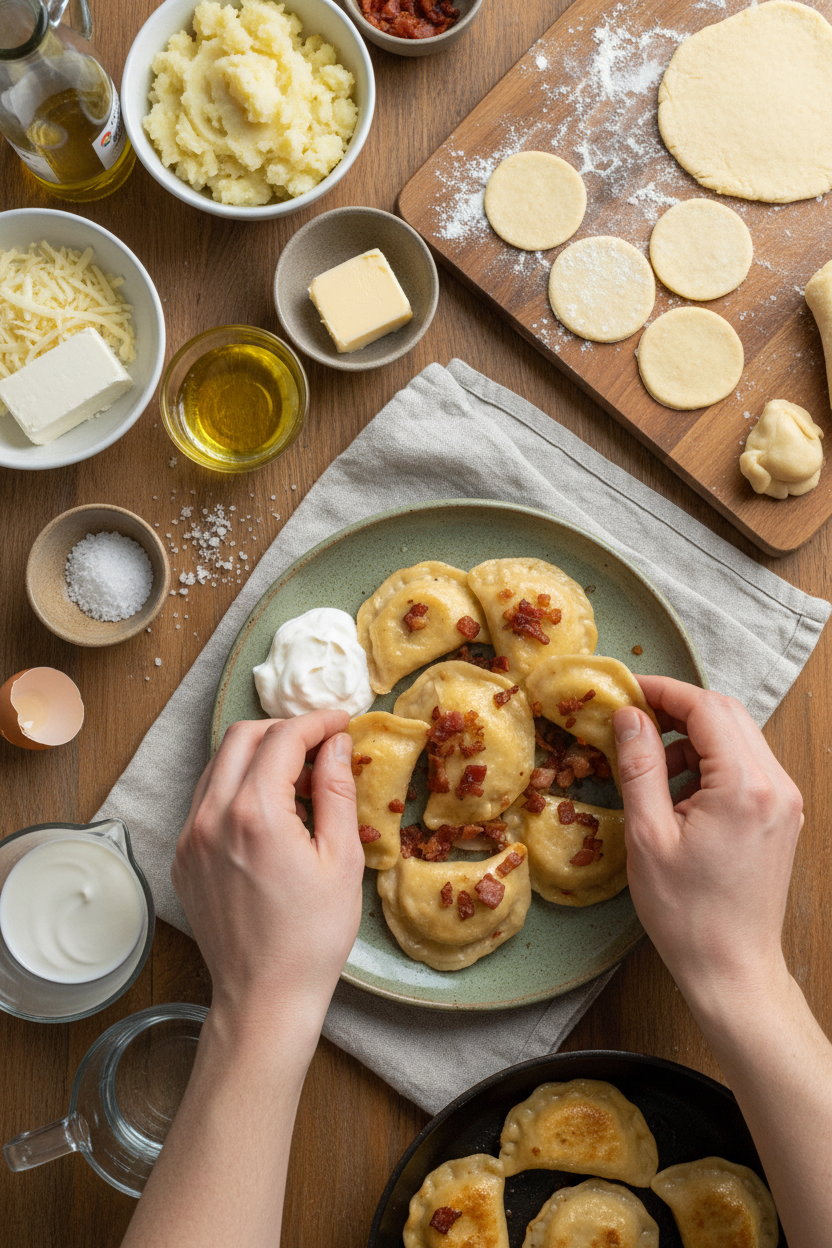
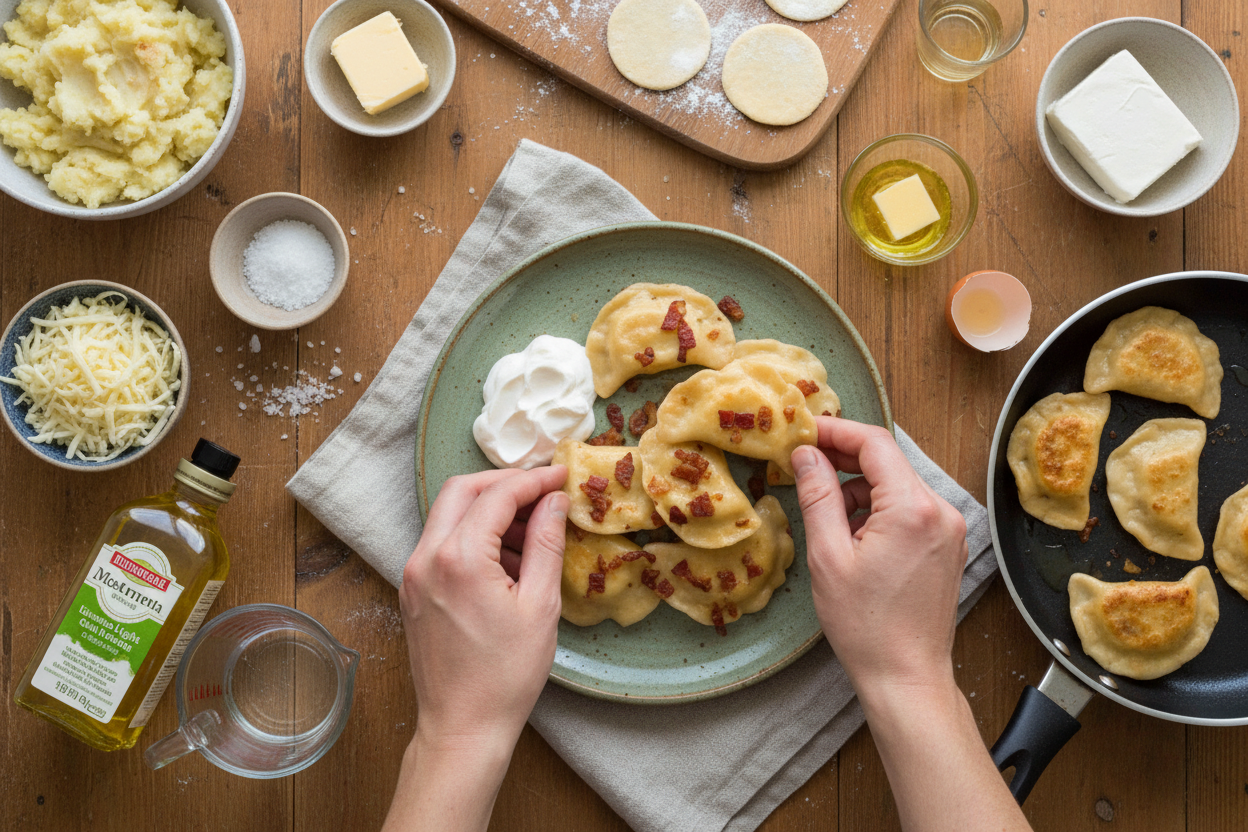
Do not overfill your dough circles. Just a half tablespoon is enough. Pinch the edges tight. Give them a second little crimp to seal the deal. This keeps the filling safe inside.
They look like little half-moon pillows. Making them is a peaceful job. I like to do it at the kitchen table. It gives my hands something to do while my mind wanders. Do you have a food that you find peaceful to make?
The Best Part: Bacon & Butter
While your water boils, cook the bacon. Let it get nice and crispy. Then melt the butter right in the pan. This makes a magic sauce. You will drizzle it over the hot pierogi.
It stops them from sticking together. It also makes them taste incredible. The salty bacon and rich butter coat every bite. A little sour cream on the side is perfect. It is a classic combination for a reason.
Ingredients:
| Ingredient | Amount | Notes |
|---|---|---|
| Russet potatoes, peeled | 2 lbs (5 medium) | For potato filling |
| Salt | 1/2 tsp | For potato filling |
| Unsalted butter, melted | 2 Tbsp | For potato filling |
| Cream cheese, softened | 2 oz | For potato filling |
| Mozzarella cheese, shredded | 3/4 cup | For potato filling |
| Warm water | 1 cup | For dough |
| Whole milk | 1/4 cup | For dough |
| Sour cream | 2 Tbsp | For dough |
| Extra light olive oil or vegetable oil | 3 Tbsp | For dough |
| Large egg | 1 | For dough |
| Fine sea salt | 1 1/2 tsp | For dough, plus more for cooking |
| All-purpose flour | 4 cups | Measured correctly, for dough |
| Bacon, chopped | 4 oz | For toppings (for 1/3 batch) |
| Unsalted butter | 2 Tbsp | For toppings (for 1/3 batch) |
| Sour cream | To serve | Optional, for toppings |
My Cozy Kitchen Pierogi
Hello, my dear! Come sit. Let’s make pierogi together. These little dumplings are pure comfort food. My own grandma taught me this recipe. I still remember her hands, swift and sure. Today, we’ll make a potato and cheese filling. Doesn’t that smell amazing? The dough is soft and fun to work with. It’s like playing with edible clay. Don’t worry if they’re not perfect. Homemade means made with love, remember? Yours will be wonderful.
- Step 1: First, let’s cook the potatoes. Peel them and cover with water. Boil until they are very soft. Drain them and let them cool just a bit. Then, mash them until they are perfectly smooth. No lumps allowed! This is the fluffy base for our filling.
- Step 2: Now, let’s make that filling cozy. Mash in the salt, melted butter, and soft cream cheese. This makes it so rich. Finally, stir in the shredded mozzarella. It will get wonderfully stringy. Set this bowl aside. We want it to be cool when we handle it.
- Step 3: Time for the dough! Whisk the water, milk, sour cream, egg, oil, and salt. It will look a little curdled. That’s just fine. Now, we add the flour. Mix it in slowly. The dough will come together into a soft ball. (A hard-learned tip: add the last bit of flour slowly. Too much makes tough dough!).
- Step 4: Knead the dough for a few minutes. Then let it rest under a towel. This nap makes it easier to roll out. I use this time to wash up. Quick quiz: what makes the potato filling extra rich and creamy? Share below!
- Step 5: Roll the dough very thin. Use a cup to cut circles. Place a small scoop of filling on each. Fold the dough over and pinch it tight. Give the edge a little crimp with your fingers. This seal is important so they don’t open in the water.
- Step 6: Cook the bacon for the topping until crisp. Then melt butter right in the pan. Set this golden, salty goodness aside. Now, boil your pierogi in salted water. They are done when they float to the top! Drizzle that bacon butter over them right away.
Cook Time: 45 minutes
Total Time: 1 hour 30 minutes
Yield: About 40 pierogi
Category: Dinner, Comfort Food
Three Fun Twists to Try
Once you master the classic, get creative! Here are three simple twists my grandkids love.
- Sweet Berry: Fill with mashed sweet cheese and a blueberry. Dust with powdered sugar.
- Summer Garden: Sauté mushrooms and onions for a earthy, savory bite.
- Breakfast Pierogi: Fill with scrambled egg and a bit of sausage. Serve with applesauce!
Which one would you try first? Comment below!
Serving Your Masterpiece
Pierogi are a whole meal! I love them with a simple side. Try a crisp cucumber salad. Or some sautéed apples and onions. A big dollop of cool sour cream is a must. For a drink, a cold glass of apple cider is perfect. Grown-ups might like a light lager beer. The flavors match so well. Which would you choose tonight?
Keeping Your Pierogi Perfect for Later
Let’s talk about saving pierogi for another day. Fresh pierogi freeze beautifully. Lay them on a baking sheet so they don’t touch. Freeze them solid for two hours.
Then pop them into a freezer bag. They will keep for months. I once froze a whole batch for my grandson’s surprise visit. It made our dinner so easy and special.
To reheat, boil frozen pierogi right from the freezer. Just cook them a minute longer. This batch cooking saves busy weeknights.
It means a homemade meal is always ready. Have you ever tried storing it this way? Share below!
Simple Fixes for Common Pierogi Problems
First, if your dough is sticky, add a little more flour. Just one tablespoon at a time. Your dough should feel soft like your earlobe.
Second, seal those edges tightly. I remember when my first batch opened in the water. Pinch, then crimp the edges twice. This keeps the filling safe inside.
Third, do not overcrowd the boiling pot. Cook them in small batches. This keeps the water hot and prevents sticking.
Getting the seal right matters for a pretty pierogi. Cooking in batches ensures each one cooks evenly. Which of these problems have you run into before?
Your Pierogi Questions, Answered
Q: Can I make this gluten-free?
A: Yes. Use your favorite gluten-free flour blend. The texture will be a bit different but still tasty.
Q: Can I make them ahead?
A: Absolutely. Make the filling a day early. Keep it covered in your fridge.
Q: What cheese can I swap?
A: Cheddar or farmer’s cheese work great. Use what you love and have on hand.
Q: Can I double the recipe?
A: You sure can. It is perfect for a big family meal or freezing.
Q: Any optional tips?
A: A fun fact: Pierogi are the national dish of Poland. Try sautéing boiled pierogi in butter for a crispy finish. Which tip will you try first?
From My Kitchen to Yours
I hope you love making these little dumplings. Cooking is about sharing stories and full bellies. I would love to see your creations.
Show me your beautiful pierogi on your plate. Have you tried this recipe? Tag us on Pinterest! Your photos make my day.
Happy cooking!
—Tessa Hammond.

Homemade Pierogi Recipe Step by Step Video
Description
Learn to make classic homemade pierogi from scratch with a creamy potato and cheese filling, tender dough, and a crispy bacon topping.
Ingredients
Ingredients for Potato Filling:
For the Pierogi Dough:
For the Toppings (For 1/3 batch):
Instructions
- How to Make Potato Cheese Filling: Place potatoes in a pot, add enough water to cover potatoes then bring to a boil over medium/high and continue cooking 25 minutes or until easily pierced with a fork. Drain and cool 5 minutes then mash potatoes until smooth. Mash in 1/2 tsp salt, 2 Tbsp melted butter and 2 oz cream cheese. Mash in 3/4 cup shredded mozzarella cheese. Partially cover and set aside while rolling out the dough.
- To Make Pierogi Dough: In the bowl of a stand mixer (or large mixing bowl if mixing by hand), whisk together 1 cup warm water, 1/4 cup milk, 2 Tbsp sour cream, 1 egg, 3 Tbsp oil, and 1 1/2 tsp salt until blended. Using the dough hook attachment (or wooden spoon if done by hand), add 2 cups flour and mix on speed 2 until incorporated. Add remaining flour 1/2 cup at a time, letting it incorporate before adding more. Add the last bit of flour, 1 Tbsp at a time, just until the dough no longer sticks to the sides of the bowl, or to your hands. Knead on speed 2 or by hand for 2-3 minutes until the dough is smooth and elastic. Cover with plastic wrap and let rest for 30 minutes.
- How to Mold Pierogi: Divide dough into 2 pieces. Cover the second piece and thinly roll the first piece out onto a floured surface to just under 1/8” thickness. Use a 3” diameter round cookie cutter to cut circles from the dough, keeping them as close as possible (collect scraps and keep covered to re-use). Add 1/2 Tbsp of potatoes over each round (a mini scoop makes portioning easy). To form pierogi, pull the 2 edges together and pinch tightly to seal. To ensure a tight seal, crimp the edges a second time with a pinch and twist motion. Cook or freeze pierogi for a future dinner (see freezing instructions in post).
- How to Make Bacon Topping: Make the topping before boiling pierogi so it’s ready to drizzle over pierogi to prevent sticking. In a medium skillet, saute bacon. Once crisp, melt in 2 Tbsp butter and remove from heat.
- How to Cook Pierogi: Bring a pot of water to a rolling boil and add 1 Tbsp salt. Add fresh or frozen pierogi in batches. Cook for about 2 minutes or until the water has returned to a boil and the pierogi float to the top. Remove to a bowl with a strainer or slotted spoon drizzling buttery bacon between layers.
Notes
- For freezing, place uncooked, molded pierogi on a parchment-lined baking sheet, freeze until solid, then transfer to a freezer bag. Boil from frozen, adding 1-2 extra minutes to the cooking time.


Leave a Reply