The Butter That Started It All
Let me tell you about the butter. It is the heart of this dish. You mix soft butter with garlic and lemon. Add some fresh parsley too. Doesn’t that smell amazing? It will make your whole kitchen happy.
You mash it all with a fork. It takes a minute to come together. Be patient. This butter is a secret surprise inside the chicken. That is why this matters. The flavor is locked in, waiting to burst out.
A Little Pocket of Joy
Now, we make a pocket in the chicken. Use a small, sharp knife. Be gentle, like you are tucking in a blanket. You want a deep pocket, but don’t cut through the other side. It is like making a little purse.
Stuff a big spoonful of that herby butter inside. Then pinch the opening closed. I still laugh at that. The first time I did this, I used too much butter. It tried to escape! What is your favorite food to stuff? Is it peppers, or maybe mushrooms?
The Messy, Fun Part
Get three plates ready. One for flour, one for beaten eggs, one for breadcrumbs. This is your breading station. Your hands will get messy. That is part of the fun! Roll the chicken in flour first. Then dip it in egg. Finally, coat it in crumbs.
The crumbs give it a wonderful crunch. Fun fact: Panko breadcrumbs are Japanese. They are extra light and flaky. They make the crispiest crust. Do you prefer a crunchy or a soft coating on your food?
The Sizzle in the Pan
Heat a little oil in a big pan. Listen for the sizzle when you add the chicken. That is the sound of flavor being made. Cook it until it is golden brown on each side. It looks so beautiful.
Use a thermometer if you have one. Chicken is done at 165 degrees. That is why this matters. It keeps everyone safe and the chicken juicy. There is no guesswork. The smell will make your stomach rumble!
The Grand Finale
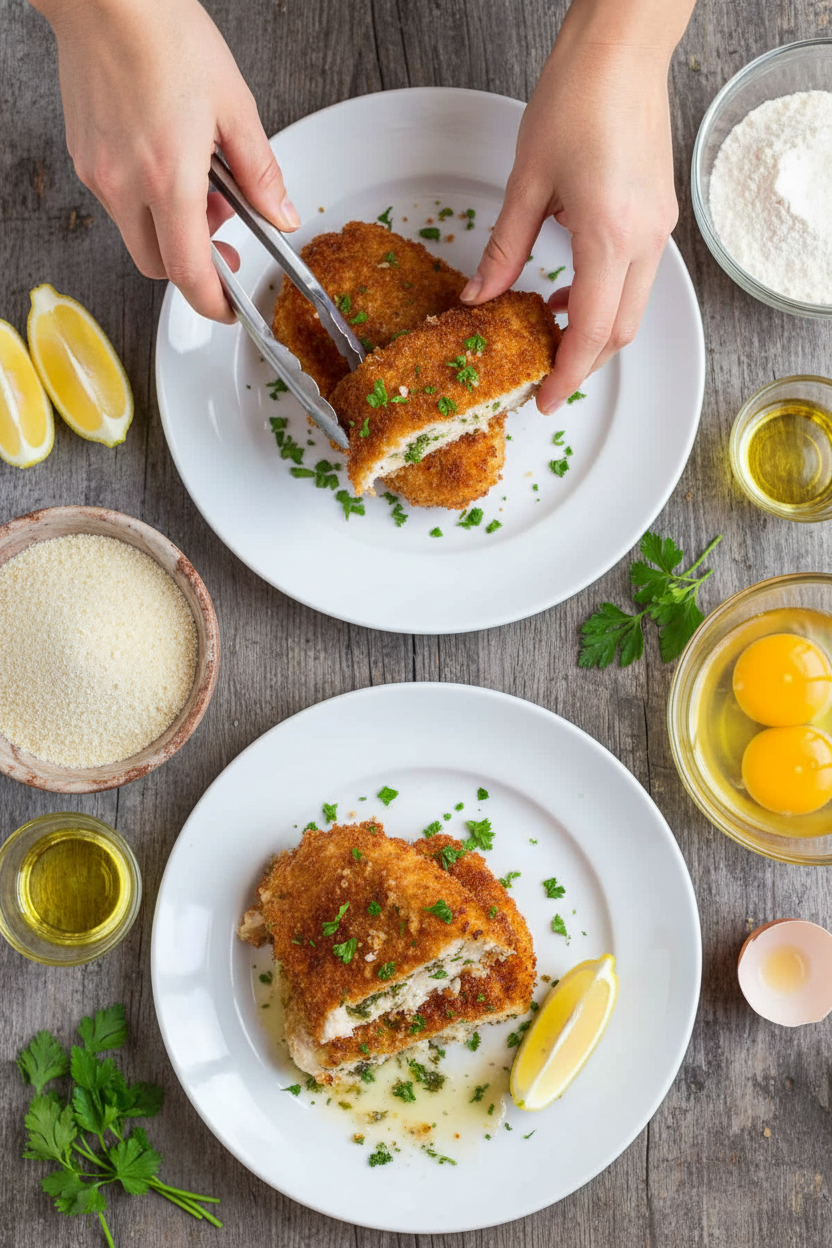
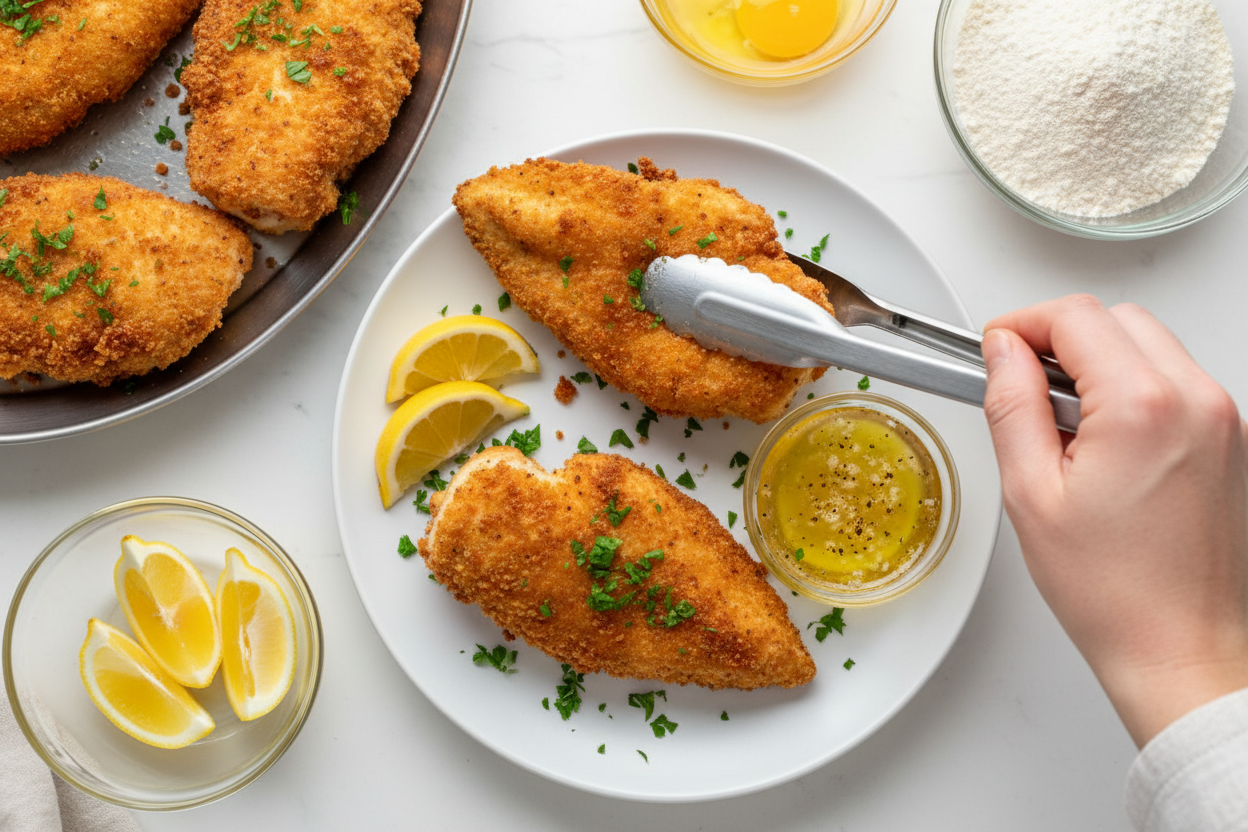
Take the chicken out of the pan. Sprinkle it with salt and fresh parsley. Now, squeeze a lemon wedge right over the top. That bright lemon smell cuts through the rich butter. It is perfect.
Be careful when you cut into it. The hot, herby butter will rush out. It is the best part. Serve it right away. What would you eat with this? I love simple mashed potatoes. They soak up that glorious butter sauce. Tell me your perfect side dish.
Ingredients:
| Ingredient | Amount | Notes |
|---|---|---|
| Unsalted butter | 6 Tbsp | room temperature |
| Garlic clove | 1 large | minced |
| Lemon juice | 1 Tbsp | plus more lemon wedges to serve |
| Fresh parsley | 2 Tbsp | chopped, plus more to garnish |
| Salt | 1/2 tsp | for the butter |
| Black pepper | 1/2 tsp | freshly ground, for the butter |
| Chicken breasts | 3 large | 12 oz each |
| Eggs | 2 | beaten |
| All-purpose flour | 1/2 cup | |
| Panko bread crumbs | 2 cups | |
| Salt and Pepper | 1/2 tsp | or to taste, for the chicken |
| Light olive oil or Canola oil | as needed | to sauté |
My Golden, Buttery Chicken Kiev
Hello, my dear. Come sit at the counter. Let’s talk about Chicken Kiev. It’s a fancy name for a very happy idea. Imagine a crispy chicken package. Inside is a river of lemon and garlic butter. It’s pure magic. I learned this from my friend Olga years ago. We laughed so much that first time. Butter went everywhere! But the taste? Oh my. It was worth every splatter.
Don’t let the steps scare you. We’ll go nice and slow. It’s like making a little present for your dinner plate. The key is a good pocket in the chicken. And cold butter! (That’s my hard-learned tip: use cold butter for stuffing. It melts later, inside the chicken, not in your hands). Ready? Let’s begin.
Step 1: The Secret Butter
First, make your secret butter. Mash room-temperature butter in a bowl. Add minced garlic, lemon juice, parsley, salt, and pepper. Keep mashing with a fork. It will look messy at first. But it comes together, I promise. Doesn’t that smell amazing already? Set it aside.
Step 2: Prepare the Chicken
Now, prepare the chicken. Cut each breast in half lengthwise. See how thick it is? Take your slim knife. Cut a deep pocket into the side. Don’t cut all the way through! Stuff about one tablespoon of your butter inside. Gently press the opening closed. Season the outside with salt and pepper.
Step 3: The Breading Station
Set up three plates for breading. Flour goes on the first plate. Beaten eggs in a bowl for the second. Panko bread crumbs on the third. Dredge each chicken in flour. Then dip it in the egg. Let the extra drip off. Finally, coat it in the crunchy panko. I still laugh at that. My fingers get so crumbly!
Step 4: Fry to Golden Perfection
Time to fry. Add about 1/4 inch of oil to a big skillet. Heat it over medium. Test it with one bread crumb. If it sizzles, it’s ready. Carefully add your chicken. Fry until golden, about 4 minutes per side. Quick quiz: How do you know it’s done inside? Share below! (Psst, it’s 165°F on a thermometer).
Step 5: Serve and Enjoy
Almost there! Let the chicken rest a minute on a plate. Sprinkle with a little salt. Garnish with fresh parsley. Serve with lemon wedges. Squeeze that lemon right over the top. Now, cut in carefully. That first, glorious burst of butter is the best part. Just be careful, it’s hot!
Cook Time: 20 minutes
Total Time: 50 minutes
Yield: 6 servings
Category: Dinner, Chicken
Three Fun Twists on the Classic
Once you master the basic, you can play. Cooking should be fun, don’t you think? Here are three ideas that make me smile.
The Garden Twist
Add finely chopped spinach and a little feta cheese to the butter. It’s so green and pretty.
The Spicy Kick
Mix a teaspoon of paprika and a pinch of cayenne into the butter. It gives a lovely, warm glow.
The Cozy Herb
Swap the parsley for fresh dill. It tastes like a sunny, summer garden. So fresh and light.
Which one would you try first? Comment below! I’d probably go for the garden one myself.
What to Serve With Your Kiev
This chicken is the star. So keep your sides simple. They are the best friends for your plate. You want something to soak up that delicious butter.
Buttered egg noodles or fluffy white rice are perfect. A simple green salad works too. Or roasted carrots! Their sweetness loves the garlic. For a drink, a crisp white wine is lovely for the grown-ups. For everyone, try sparkling lemonade. The fizz cuts through the rich butter beautifully.
Which would you choose tonight? I’m dreaming of those buttery noodles right now.
Keeping Your Chicken Kiev Happy
Let’s talk about keeping your delicious chicken for later. First, let it cool completely. Then wrap each piece tightly. You can use plastic wrap or foil.
It will keep in the fridge for three days. For the freezer, use a freezer bag. It will be good for two months. Thaw it in the fridge overnight.
To reheat, use your oven. Bake at 350°F until hot inside. This keeps the crust crispy. The microwave makes it soggy, trust me!
I once froze a whole batch for my grandson’s visit. He was so happy to have a ready-made feast! Batch cooking saves busy nights. It turns a big task into easy future meals. Have you ever tried storing it this way? Share below!
Simple Fixes for Common Hiccups
Sometimes the butter leaks out while cooking. This usually means the pocket wasn’t sealed well. Pinch that opening tightly like you’re closing a little envelope.
The breading might fall off. This happens if you don’t let excess egg drip. A good shake after the egg bath helps the crumbs stick.
Is the outside burning before the inside cooks? Your oil is too hot. Turn the heat down to medium. Let the heat cook the chicken through.
I remember when my first Kiev burst! I learned sealing matters for that wonderful, buttery surprise. Getting it right builds your cooking confidence. A perfect seal also means more flavor in every bite. Which of these problems have you run into before?
Your Chicken Kiev Questions, Answered
Q: Can I make this gluten-free?
A: Yes! Use gluten-free flour and breadcrumbs. The method stays exactly the same.
Q: Can I prepare it ahead of time?
A: You can bread the chicken hours before. Keep it on a plate in the fridge until frying.
Q: What if I don’t have fresh parsley?
A: Dried parsley works in the butter. Use one teaspoon instead of two tablespoons fresh.
Q: Can I double the recipe?
A: Absolutely. Just use a bigger skillet or cook in more batches. Don’t crowd the pan.
Q: Any optional tips?
A: A little grated lemon zest in the butter is lovely. *Fun fact: The dish is named after the capital city of Ukraine!* Which tip will you try first?
From My Kitchen to Yours
I hope you love making this special dish. It seems fancy but is really just fun. The look on someone’s face when they cut into it is priceless.
I would love to see your creations. Sharing food stories connects us all. Have you tried this recipe? Tag us on Pinterest! You can find me at @TessasKitchenTable.
Happy cooking!
—Tessa Hammond.
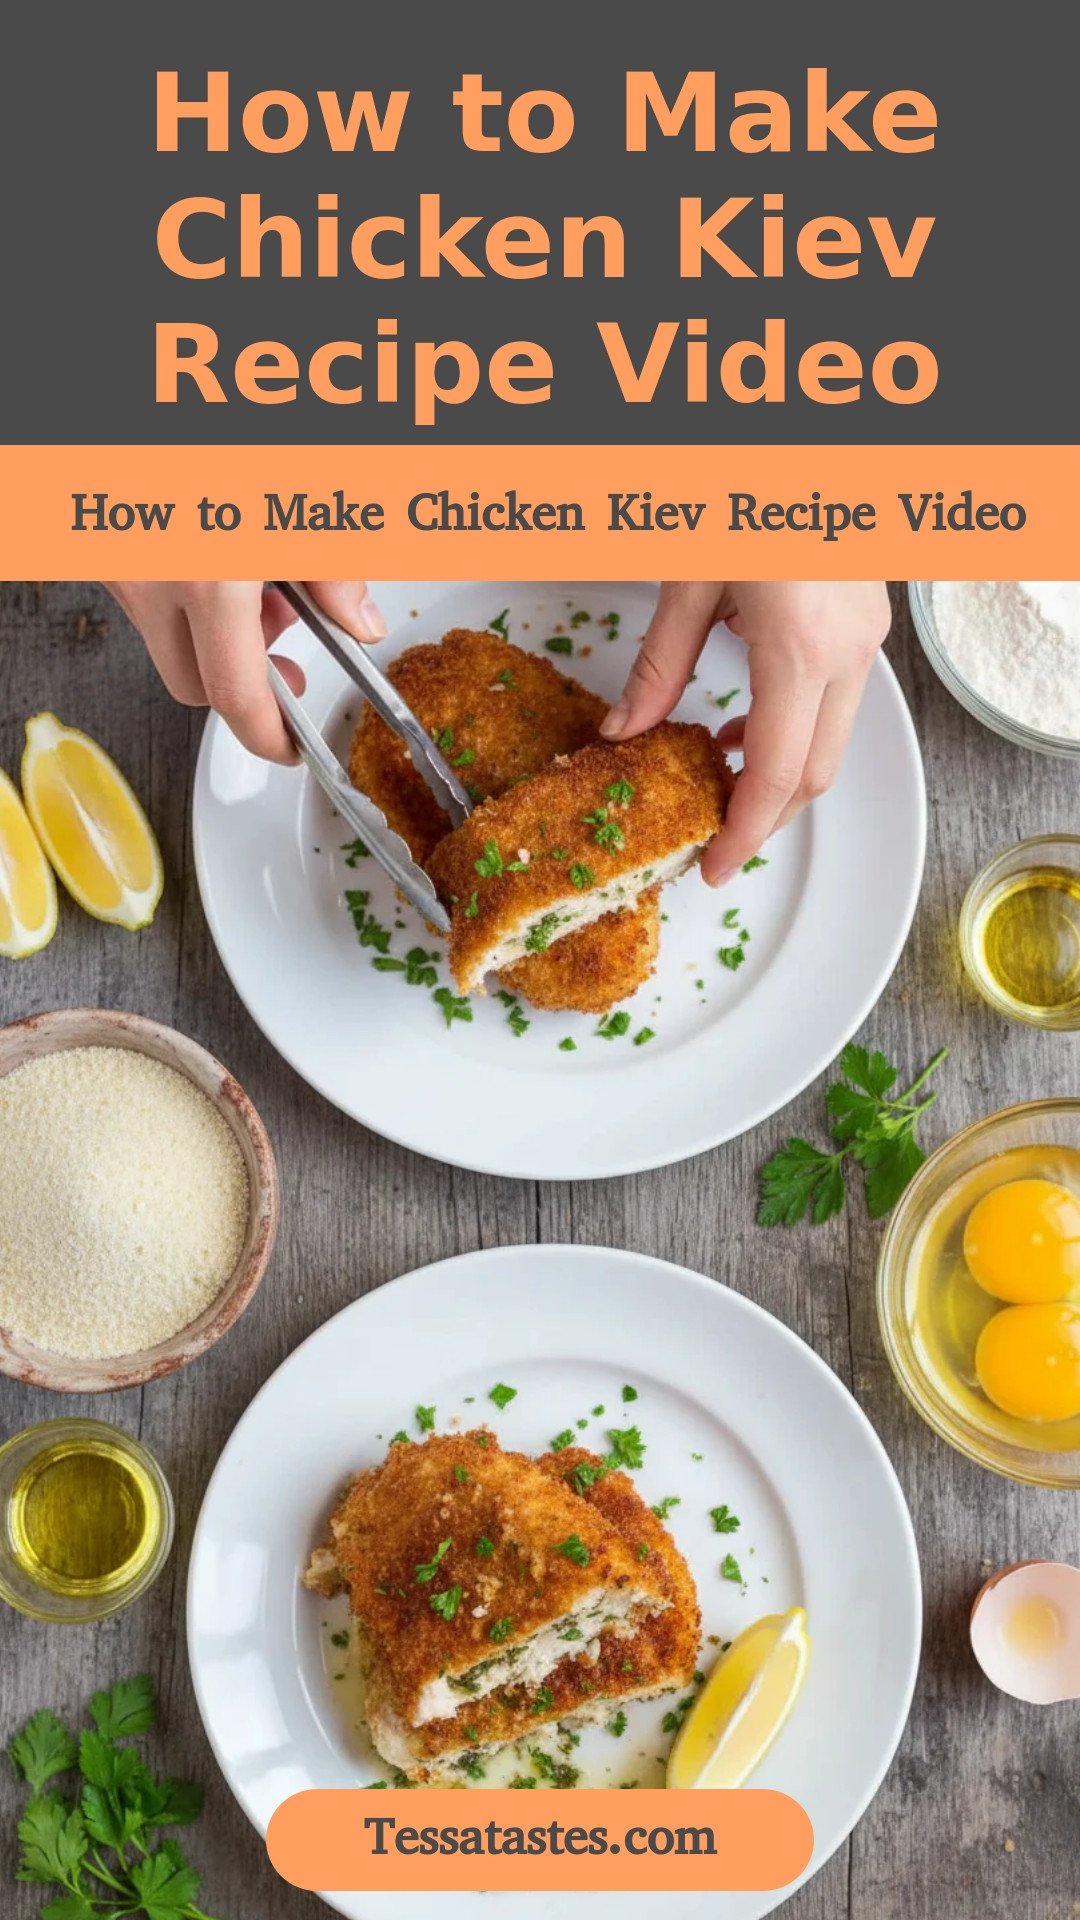
How to Make Chicken Kiev Recipe Video
Description
Experience the classic, indulgent delight of Chicken Kiev, featuring a crispy, golden exterior and a burst of herby garlic butter with every bite.
Ingredients
6 Tbsp unsalted butter, room temp
3 large chicken breasts, 12 oz each breast
Instructions
- Make the Flavored Butter – In a medium bowl, mash together all Kiev butter ingredients with a fork, just until lemon juice is incorporated into the butter. It takes a couple of minutes but it does come together.
- Prepare Chicken – Using a sharp slim knife, cut chicken breasts in half lengthwise, keeping both halves equal in size and thickness. Carefully cut a pocket into the side of each chicken breast as deep and wide as you can go without cutting through the chicken breast (about a 2″wide x3″ long pocket). Stuff each chicken breast with 1 Tbsp of Kiev butter then close the pocket and push over the top of the chicken breast to disperse the butter. Pinch the opening to seal. Season both sides of the chicken breast with salt and pepper.
- Make your breading stations – Set up 3 plates for breading: In the first plate, pour 1/2 cup flour. In the second large bowl, beat together 2 eggs. In the third large bowl, pour 2 cups panko crumbs. Dredge chicken in flour, dusting off excess then dip in eggs making sure to get a good egg coating all around and letting any excess egg drip off. Finally, dip into the bread crumbs. Transfer to a platter while forming the remaining chicken Kievs.
- Fry Chicken Kiev – Add 1/4″ of oil to a large deep skillet and place over medium heat. Once the oil is hot (350˚F or if you add a bread crumb, it should sizzle), add chicken in a single layer and fry until golden brown (4 min per side- if it browns too quickly, reduce the heat). It’s done when it reaches 165˚F on an instant-read thermometer. Repeat cooking the second batch.
- To Serve – Season hot fried chicken with a sprinkle of salt, garnish with fresh parsley, and squeeze lemon wedges over the top, then serve. Be careful of the first spurt of hot butter when you cut the chicken.
Notes
- Be careful of the first spurt of hot butter when you cut the chicken.


Leave a Reply