
My First Batch Was a Mess
I first made these for my grandson’s soccer team. I was in a big hurry. I did not chill the balls long enough.
The first one fell apart in the chocolate. What a sticky mess. I still laugh at that. It taught me a good lesson. Patience makes perfect bites.
Why We Make Food With Our Hands
I tell everyone to use their hands to mix. A wooden spoon is good too. But your hands are the best tools.
You can feel the dough come together. It tells you when it’s just right. This matters because cooking should be fun. It connects you to your food in a special way.
The Magic of Graham Crackers
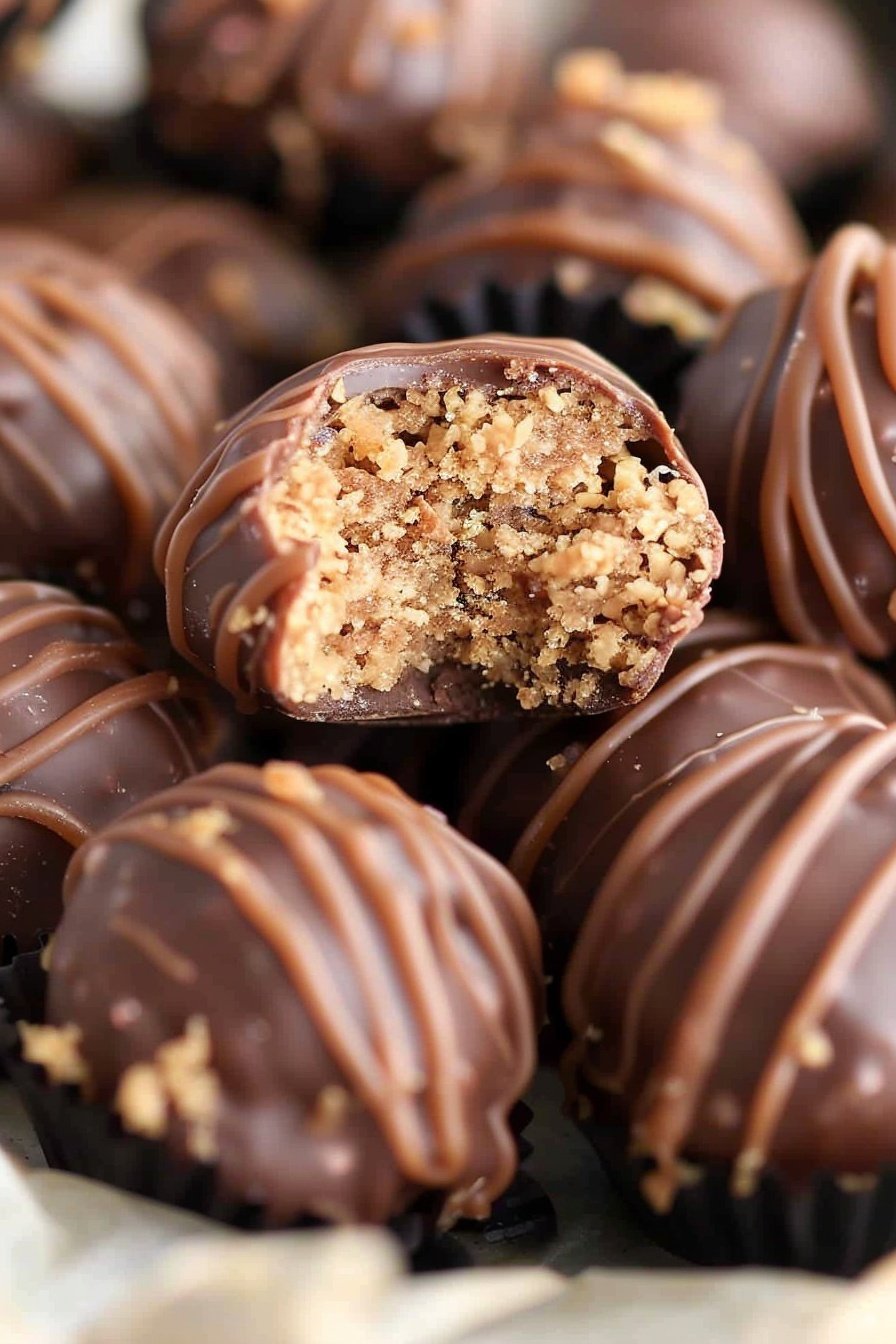
Have you ever wondered why we use graham cracker crumbs? They give a little crunch. They also make the bites hold their shape.
Fun fact: Graham crackers were invented a long time ago. A man thought they would help people be healthy. I just think they taste wonderful with chocolate. Do you have a favorite cookie you like to crush into recipes?
The Best Part is Dipping
Melting the chocolate is my favorite step. Doesn’t that smell amazing? Using two forks is my secret. It lets the extra chocolate drip off.
This keeps your treats from having a messy puddle at the bottom. This little tip matters. It makes your treats look like they came from a fancy shop.
Your Turn in the Kitchen
These are perfect for a first solo recipe. They are no-bake, so you cannot burn them. What will you name your energy bites?
Will you share them with friends or family? Tell me who you would make these for. I love hearing your stories.
Ingredients:
| Ingredient | Amount | Notes |
|---|---|---|
| creamy peanut butter | 1 1/2 cups | |
| unsalted butter | 1 cup | room temperature |
| powdered sugar | 4 cups | |
| graham cracker crumbs | 1 1/2 cup | |
| salt | 1/2 teaspoon | |
| chocolate almond bark/candy coating | 1 to 2 (16 to 24-ounce) packages |
My Favorite No-Bake Energy Bites
Hello, my dear! Come sit with me in the kitchen. I want to share my recipe for No-Bake Energy Bites. These little treats are pure joy. They remind me of my own grandma’s candy. She always had a tin of something sweet ready for us. Making them fills the whole house with a happy feeling. Doesn’t that smell amazing?
These bites are perfect for a quick boost. You can make them without even turning on the oven. I love how simple they are. Let’s get our hands a little messy, shall we? It’s the best part. I still laugh at the memory of my grandson with peanut butter on his nose.
Ingredients
- 1 cup creamy peanut butter
- 1/2 cup softened butter
- 2 cups powdered sugar
- 1 1/2 cups graham cracker crumbs
- 1/4 teaspoon salt
- 16 ounces chocolate almond bark
Instructions
Step 1: Grab your biggest bowl. Put the peanut butter and soft butter inside. Add the powdered sugar, graham cracker crumbs, and salt. Now, mix it all up. I like to use a wooden spoon. Then I finish with my clean hands. You can feel when the dough is just right. (A hard-learned tip: Using a mixer makes the dough too fluffy. Then the balls fall apart in the chocolate!).
Step 2: Take about a tablespoon of the mixture. Roll it into a tight little ball between your palms. Place each ball on a baking sheet. When the sheet is full, pop it into the fridge. They need to chill for about 30 minutes. This helps them get firm. It makes the next step so much easier.
Step 3: Now for the magic! Melt the chocolate almond bark. Follow the directions on the package. Use two forks to roll a cold ball in the chocolate. Gently tap the fork to let the extra chocolate drip off. Place the coated ball on wax paper. Work in small batches. Keep the rest in the fridge so they stay cool. Do you prefer milk chocolate or dark chocolate for dipping? Share below!
Cook Time: 0 minutes
Total Time: 45 minutes
Yield: 60 bites
Category: Snack, Dessert
Three Fun Twists to Try
Once you master the basic recipe, you can get creative. It’s so fun to play with flavors. I love trying a new version each time I make them. Here are a few of my favorite ideas. They are all delicious in their own way.
Crunchy Carnival: Swap the creamy peanut butter for a crunchy one. Then add a handful of colorful sprinkles to the dough. It’s a party in every bite!
Coconut Dream: Roll the finished chocolate balls in shredded coconut. It adds a lovely, tropical taste. The texture is wonderful, too.
Pretzel Power: Mix in some finely crushed pretzels with the graham crumbs. The sweet and salty mix is just perfect. You will love it. Which one would you try first? Comment below!
Serving Your Sweet Creations
These little bites are wonderful all on their own. But you can make them extra special. I like to put a few in a tiny paper cupcake liner. It makes them look so fancy. You could also stack them on a pretty plate for guests. They always disappear quickly!
What should you drink with them? A tall, cold glass of milk is my top choice. It’s a classic for a reason. For the grown-ups, a cup of strong black coffee is lovely. The bitterness of the coffee pairs so well with the sweet chocolate. Which would you choose tonight?

Keeping Your Energy Bites Fresh
These little bites are perfect for making ahead. I always keep a batch in my fridge. They stay fresh for over a week in an airtight container.
You can also freeze them for a sweet treat later. I once forgot a container in the freezer for a month. They were just as delicious when I found them.
Why does this matter? Having ready-to-eat snacks saves you time. It also stops you from buying expensive, less healthy options. Batch cooking is a little gift to your future self.
Have you ever tried storing it this way? Share below!
Fixing Common No-Bake Problems
Is your mixture too sticky to roll? Your hands might be too warm. Just wash them in cold water and dry them well. This helps the dough not stick.
Do your balls fall apart in the chocolate? They might not be cold enough. I remember when this happened to me. I had to put everything back in the fridge.
Is your chocolate coating too thick? You can add a tiny spoon of coconut oil. This makes it smoother and easier to dip. Getting the texture right builds your cooking confidence.
It also makes the final flavor so much better. A smooth coat tastes wonderful with the peanut butter inside. Which of these problems have you run into before?
Your Energy Bite Questions, Answered
Q: Can I make these gluten-free? A: Yes! Just use gluten-free graham crackers or crushed gluten-free cookies.
Q: How far ahead can I make them? A: You can make them up to five days ahead. They are perfect for a busy week.
Q: What can I use instead of peanut butter? A: Sunflower seed butter is a great swap. It works exactly the same way.
Q: Can I make a smaller batch? A: Of course! Just cut all the ingredients in half. You will get about thirty bites.
Q: Any other fun add-ins? A: Try a handful of mini chocolate chips. A fun fact: my grandson calls these “sprinkles for the inside.” Which tip will you try first?
From My Kitchen to Yours
I hope you love making these no-bake treats. They always remind me of my own grandchildren. We have so much fun rolling the balls together.
I would love to see your creations. Your kitchen adventures make me so happy. Have you tried this recipe? Tag us on Pinterest!
Happy cooking!
—Tessa Hammond.

No-Bake Energy Bites
Description
Whip up blissful, no-bake energy bites! The perfect healthy snack for on-the-go fuel. Easy, delicious, and packed with natural energy for busy days.
Ingredients
Instructions
- In a large bowl, mix together the peanut butter, butter, powdered sugar, graham cracker crumbs, and salt. (You can use a mixer here, but I prefer a wooden spoon and clean hands. For me, using a mixer makes the texture too light which makes them hard to coat in chocolate without falling apart.)
- Make the balls by rolling about 1 tablespoon of the mixture into a tight ball. Place them on a baking sheet and refrigerate for about 30 minutes.
- Melt the almond bark according to the package instructions. Use two forks to roll each ball in the chocolate and tap off the excess before placing them on a large sheet of wax or parchment paper. Work in batches, keeping the rest cool in the refrigerator until you’re ready to dip. Work until all of the balls are coated.
- Store in an airtight container for a few days or in the fridge for longer.


Leave a Reply