A No-Bake Surprise
My grandson calls this my “magic trick” dessert. I just laugh. There is no magic. It is just layers of good things. You do not even need to turn on the oven. I still smile when I see his face after the first bite.
This matters because some days are just too hot for baking. Or maybe you are in a hurry. A cool, creamy treat can save the day. It is a little act of kitchen kindness. What is your favorite no-bake treat to make?
Building Your Base
First, we make the crust. You just need those peanut butter cookies. Line them up in your dish. They will get soft and cake-like later. It is a wonderful little secret.
Do not worry if they do not fit perfectly. My cookies are always a little crooked. It adds character. This step matters because a good base holds everything together. Just like a good friend.
The Creamy Middle Layers
Now for the creamy cheese layer. Mix the cream cheese and sugar until smooth. Then fold in the whipped topping. Doesn’t that look dreamy? Spreading it over the cookies is my favorite part.
Then we make the peanut butter layer. You whisk pudding and milk. Then you add the peanut butter. *Fun fact: Peanut butter was first made as a protein food for people with no teeth.* Now, is that not interesting?
A Story and a Topping
I once brought this to a church picnic. A man asked me for the recipe for his wife. I told him it was a secret. I still laugh at that. Now I am sharing the secret with you.
The topping is the fun part. More whipped topping, then chips and cookie pieces. Drizzle the melted peanut butter over it all. It looks so fancy. Do you like to drizzle in lines or swirls?
The Hardest Part
The hardest part is waiting. You must let it chill. This matters because the waiting makes the flavors become friends. They get to know each other. It makes every bite perfect.
I always set a timer. Otherwise, I will peek too soon. Trust me, it is worth the wait. The texture becomes like a soft, peanut buttery cloud. What is the hardest part of a recipe for you? Is it the waiting?
Ingredients:
| Ingredient | Amount | Notes |
|---|---|---|
| peanut butter sandwich cookies | 16 ounces | For the crust |
| cream cheese | 8 ounce | softened to room temperature |
| powdered sugar | 1 cup | |
| whipped topping | 1 cup | |
| instant vanilla pudding | 3.4 ounces | |
| whole milk | 1½ cups | |
| creamy peanut butter | 1 cup | |
| whipped topping | 1 cup | |
| whipped topping | 2 cups | For the topping |
| peanut butter chips | ½ cup | |
| reserved whole peanut butter cookies | 8 | chopped into pieces |
| creamy peanut butter | ½ cup | melted |
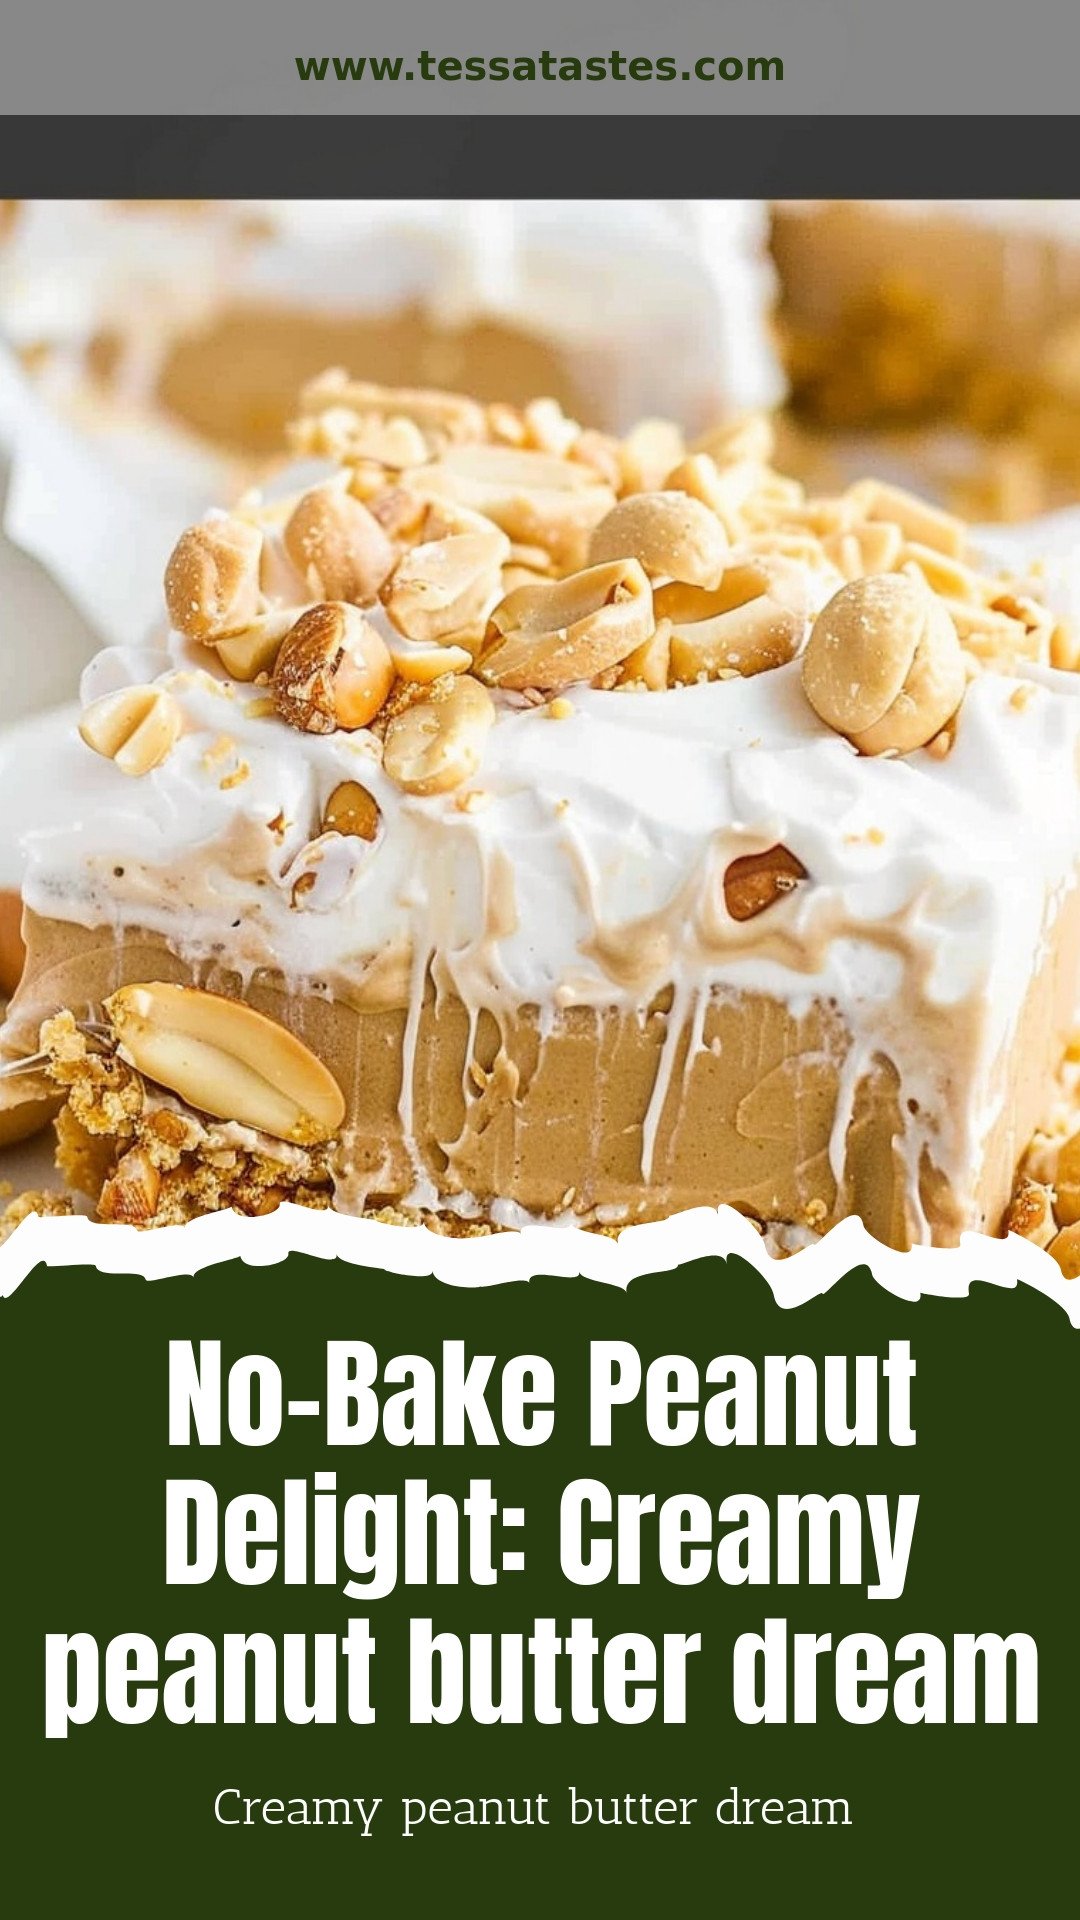
My No-Bake Peanut Delight
Oh, this recipe takes me back. My grandson Leo invented it with me one hot summer day. We wanted a peanut butter treat but didn’t want to turn on the oven. We just started layering things we loved from the pantry. The result was this creamy, dreamy dessert. I still laugh at that messy, happy afternoon. It’s become a family favorite for good reason. It’s so simple and so satisfying. Doesn’t that sound wonderful?
- Let’s get our pan ready. You’ll need a 9×13 glass dish. Give it a quick grease with a little butter or spray. This just makes everything easier to slice later.
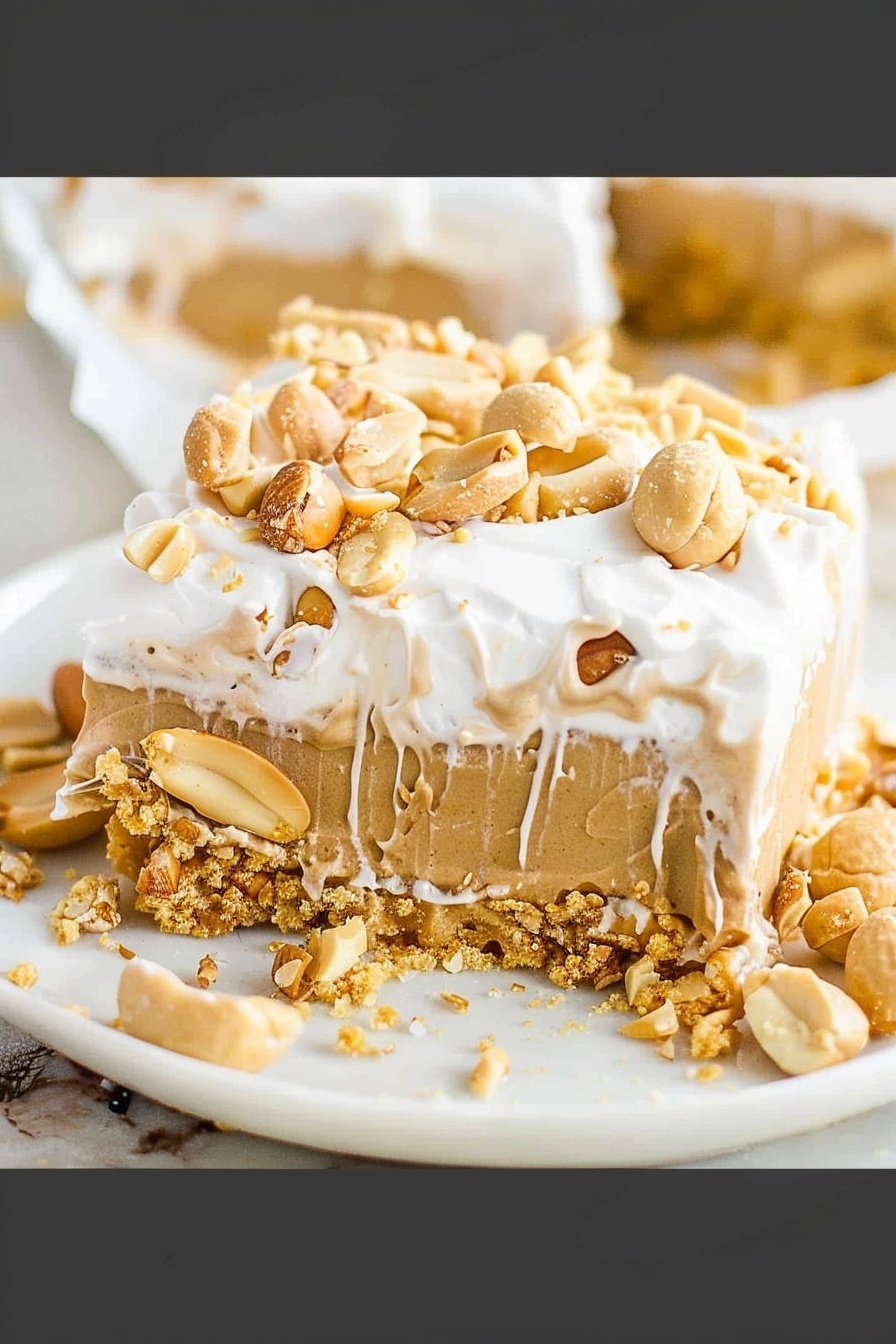
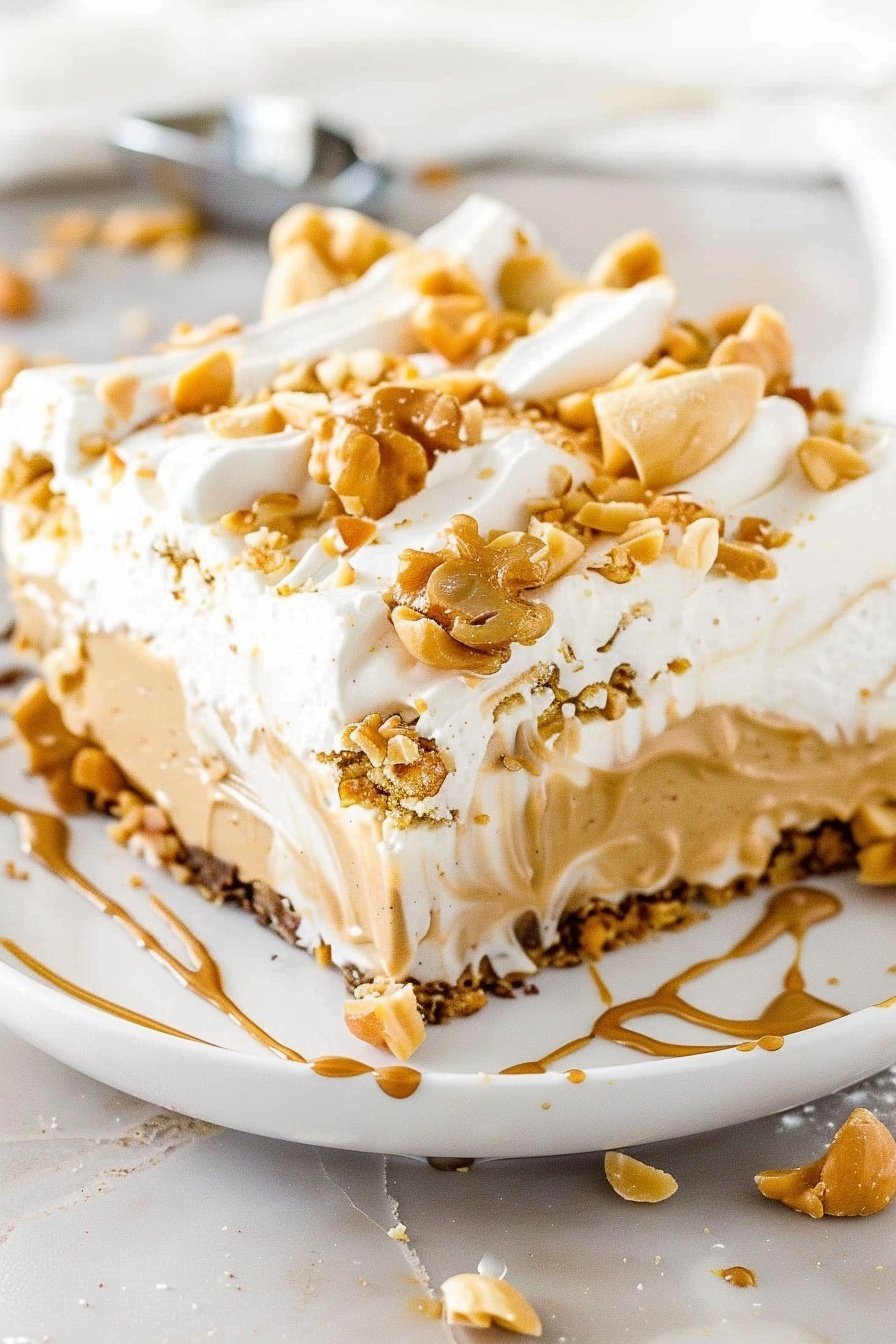
- Now, let’s talk about the cookie base. We’re using those yummy peanut butter sandwich cookies. You don’t even need to crush them up fine. Just place a single layer right in the bottom of the dish. You’ll use about 22 cookies for this. Save the rest for the top, they add a lovely crunch.
Step 1: The Cream Cheese Layer
Grab a big bowl for the cream cheese layer. Make sure your cream cheese is soft. It mixes so much better that way. Add the powdered sugar and one cup of whipped topping. Now, beat it all together until it’s smooth and creamy. I use my old hand mixer for this. Spreading this layer over the cookies is my favorite part. It looks so neat and white. Pop the whole dish into the freezer for 15 minutes. This helps the layers stay separate.
Step 2: The Peanut Butter Pudding
Time for the peanut butter pudding. In another bowl, whisk the vanilla pudding mix with the milk. You’ll see it start to thicken up nicely. Now, mix in that whole cup of creamy peanut butter. I like to add the extra cup of whipped topping here too. It makes the filling light and fluffy. (A hard-learned tip: Don’t use the pudding mix straight from the box without the milk. It will be much too thick and gritty!). Spread this over the chilled cream cheese layer. Back into the freezer it goes for another 15 minutes.
Step 3: The Final Toppings
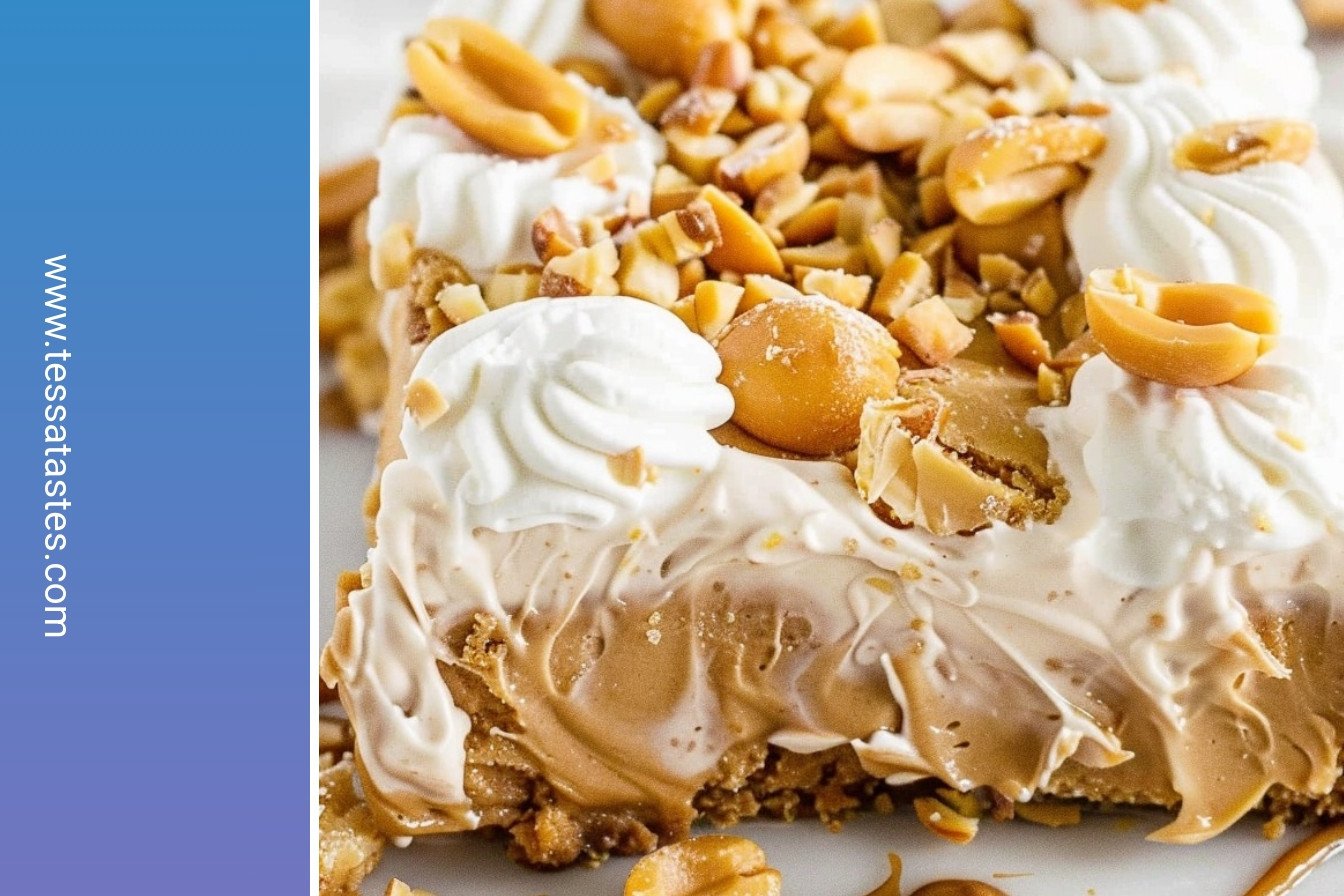
The final touch is the best part. Gently spread the last two cups of whipped topping over the pudding. Now, for the fun toppings. Sprinkle on those peanut butter chips. They give a little melt-in-your-mouth sweetness. Crumble the leftover cookies you saved. Then, drizzle the melted peanut butter over everything. It makes the prettiest pattern. Let it chill in the fridge for 30 minutes before you cut it. This waiting is the hardest part, I know! What’s your favorite part of this recipe? Share below!
| Cook Time | No baking required! |
| Total Time | 1 hour 30 minutes |
| Yield | 16 servings |
| Category | Dessert, No-Bake |
Three Tasty Twists to Try
This recipe is like a blank canvas. You can change it up so many ways. My friend Martha makes a chocolate version that is just divine. It got me thinking about other fun twists. Here are a few ideas I’ve collected over the years. They are all so simple but feel brand new.
- Chocolate Lover’s Swap: Use chocolate sandwich cookies for the crust. Add some chocolate chips to the topping.
- Fruity Surprise: Add a thin layer of sliced bananas or strawberry jam between the cream cheese and pudding layers.
- Salted Caramel Drizzle: Swap the melted peanut butter topping for a rich salted caramel sauce. It’s a sweet and salty dream.
Which one would you try first? Comment below!
Serving Your Peanut Delight
This dessert is a star all on its own. But I love making it feel extra special. For a party, I sometimes serve it in little individual cups. Layer the ingredients in clear glasses for a pretty look. It shows off all those lovely layers. A little dollop of extra whipped cream on top never hurts either.
What to drink with it? A tall, ice-cold glass of milk is the classic choice. It’s the perfect partner for peanut butter. For the grown-ups, a nice cup of coffee with cream works wonderfully. The bitter coffee balances the sweet, creamy dessert so well. Which would you choose tonight?
Keeping Your Peanut Delight Perfect
This dessert is best kept cold. Cover the dish tightly with plastic wrap. You can store it in the fridge for three days.
For longer storage, the freezer is your friend. I once made two for my grandson’s birthday party. It was so nice to have one ready in the freezer.
This matters because it saves you time on a busy day. You can enjoy a sweet treat without any fuss. Have you ever tried storing it this way? Share below!
Easy Fixes for Common Kitchen Hiccups
Is your cream cheese too cold? It will be lumpy if not softened. Just let it sit on the counter for an hour.
I remember when my pudding was too runny. I did not let it thicken first. Always whisk the pudding and milk until it gets thick.
Getting clean slices is tricky. Dip your knife in warm water first. This helps you cut neat pieces every single time.
Fixing these small issues builds your cooking confidence. It also makes the dessert taste and look its very best. Which of these problems have you run into before?
Your Peanut Delight Questions Answered
Q: Can I make this gluten-free? A: Yes! Use your favorite gluten-free peanut butter cookies for the crust.
Q: How far ahead can I make it? A: You can assemble it a full day before you need it.
Q: What can I use instead of peanut butter chips? A: Chocolate chips are a wonderful swap. They taste great with peanut butter.
Q: Can I make a smaller batch? A: Absolutely. Just cut the recipe in half and use a smaller dish.
*Fun fact: The first no-bake recipes became popular when refrigerators became common in homes.* Q: Is the melted peanut butter topping optional? A: It is, but it adds a lovely, rich finish. Which tip will you try first?
Share Your Kitchen Creations
I hope you love making this Peanut Delight. It always brings a smile to my family’s faces. I would love to see your beautiful desserts.
Please share a picture of your creation. It makes this old grandma’s heart so happy. Have you tried this recipe? Tag us on Pinterest!
Happy cooking!
—Tessa Hammond.
No-Bake Peanut Delight: Creamy peanut butter dream: Creamy peanut butter dream
Description
Creamy, no-bake Peanut Delight! This easy peanut butter dream requires zero baking and is the perfect quick, satisfying dessert for any occasion.
Ingredients
=== Crust ===
=== Cream Cheese Layer ===
=== Peanut Butter Layer ===
=== Topping ===
Instructions
- Grease a 9×13 glass baking dish and set aside.
- Spread a single layer of peanut butter cookies to fill the baking dish. You should need about 22 cookies and then you can reserve the remainder to use with the topping.
- Cream together cream cheese, powdered sugar, and 1 cup whipped topping.
- Spread evenly over the peanut butter cookie base. Place in the freezer to chill for 15 minutes.
- Whisk together vanilla pudding mix and milk until it begins to thicken.
- Use the whisk or a hand beater to mix peanut butter and an additional cup of whipped topping into the pudding mixture.
- Spread peanut butter mixture over the chilled cream cheese layer. Place baking dish into the freezer for an additional 15 minutes to chill.
- Gently top with remaining whipped topping. Sprinkle with peanut butter chips, crushed peanut butter cookies, and melted peanut butter.
- Chill in the refrigerator for 30 minutes or freezer for 15 minutes before serving.


Leave a Reply